Affiliate Disclosure: If you buy something through some of the links on this post, you won’t pay any extra, but we’ll get a small commission. This helps us keep things running. Thanks for your support!
Discover the Best Beyblade X Combos of Each Era
The one constant in the Beyblade X metagame is change. New releases, new parts, and new ideas from players around the world continuously reshape what is considered “the best”. What was dominant a few months ago may no longer be today—and what seems overlooked now may become the next defining strategy.
This article serves as a hub for all of our “Best Beyblade X Combos” lists, broken down into different eras based on different product release windows. It is a natural extension to our buyer’s guide for players who’d like to dive deeper into what Beyblade customizations are actually strong.
Each list reflects a specific point in time within the generation, capturing what was strongest based on the available parts, tournament results, and player experience during that release window.
Perhaps the most common question in Beyblade is still: “What’s the best combo?” It’s a fair question, but not a simple one. Experience, mindset, shooting technique, part condition, and build quality all play critical roles in determining the outcome of a battle and how to win Beyblade tournaments.
That said, the combo you choose is the tool which defines your strategic options. It shapes how your Beyblade moves, how it wins, and what risks you are taking each time you launch. Starting from a strong, reliable combination can give you a meaningful advantage before the battle even begins.
At the same time, no list can replace your own experience. The combinations featured here are not guarantees. They are proven, high-performing starting points. Their true strength depends on how well they align with your playstyle, how well they are built, and how effectively you can use them in real matches. As always, we encourage you to test, adapt, and refine based on what you see both locally and globally.
With that in mind, use this guide as a foundation. Learn what makes these strong Beyblade X combos, understand their weaknesses, and then build from there.
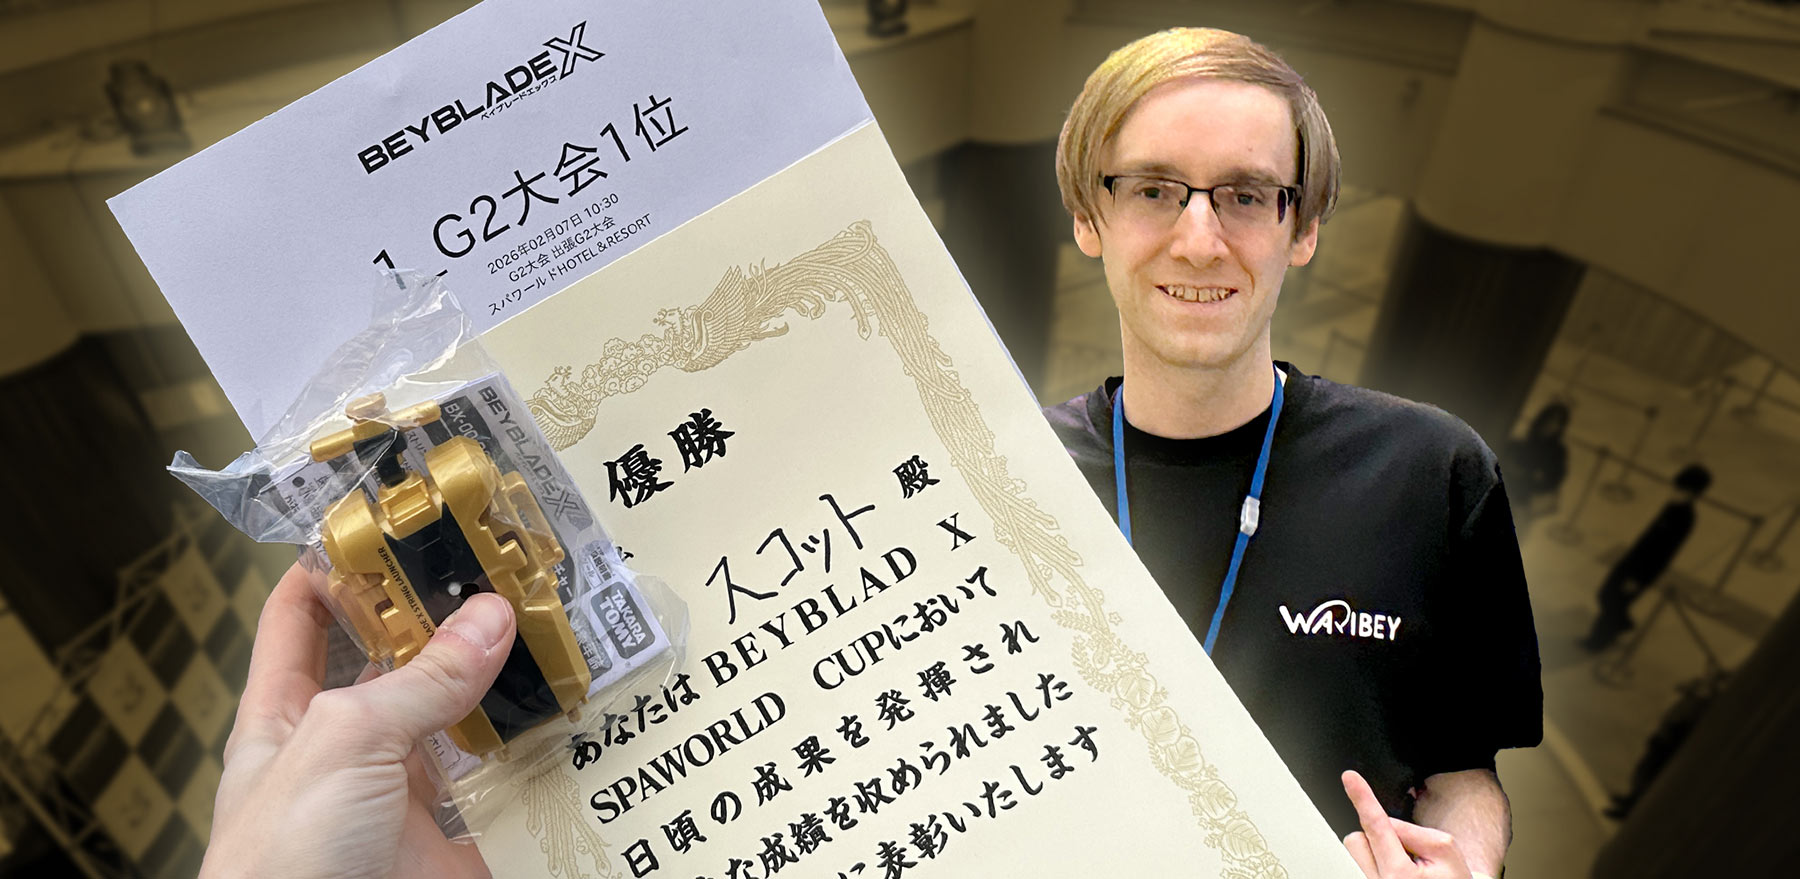
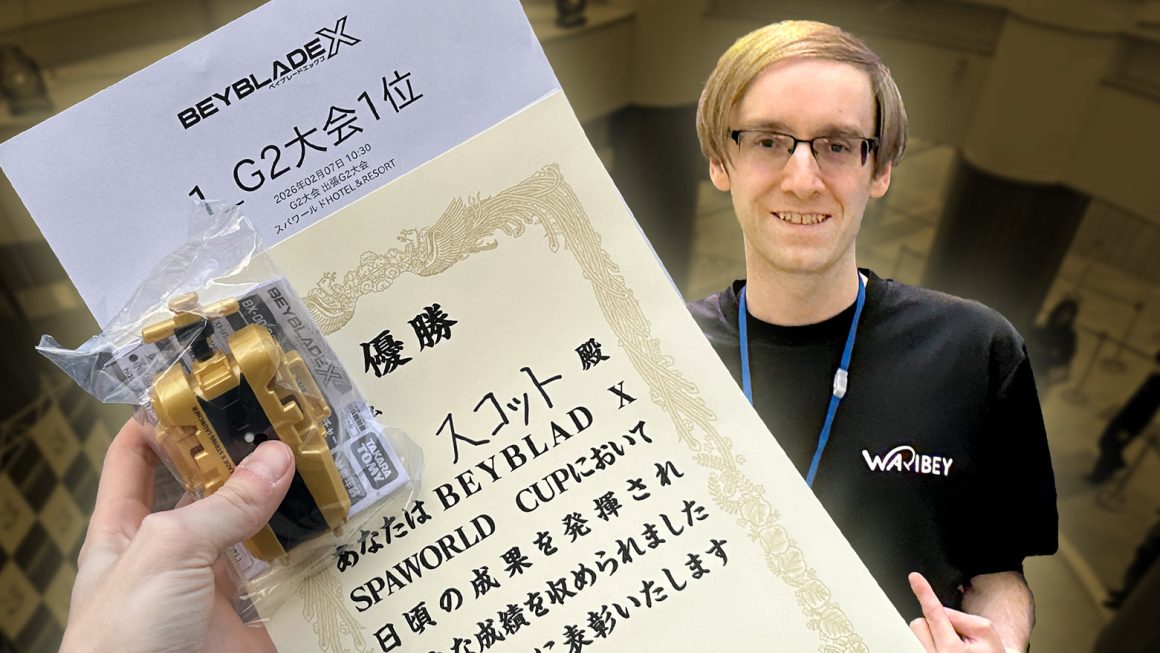
Champions aren’t born overnight. In my latest article, I break down how my pursuit of knowledge, adaptability, and reproducibility compounded into victory at a 256-player G2 tournament.
Sponsored: Order the newest Beyblades at malloftoys.com!
Heads up: If you buy something through Mall of Toys, you won’t pay any extra, but I’ll get a small commission. This helps me keep things running. Thanks for your support!
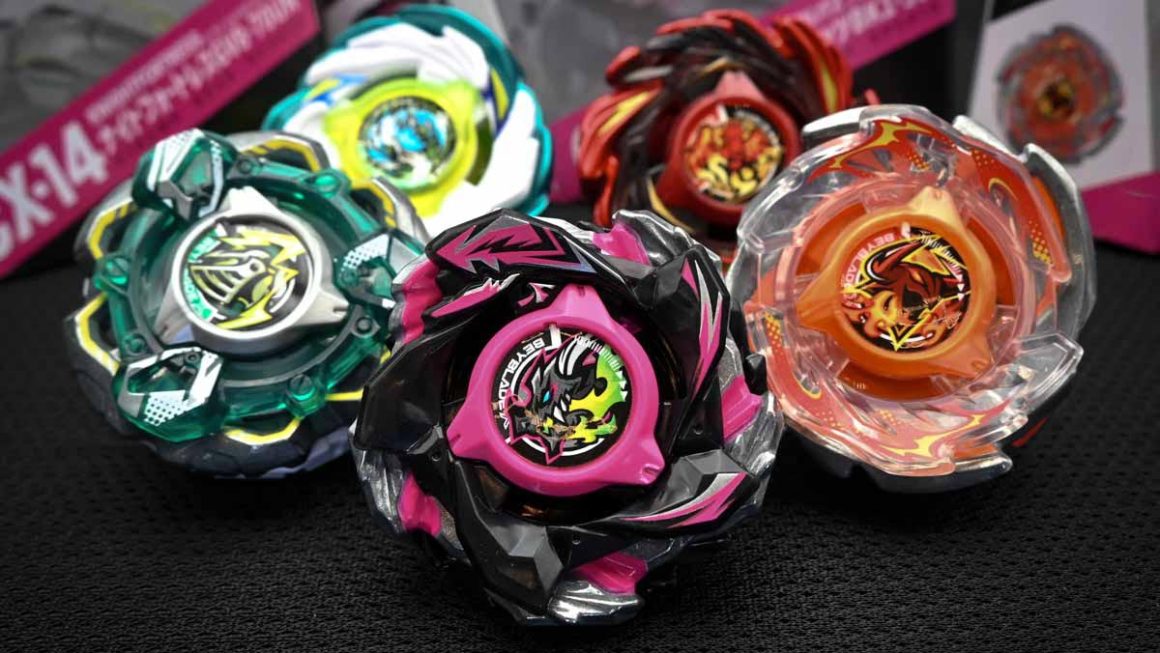
The Best Beyblade X Xtreme Stadium Combos
All Lines (BX/UX/CX)
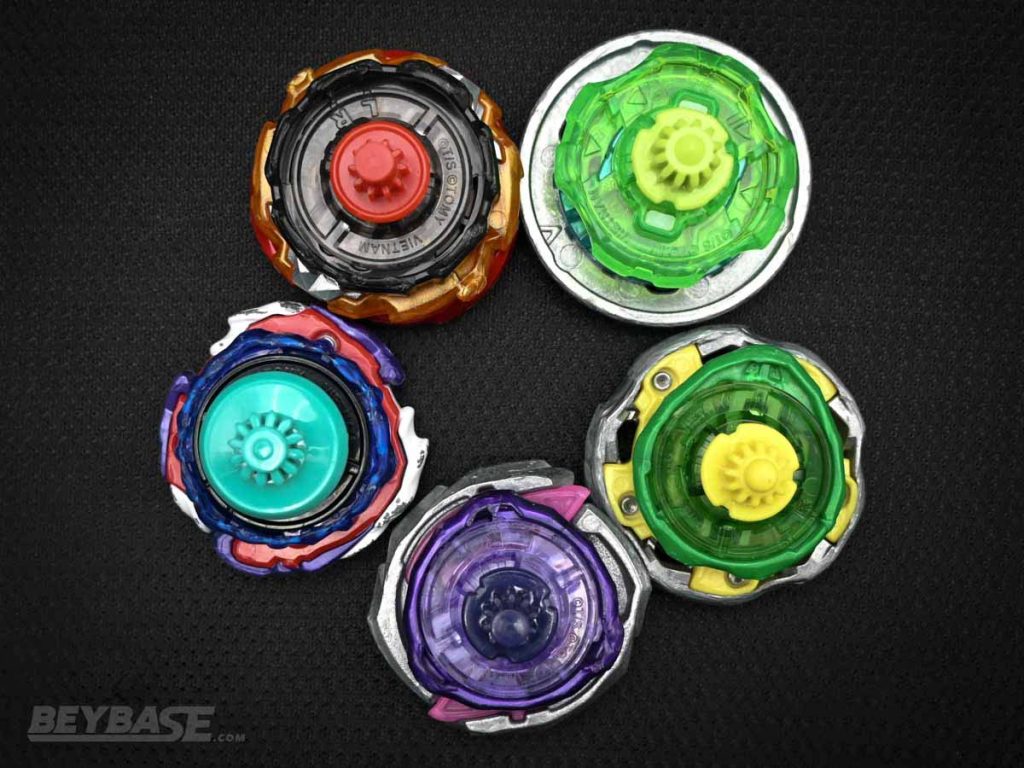
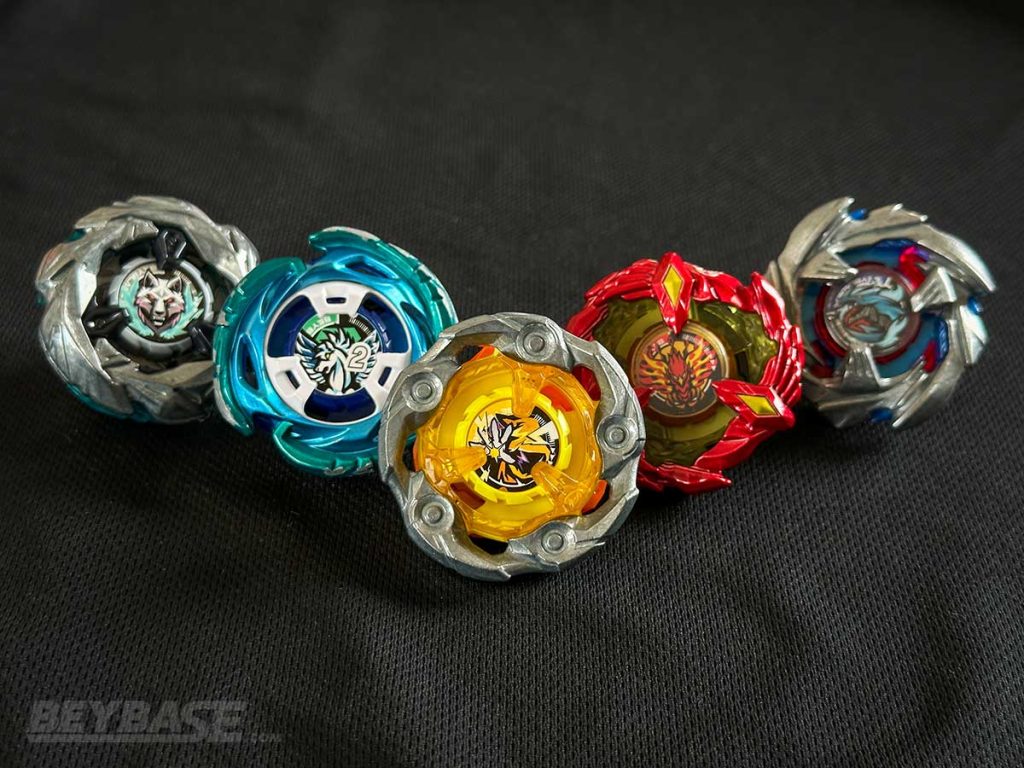
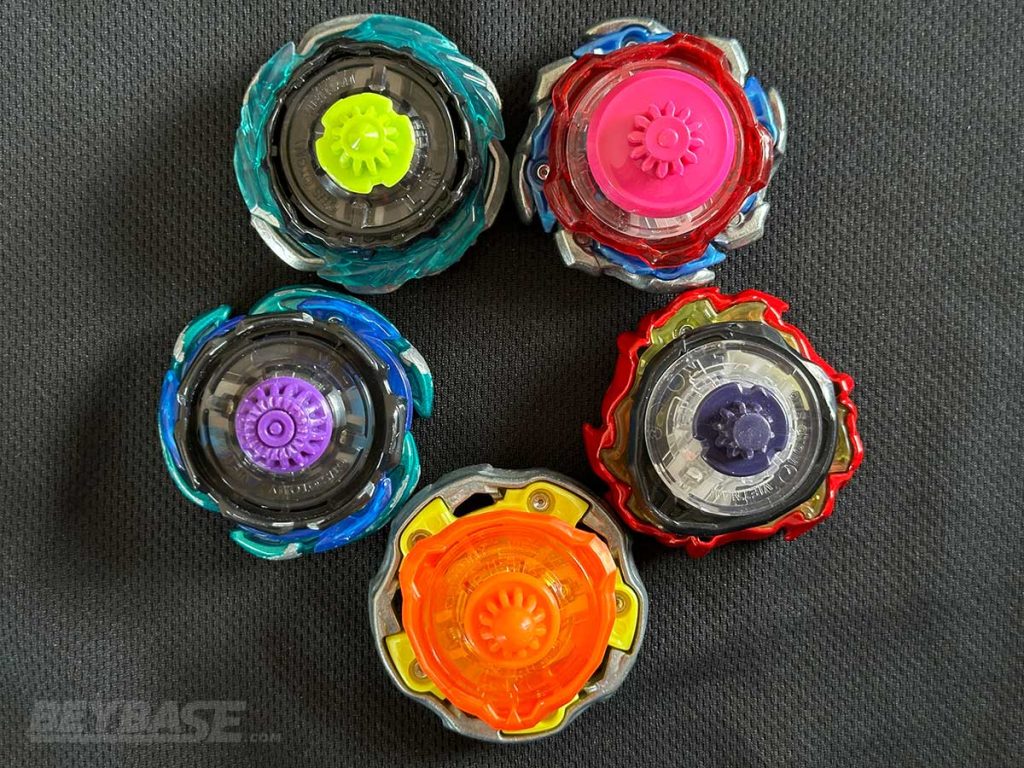
These are the best Beyblade X combos in the Xtreme Stadium for tournament formats permitting all parts across Basic Line (BX), Unique Line (UX), and Custom Line (CX) tops to be used.
Up to BX-48/UX-18/CX-12

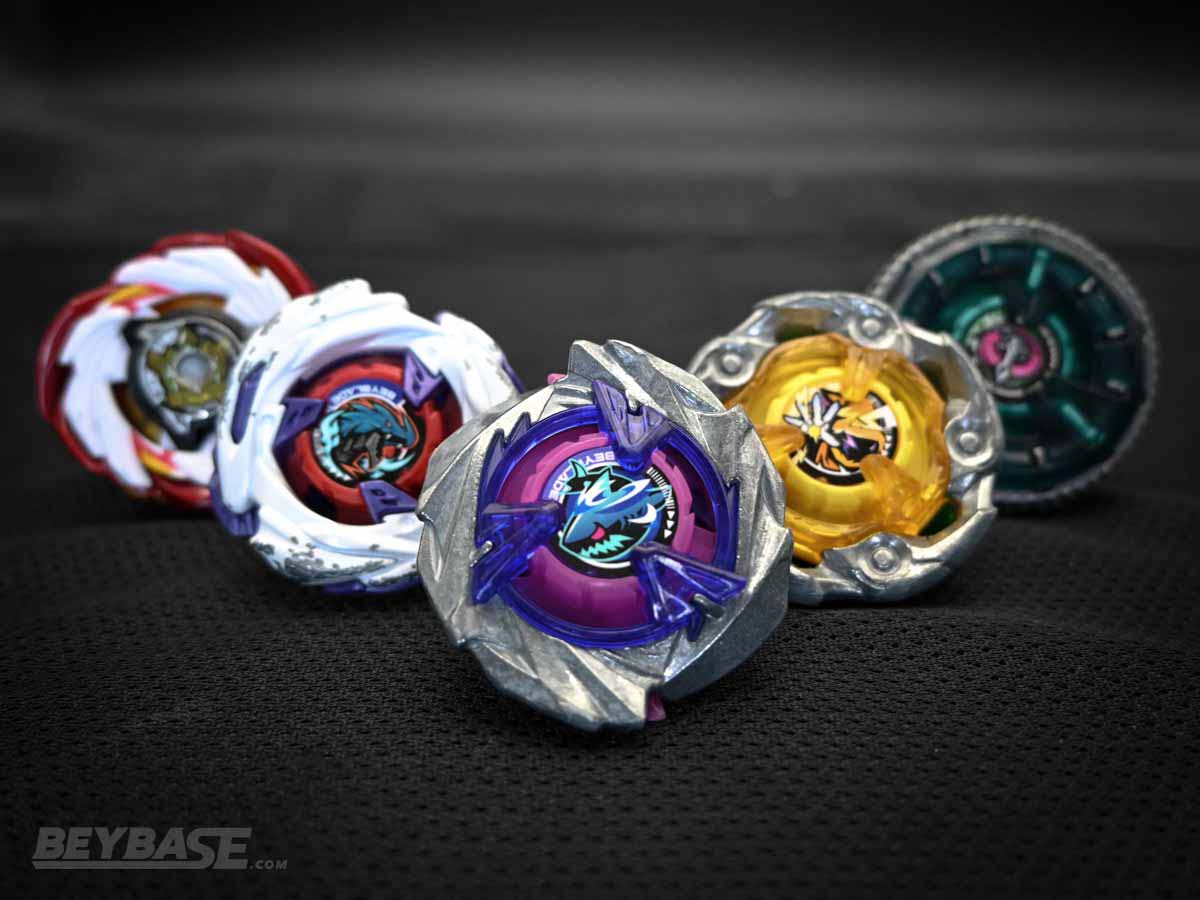
Top 5 Combos Comparison Chart
| Combo | Statistics | Strengths | Weaknesses |
|---|---|---|---|
 Shark Scale 3-60 Low Rush | Attack: 5 ★ Stamina: 3 ★ Defense: 3 ★ | • Unrivalled attack power • Low profile • Balanced overall performance | • Self-KO tendency • Requires shooting power and skill • Part wear and breakage risk |
 Wizard Rod 1-60 Low Orb | Attack: 1.5 ★ Stamina: 4 ★ Defense: 4.5 ★ | • Strong defense • Good stamina • Reliability | • Weak to left-spin and pure stamina • Lack of attack power • Positioning is critical |
 Meteor Dragoon 9-60 Elevate | Attack: 3 ★ Stamina: 3.5 ★ Defense: 4 ★ | • Strong stamina and defense • Decent attack power • Ease of use | • Requires Elevate Bit with thick shaft • Same-spin stamina • Difficult to master |
 Emperor Blast Heavy 7-60 Rush | Attack: 3.5 ★ Stamina: 3 ★ Defense: 3.5 ★ | • Balanced overall performance • Heavy weight • Reliability | • Costly to build • Burst risk and reverse potential • Requires shooting power and skill |
 Clock Mirage 4-55 Under Needle | Attack: 0.5 ★ Stamina: 5 ★ Defense: 2 ★ | • Unrivalled stamina • The ultimate counterpick | • Very poor defense • Ideal usage scenarios are limited • Costly to build |
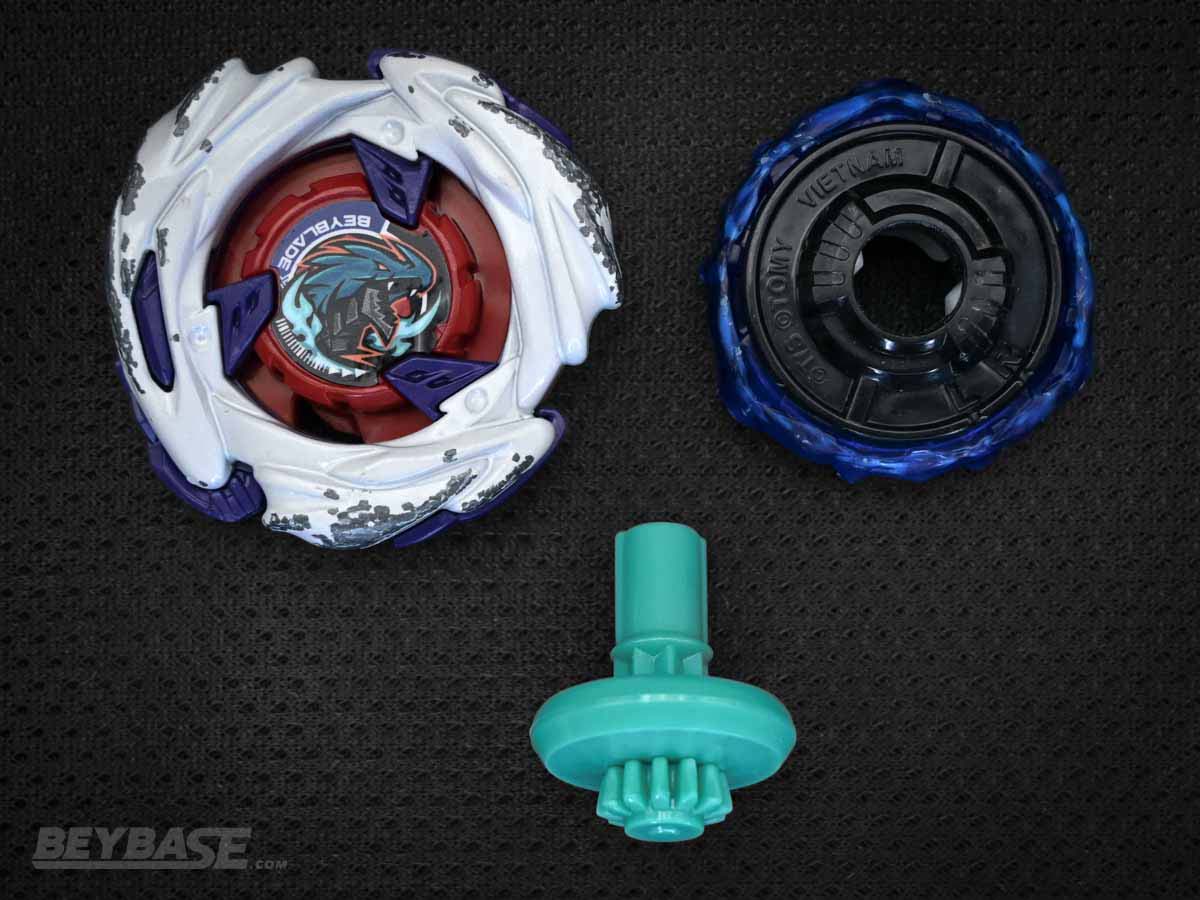
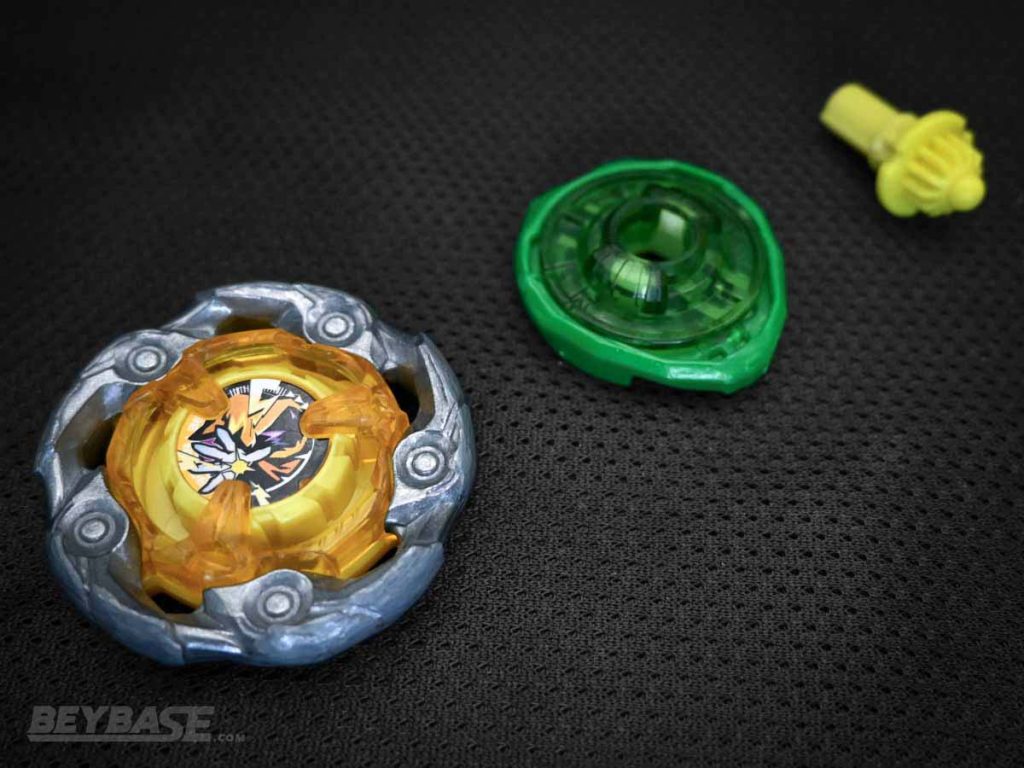
1. Shark Scale 3-60 Low Rush
Unlike more one-dimensional attackers, it can recover posture, continue circling, and re-engage.
Why is Shark Scale 3-60LR good?
Relentless attack powerhouse. Shark Scale 3-60LR stands out because it combines overwhelming offensive pressure with just enough stamina and stability to stay dangerous throughout the entire battle.
Its ability to deliver fast, repeated Xtreme Dashes, both early and late, means opponents are constantly under threat, not just surviving an opening burst of aggression. Unlike more one-dimensional attackers, it can recover posture, continue circling, and re-engage, making it feel less like a gamble and more like sustained pressure when used well.
That said, this power comes with real responsibility. Low Rush amplifies both its strengths and its risks, especially the tendency to self-KO if movement isn’t controlled. On top of that, the combo’s full potential depends heavily on launch technique and awareness. Poor shooting or bad timing can quickly flip a winning position into a loss. It’s one of the most rewarding combos on the list, but also one of the most demanding in terms of execution.
Strengths
- Unrivalled attack power. The Shark Scale Blade has the weight, aggressive contact points, and shape to pulverize almost any opponent during this era. The Low Rush Bit enables it to deliver fast, precise, and powerful Xtreme Dashes and strikes on opponents which are near impossible to defend against for most opponents. And what’s more, thanks to the decent stamina of the Low Rush Bit, this combo is capable of not only performing powerful early Xtreme Dashes, but late game ones too. This makes it a threat from start to finish.
- Low profile. The Shark Scale Blade itself has a fairly low profile with naturally rising slopes designed to lift opponents. In combination with the standard low-height 3-60 Ratchet and Low Rush Bit, Shark Scale 3-60LR can simultaneously aim for Burst Finishes, Over Finishes, and Xtreme Finishes while also defending against attacks from above.
- Balanced overall performance. The outward weight distribution afforded to the Shark Scale by being part of the Unique Line (UX) and its overall shape places it in the upper echelon of stamina for attack type Blades of this era. The lower side of the Blade is surprisingly smooth and round, which gives it the ability to spin cleanly even when falling over or launched on an aggressive angle towards the floor of the stadium. The face of the Blade is also fairly bumpy and aggressive, meaning that opponents colliding with it can be deflected while it simultaneously holds its ground. And even when it is knocked out, the Shark Scale Blade’s shape alone can–at times–help it to reverse from an Over Zone or the Xtreme Zone. The 3-60 Ratchet helps to offset some of the inherent imbalance of the Shark Scale Blade and enables it to retain its posture for longer, while the Low Rush Bit itself enhances both its attack power without totally compromising its stamina. Shark Scale 3-60LR is not a one-hit wonder. All of these qualities combine to create a multidimensional combination capable of responding to the will, skill, and effort of the player using it.
Weaknesses
- Self-KO tendency. The biggest problem with the Low Rush Bit is its tendency to skip the Xtreme Line and ridges of the stadium floor and self-KO itself. Even when properly balanced tuned, the high movement speed of Low Rush can create situations where it flings itself out of the stadium. As such, players using this combination must spend time thinking carefully about when and how it is appropriate to play aggressively and when to take a safer approach. An easy way to remedy this without changing the identity of the combination is to replace Low Rush with the Rush Bit. There are some tradeoffs when it comes to height, attack power, and stamina between the two, however.
- Requires shooting power and skill. In order to extend the attack window and stamina of Shark Scale 3-60LR, it is important to have strong shooting power and an understanding of where and how to shoot it depending on the situation. Shark Scale 3-60LR is an incredibly versatile customization, but the ability to take advantage of that is dependent on the player to a large degree.
- Part wear and breakage risk. The design of the Shark Scale Blade includes two “fins” protruding from its underside. These are prone to whitening, rounding, and in the worse-case scenario, breaking off entirely. In official competition, even if it is only these parts that are broken, you will be unlikely to be permitted to use it. Additionally, through extended usage the Shark Scale Blade tends to wear down and become much rounder. This noticeably decreases its attack power, making the purchase of new copies of the Blade in order to maintain peak performance critical. Part wear and breakage issues plague several parts in Beyblade X, but Shark Scale having the aforementioned design flaw in combination with being a vicious attack type prone to degraded performance over time makes it worth mentioning here.
Combo Variations
| Combo | Performance Up (+) | Performance Down (-) |
|---|---|---|
| Shark Scale 3-60 Rush | + Defense | – Attack |
| Shark Scale 7-60 Rush | + Stamina + Defense | – Attack |
| Shark Scale 9-60 Low Rush | + Defense | – Stamina |
| Shark Scale 1-60 Kick | + Stamina | – Attack |
Players’ Voice
The Shark Scale Blade is the most powerful Blade in the game during this era and it’s not even close. It’s the Wizard Rod of attack types. The variant you choose to wield may change depending on the circumstances and player preference, but the result is the same in every case. The heart of these combos is the Shark Scale Blade; it has a rare combination of attack, stamina, and defense that places the user’s launching skill, tuning ability, playing experience, matchup knowledge, and will at the forefront of each match. Broadly speaking, you get out of it what you put into it. It is an unparalleled, high performance tool that the best players around the world have used time and time again to transcend traditional typing disadvantages, express their mastery, and win tournaments during this era of Beyblade X.
Blader Kei
How to build Shark Scale 3-60LR

-
Shark Scale Blade (1 of the following)
-
3-60 Ratchet (1 of the following)
- UX-15 Shark Scale Deck Set
- BX-01 Dran Sword 3-60F
- BX-33 Weiss Tiger 3-60U
- BX-00 Xeno Xcalibur 3-60GF
- F9580 Sword Dran 3-60F
- G0194 Keel Shark 3-60LF
- G0286 Savage Bear 3-60S
- G1671 Lance Knight 3-60LF
- G1754 Yell Kong 3-60GB
-
Low Rush Bit (1 of the following)
- UX-11 Impact Drake 9-60LR
- UX-18 Random Booster Vol. 8 – 06: Weiss Tiger 4-80LR
- G0842 Drop Attack Battle Set
- G2755 Circle Ghost and Hack Viking Dual Pack – Circle Ghost 4-60LR
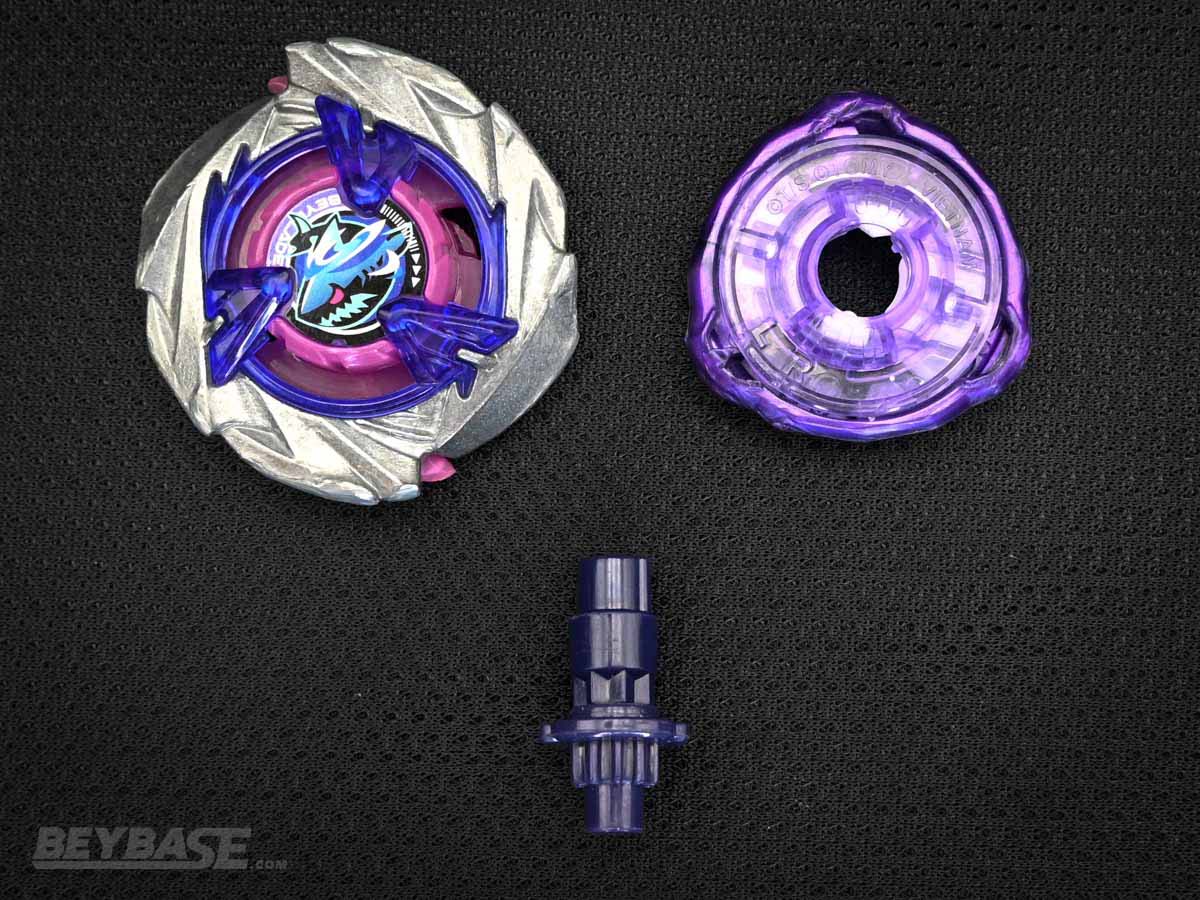
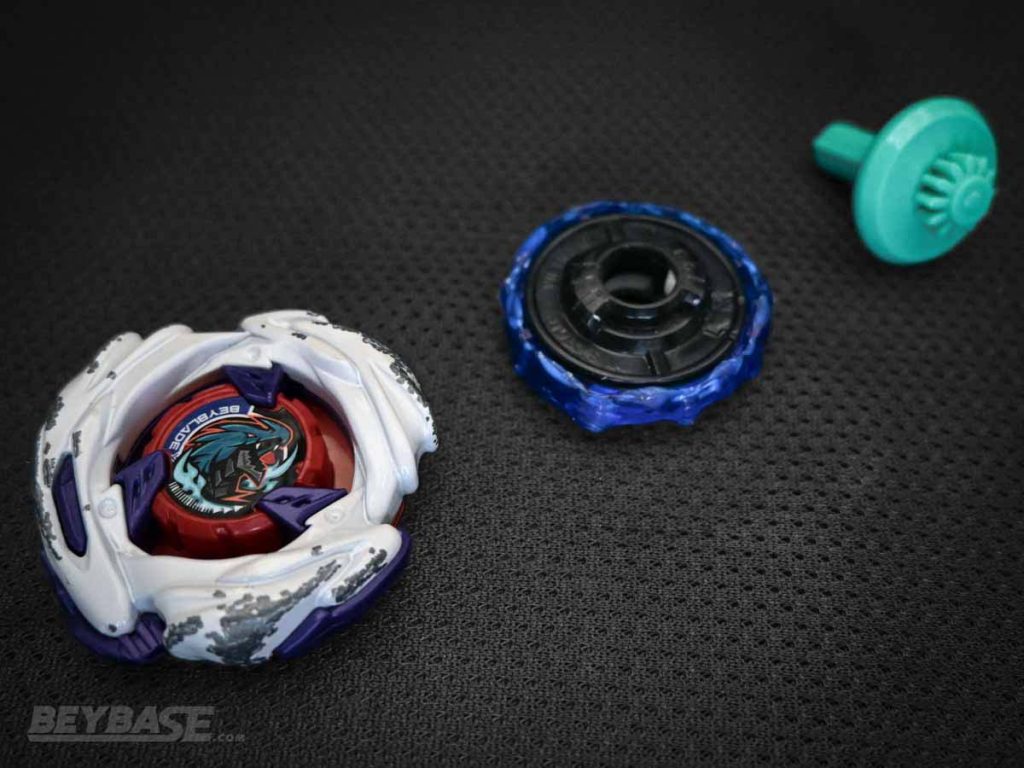
2. Wizard Rod 1-60 Low Orb
With elite stamina and KO resistance it can absorb hits, stabilize, and outlast most opponents …
Why is Wizard Rod 1-60LO good?
Best stamina and defense hybrid combo. Wizard Rod 1-60LO excels because it turns consistency into a win condition. With elite stamina and KO resistance it can absorb hits, stabilize, and outlast most opponents with a Spin Finish.
What makes it especially strong is how reliably it performs when built and launched skillfully. Its parts minimize unnecessary movement, protect against attacks from below, giving players a stable foundation to control matches and reduce randomness, which is invaluable in formats like 3on3.
However, it doesn’t do much for you offensively, and it absolutely won’t bail you out of bad positioning. Without attack power, Wizard Rod 1-60LO relies heavily on proper launch angles and placement to avoid being bursted or knocked out. In other words, it rewards disciplined play and awareness, but can feel unforgiving if you misread your opponent or fail to take advantageous positioning early in the battle.
Strengths
- Strong defense. What has always made the Wizard Rod Blade so incredible is not only its stamina, but its posture retention. Wizard Rod 1-60LO is a Beyblade that in the right hands can feel near impossible to knock out. When this combination is launched on an angle, into the right location, and the right timing, it becomes capable of receiving and deflecting incoming attacks with ease. Ultimately, it then rights itself and takes the battle by Spin Finish. This combination is a textbook example of how Beyblade X and the design of the Xtreme Stadium rewards skilled players. It doesn’t just give you defensive power; it relies on you to unlock it.
- Good stamina. The Wizard Rod Blade has stood the test of time, remaining in high rotation among competitive players for over two years. While it may have seceded its title as the best stamina type Blade to the Clock Mirage Blade, it is still by far the most common and versatile of the two. This particular combination is supported by the Low Orb Bit which provides it with strong stability and stamina; enough to win by Spin Finish against the vast majority of right-spinning opponents it will face.
- Reliability. The short height of the Low Orb Bit and the increased potential to reverse from the Over Zone due to the asymmetrical 1-60 Ratchet makes this Beyblade difficult to knock out. The Wizard Rod Blade has stood the test of time as a force to be reckoned with in the competitive scene. The reason is because of the inherent reliability built into its design; it has not only top tier stamina, but incredible posture retention and a relatively flat upper side or ‘face’ which enables it to effectively absorb incoming attacks when launched on an angle. All three pieces combine to offer a sense of reliability that is difficult to come by in Beyblade X. Particularly when it comes to the 3on3 match format, a combination like this is close to feeling essential to balancing out the volatility produced by more aggressive combinations in your deck.
Weaknesses
- Weak to left-spin and pure stamina. Although Wizard Rod 1-60LO has top tier defensive potential, it has clear weaknesses against left-spin stamina types such as Meteor Dragoon 9-60E from this list and pure right-spin stamina types such as Wizard Rod 3-60B. The 1-60 Ratchet and Low Orb Bit improves its defensive ability, but the trade off is that it will scrape the stadium floor sooner than these types of opponents, leading it to lose by Spin Finish. Whether this is a dealbreaker or not for you will depend on how and when you intend to use it and what is common in your local competitive scene.
- Lack of attack power. It goes without saying, but none of the parts in this combination have much of anything to speak of when it comes to attack power. The Wizard Rod Blade when fresh has some recoil inherent to its design that it can take advantage of to score lucky knockouts, but this isn’t to be relied upon. And in fact, it is probably better to use a copy that is slightly worn down (but still within the acceptable range under B4 regulations) in order to increase defense and reduce random recoil.
- Positioning is critical. Wizard Rod 1-60LO outputs good stamina performance as long as you have high shooting power. But defense is another story. If this combination is struck powerfully while in a typical horizontal posture, it is not impossible for it to be knocked out and fail to return. Or to be bursted. Players using this combination must remain aware of their opponent’s launch tendency and timing when considering how to shoot Wizard Rod 1-60LO. In essence, this combination is most successful defensively when two things happen. First is when it, to a degree, accepts incoming attacks on the top part or or “face” of the Blade. Doing so reduces their strength while also interrupting the movement pattern of the attacking Beyblade. The angle is critical however due to the fact that unlike the 9-60 Ratchet, it may start to scrape the stadium floor and drain your stamina if banked too heavily. Second is shooting with an intention to move towards and around the back side of the stadium during the opening phase of the battle; the further you are away from the Over and Xtreme Zones, the less likely you are to be knocked out. The ideal scenario tends to be spinning near the back side of the stadium in the early going on an angle, circling around the outside afterwards, and eventually regaining your upright posture and settling down into the centre of the stadium to take the Spin Finish.
Combo Variations
| Combo | Performance Up (+) | Performance Down (-) |
|---|---|---|
| Wizard Rod 9-60 Free Ball | ||
| Wizard Rod 1-60 Hexa | + Defense | – Stamina |
Players’ Voice
With the advent of even stronger attack types and improvement in general player skill over the past few years, players have been guided towards building more defensive combinations using the Wizard Rod Blade. The 1-60LO variant here offers a great compromise between the traditional pure stamina builds like 3-60B and the more defensive, popular 1-60H variant. Each one, among others, still has use depending on the situation, player preference, and your local scene. 1-60LO has served me well personally, most notably clinching the 256-player Dispatch G2 tournament winning point at the SpaWorld Cup.
Blader Kei
How to build Wizard Rod 1-60LO

-
Wizard Rod Blade (1 of the following)
- BX-35 Random Booster Vol. 4 – 04: Wizard Rod 1-60R
- UX-03 Wizard Rod 5-70DB
- UX-04 Battle Entry Set U – Wizard Rod 5-70DB (Special Ver.)
- G1537 Wand Wizard 5-70DB
- G1538 Wand Wizard 1-60R
-
1-60 Ratchet (1 of the following)
- BX-31 Random Booster Vol. 3 – 05: Shark Edge 1-60Q
- BX-35 Random Booster Vol. 4 – 04: Wizard Rod 1-60R
- UX-01 Dran Buster 1-60A
- UX-10 Customize Set U
- UX-13 Golem Rock 1-60UN
- G1534 Keel Shark 1-60Q
- G1536 Buster Dran 1-60A
- G1538 Wand Wizard 1-60R
- G1646 Rock Golem 1-60UN
-
Low Orb Bit (1 of the following)
- CX-02 Wizard Arc R4-55LO
- CX-17 Random Booster Vol. 10 – 03: Samurai Saber 9-65LO
- CX-00 Wizard Arc R4-55LO
- G1679 Arc Wizard R 4-55LO
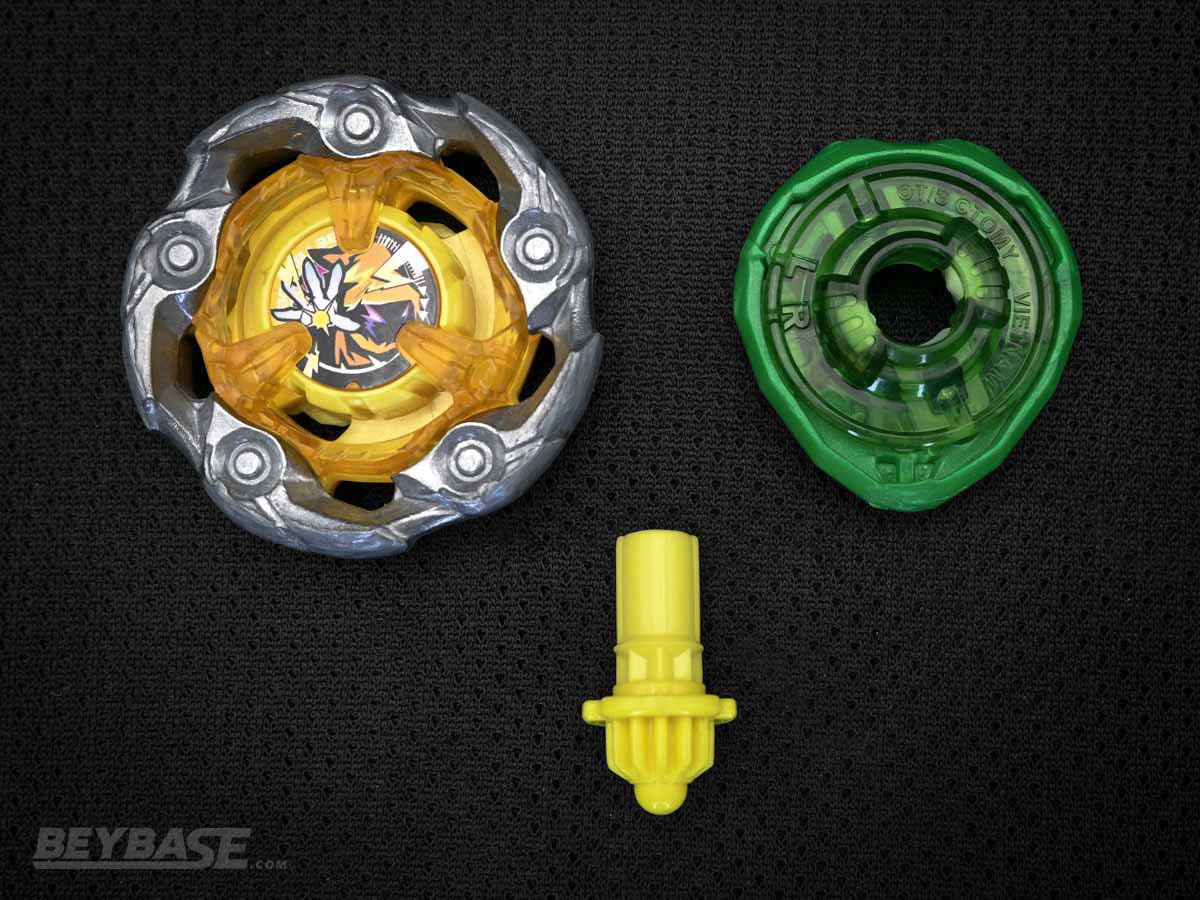
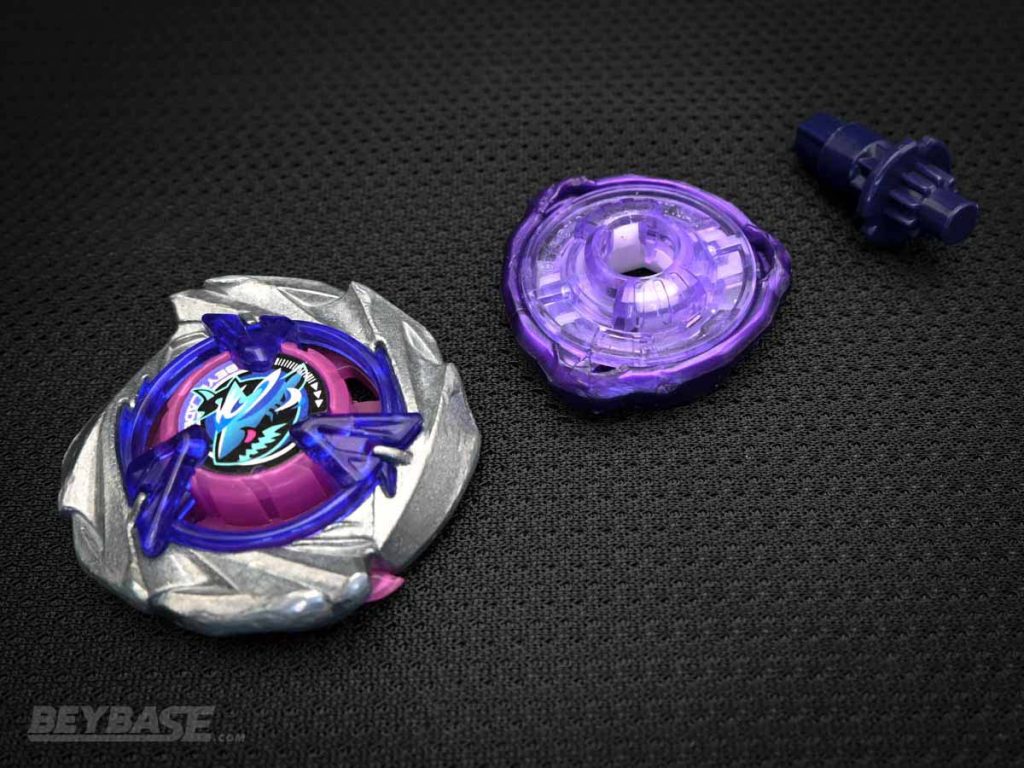
3. Meteor Dragoon 9-60 Elevate
Its ability to absorb spin from right-spinning opponents allows it to turn disadvantageous situations into wins.
Why is Meteor Dragoon 9-60E good?
Best spin equalizer. Meteor Dragoon 5-60E is powerful because it leverages left-spin mechanics and the Elevate Bit to consistently win long games. Its ability to absorb spin from right-spinning opponents allows it to turn disadvantageous situations into wins, while its wide movement pattern gives it surprising survivability against attacks. It also has just enough offensive presence to capitalize on positioning mistakes, making it more versatile than a pure stamina type.
Its biggest strength–controlled, steady movement–can also become a weakness. If it gets caught in the wrong position, it lacks the speed to escape, leaving it vulnerable to knockouts from hyper-aggressive opponents. It also requires specific parts (notably a stronger Elevate mold variant) to reach its full potential, and mastering left-spin movement takes intentional practice. While beginner-friendly at a surface level, deeper optimization is key to making it truly competitive.
Strengths
- Strong stamina and defense. Meteor Dragoon 9-60E is unique, being the only left-spin combination on this list. It makes use of top tier spin equalization enabled by its rotational direction and the extremely wide base of the Elevate Bit to outlast and absorb hits from most right-spinning opponents. The 9-60 Ratchet also promotes burst resistance, reducing the chances for attacking opponents to knock it out or burst it. The aggressive, imbalanced design of Meteor Dragoon can also work to its advantage by allowing it to reverse from the Over Zone at times when knocked out.
- Decent attack power. The Meteor Dragoon Blade itself is an attack type. And the Elevate Bit produces a smooth, wide movement pattern around the Xtreme Stadium. This enables Meteor Dragoon 9-60E to catch unsuspecting opponents–especially those positioned close to an Over Zone or the Xtreme Zone–off-guard and knock them out.
- Ease of use. Shooting power is often an asset in Beyblade, and while that isn’t necessarily untrue for Meteor Dragoon 9-60E, it is less important in comparison to the other Beyblades on this list. Being left-spin, you can get away with less than max power in many situations. And in fact, shooting with less than maximum power can be beneficial in many matchups in order to reduce self-KOing. This makes it one of the more beginner-friendly combinations on this list.
Weaknesses
- Requires Elevate Bit with thick shaft. The blue Elevate Bit included with Shark Edge 4-70E, one of the six possible pulls in BX-48 Random Booster Vol. 9 is effectively required in order to maximize the potential of Meteor Dragoon 9-60E. The reason is because this particular Elevate (and perhaps any future re-releases of it) has a thicker shaft than all previously released versions. As such, it has become much more difficult to burst. The suppression of burst risk through usage of an Elevate Bit with a thick shaft significantly increases the overall viability of this combination in all situations. It solves its most glaring weakness, turning it into a formidable threat against just about any opponent. But without an Elevate Bit with a thick shaft that fits tightly with your selected Ratchet, attack types can easily inflict Burst Finishes on Meteor Dragoon 9-60E.
- Same-spin stamina. The Meteor Dragoon Blade has one of the most prominently imbalanced designs in Beyblade X to date, which makes it difficult to maximize its stamina. Against right-spinning opponents, this is compensated for by equalizing spin with them as a left-spinning top and improving posture retention with the wide Elevate Bit. However, the story changes against left-spinning opponents. During this era, the most prominent left-spin Blade alongside Meteor Dragoon is the Cobalt Dragoon Blade. Cobalt Dragoon is also imbalanced, but is easier to balance tune and generally has better stamina than Meteor Dragoon. Meteor Dragoon’s superior attack ability can work in its favour against Cobalt Dragoon, but it might be difficult to secure Spin Finishes against it if all else is equal.
- Difficult to master. Although easy to use on a basic level, Meteor Dragoon 5-60E benefits from, and in some ways demands, getting used to its counter-clockwise movement patterns. Most Beyblades are right-spin, meaning that by default most players are instinctually in tune with how their Beyblade will move clockwise. This becomes reversed when using left-spin, which requires intentional practice to understand and internalize. For a combination whose biggest weakness is losing to same-spin opponents, deeply understanding how to make it move into advantageous positions in order to increases the chances of scoring a knockout or preserving stamina is paramount.
Combo Variations
| Combo | Performance Up (+) | Performance Down (-) |
|---|---|---|
| Meteor Dragoon 7-60 Level | + Attack | – Stamina |
| Cobalt Dragoon 5-60 Elevate | + Stamina | – Attack – Defense |
Players’ Voice
At first, the Meteor Dragoon Blade felt to me like a Infinity Stadium specialist due to how proficient it is at reversing from the Over Zones in that stadium. I almost wrote it off for the Xtreme Stadium. However, my semi-finals opponent at the Dispatch G2 SpaWorld Cup tournament opened my eyes to its potential. He used Meteor Dragoon 9-60E for all six rounds of the preliminary tournament, and this was even before the new Elevate Bit with the thicker shaft had been released. Then, a few months later at the Beyblade X X-TREME CUP G1 2026 in Tokyo, the third place player made it all the way to the finals using Meteor Dragoon 9-60E. The first place player also included it in their deck. If you can build a version of this combo that doesn’t burst easily and you understand how to shoot it, it can be a very powerful weapon against a wide range of opponents.
Blader Kei
How to build Meteor Dragoon 9-60E

-
Meteor Dragoon Blade (1 of the following)
-
9-60 Ratchet (1 of the following)
- BX-23 Phoenix Wing 9-60GF
- BX-46 Battle Entry Set Infinity – Cobalt Drake 9-60R
- BX-00 Cobalt Dragoon 9-60F (J.League Ver.)
- UX-05 Random Booster Shinobi Shadow Select – 02: Shinobi Shadow 9-60LF
- UX-11 Impact Drake 9-60LR
-
Elevate Bit (1 of the following)
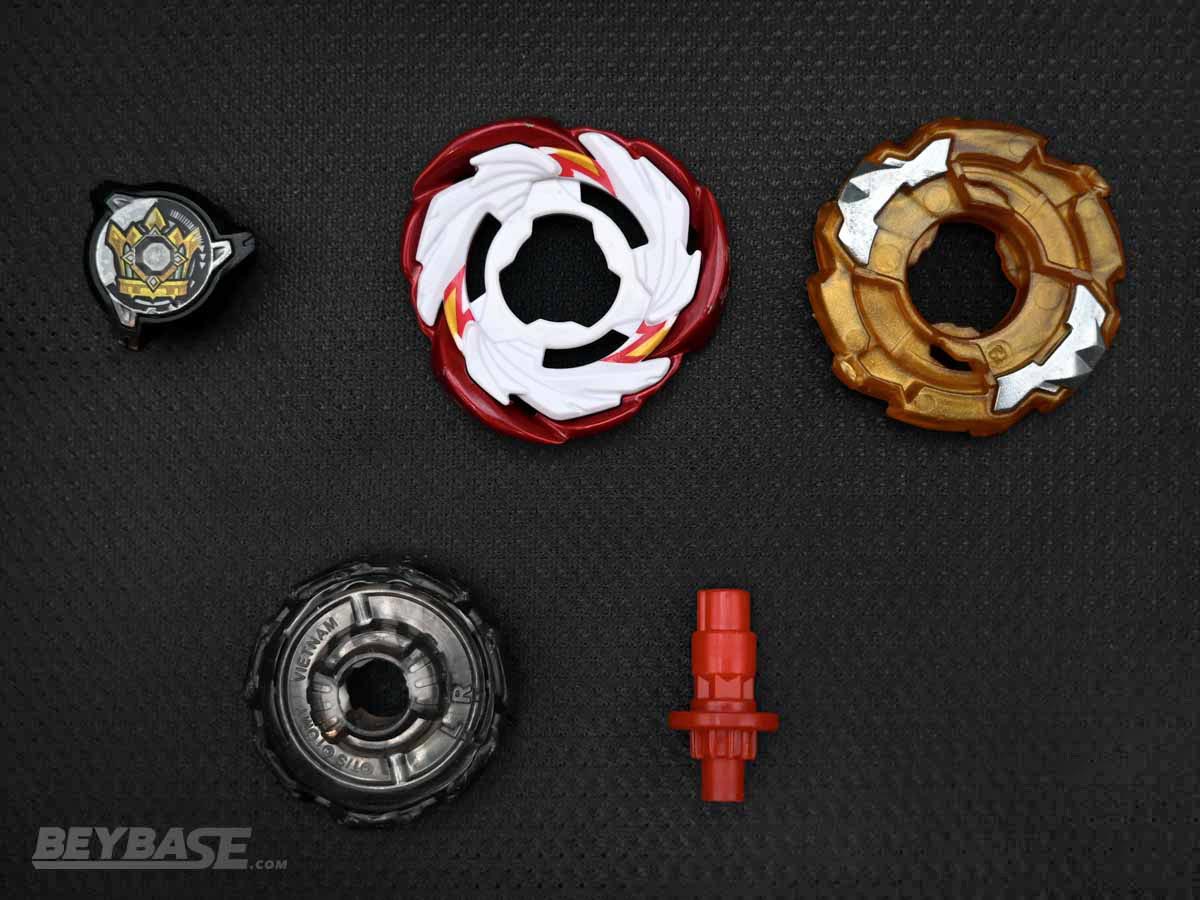
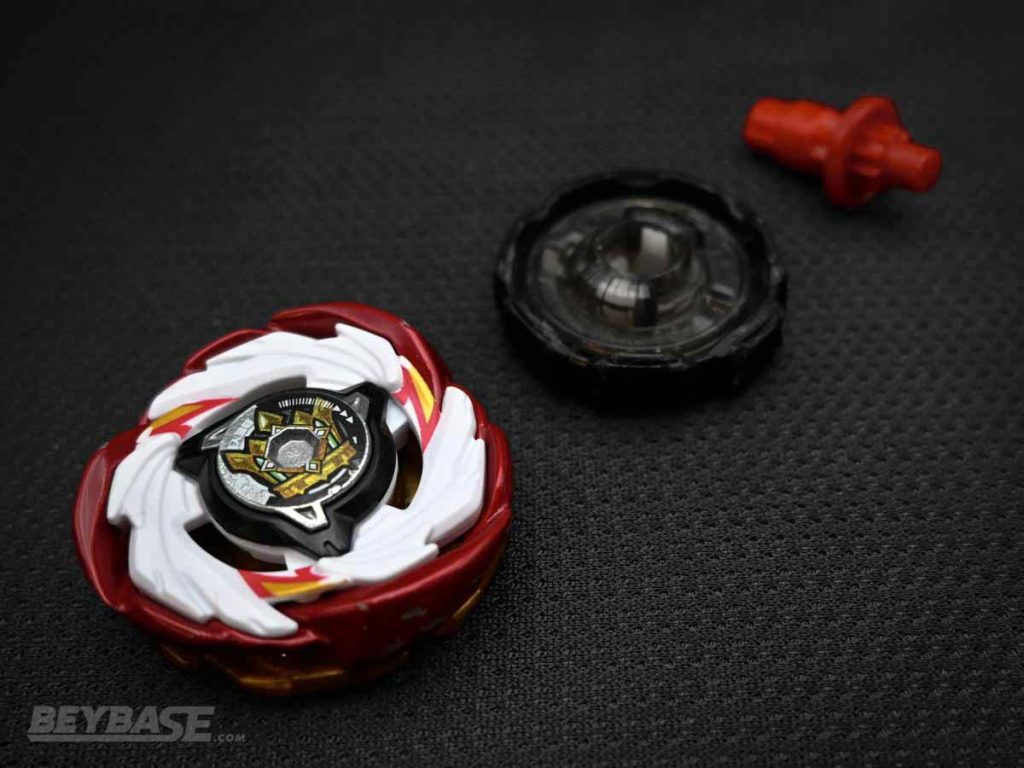
4. Emperor Blast Heavy 7-60 Rush
Emperor Blast Heavy 7-60R earns its place through a rare combination of power, weight, and control.
Why is Emperor Blast Heavy 7-60R good?
Reliable, high-spec attacker. Emperor Blast Heavy 7-60R earns its place through a rare combination of power, weight, and control. Its heavy build enhances both its offensive impact and defensive resilience, while the Rush Bit provides consistent, controlled aggression without the volatility of more extreme setups. This balance makes it a dependable choice. You can launch it confidently at full power and expect solid performance across a wide range of matchups.
The tradeoff is that it doesn’t dominate any single category as hard as more specialized combos. Its attack window is shorter and power is lower than other top-tier options, and its structure introduces some burst risk and building complexity. On top of that, optimizing a CX combo takes time, resources, and careful part balancing. It’s a strong all-rounder, but getting the most out of it requires both investment and refinement.
Strengths
- Balanced overall performance. Emperor Blast Heavy 7-60R is a balance-focused attack type. The Emperor Lock Chip, Emperor Main Blade, and Heavy Assist Blade combine to create a Blade with a remarkable combination of attack, defense, and stamina properties. The 7-60 Ratchet provides stability that helps to slightly combat the top-heavy nature of Custom Line (CX) Blades. And the Rush Bit provides a stable base which enables multiple clean, controlled Xtreme Dashes into strong attacks which can smash virtually any opponent out of the stadium with the right positioning, shoot power, and timing. Rush also has the stamina and movement to help this combination avoid and outlast many other common aggressive opponents.
- Heavy weight. The Emperor Blast Heavy Blade, weighing in at around 45-45.5 grams, is far heavier than most other common Blades seen in the competitive scene during this era. Weighing around 5 grams or more than most opponents benefits this Beyblade’s aforementioned abilities across the board. Thanks to this, it’s more likely to knock opponents out or to successfully defend against incoming attacks.
- Reliability. In addition to the advantages inherent to its significant weight difference versus other popular combinations, the Rush Bit suppresses self-KOing relative to other viable Bit options such as the Low Rush Bit or Kick Bit. This fact makes it easy to shoot at full power, which forces opponents on riskier, more self-KO prone Bits to do the same in an effort to take the Spin Finish on you. Considering this combination from all angles, it has a fairly low rate of being Xtreme Finished by opponents or by itself. This creates a sense of reliability that not only enables players to shoot it without fear, but to also enable the broader success of their deck when playing the 3on3 match format.
Weaknesses
- Costly to build. Emperor Blast Heavy 7-60R requires both time and money to build successfully. The same can be said for any combination, but there is a reason why with this combination it becomes more painfully obvious. The Custom Line (CX) introduces expanded customization possibilities, but simultaneously introduces additional variables into the construction equation. The most obvious being the need to purchase more parts and products in order to build it in the first place. Second, instead of attempting to balance a single piece BX or UX Blade with your Ratchet and Bit when building your Beyblade, you need to balance three parts (Lock Chip, Main Blade, Assist Blade) along with the Ratchet and Bit. CX Blades can be oriented in three ways, meaning there are nine potential orientations for the Blade alone. If just one of the three parts of the Blade doesn’t balance well with the rest, you’ll have to consider buying more copies of the parts you need. Some parts, like the Heavy Assist Blade also have contact points that support the combination’s offensive power that will wear down over time. All of this combines to create a process which is both costly and time-consuming.
- Burst risk and reverse potential. The weight and movement of this combination do help it defensively, but the 7-60 Ratchet introduces a slight burst risk. CX Line tops are slightly taller than BX and UX Line tops, which means 7-60 is exposed more on Emperor Blast Heavy than it is with a BX or UX Blade. Additionally, Emperor Blast Heavy is fairly round, meaning that when it does get knocked out, there is not a good chance of it bounding back into the stadium.
- Requires shooting power and skill. While this combination does have the attack power required to knock opponents out of the stadium, being fairly heavy it does require some power in order to fully utilize. Another reason is that the Emperor Blast Heavy Blade and Rush Bit aren’t as aggressive as, for example, the Shark Scale Blade and Low Rush Bit. Timing is also important. Emperor Blast Heavy 7-60R succeeds most often in its role as an attack type when it can catch opponents at the start of battle. Its window of opportunity for truly powerful, win condition-inflicting attacks is shorter than other options using Blades like Shark Scale.
Combo Variations
| Combo | Performance Up (+) | Performance Down (-) |
|---|---|---|
| Emperor Blast Heavy 7-70 Low Rush | + Attack | – Defense |
| Emperor Blast Wall 9-60 Rush | + Defense | – Attack |
| Emperor Blast Heavy 9-60 Kick | + Stamina | – Attack |
| Aero Pegasus 7-60 Rush | + Attack | – Stamina |
Players’ Voice
A lot of players wrote off the Custom Line (CX) when it was first released. And for good reason. The Blast Main Blade and Wall Assist Blade started to rewrite the script, but it wasn’t until the Emperor Lock Chip and Heavy Assist Blade came out that it started to click for me personally. Before Shark Scale was released, I really loved the original blue Aero Pegasus Blade (as that’s all that was available at the time). But I didn’t love how Aero Pegasus performed against Shark Scale. And including both in my deck didn’t feel advantageous. This led me down the path of adopting Emperor Blast Heavy as a heavier replacement that performed similarly in some ways, but also offered the benefits that come with being heavier than most of the opponents it faces. The newer, heavier, red Aero Pegasus Blade and the Elevate Bit with the thicker shaft have changed the conversation to some degree, but Emperor Blast Heavy is still arguably the most competitive option for CX-based combinations during this era.
Blader Kei
How to build Emperor Blast Heavy 7-60R

-
Emperor Lock Chip
-
Blast Main Blade
-
Heavy Assist Blade
-
7-60 Ratchet (1 of the following)
- BX-00 Draciel Shield 7-60D
- UX-06 Leon Crest 7-60GN
- G1682 Fort Hornet R 7-60T
- G2218 Draciel Shield 7-60D
-
Rush Bit (1 of the following)
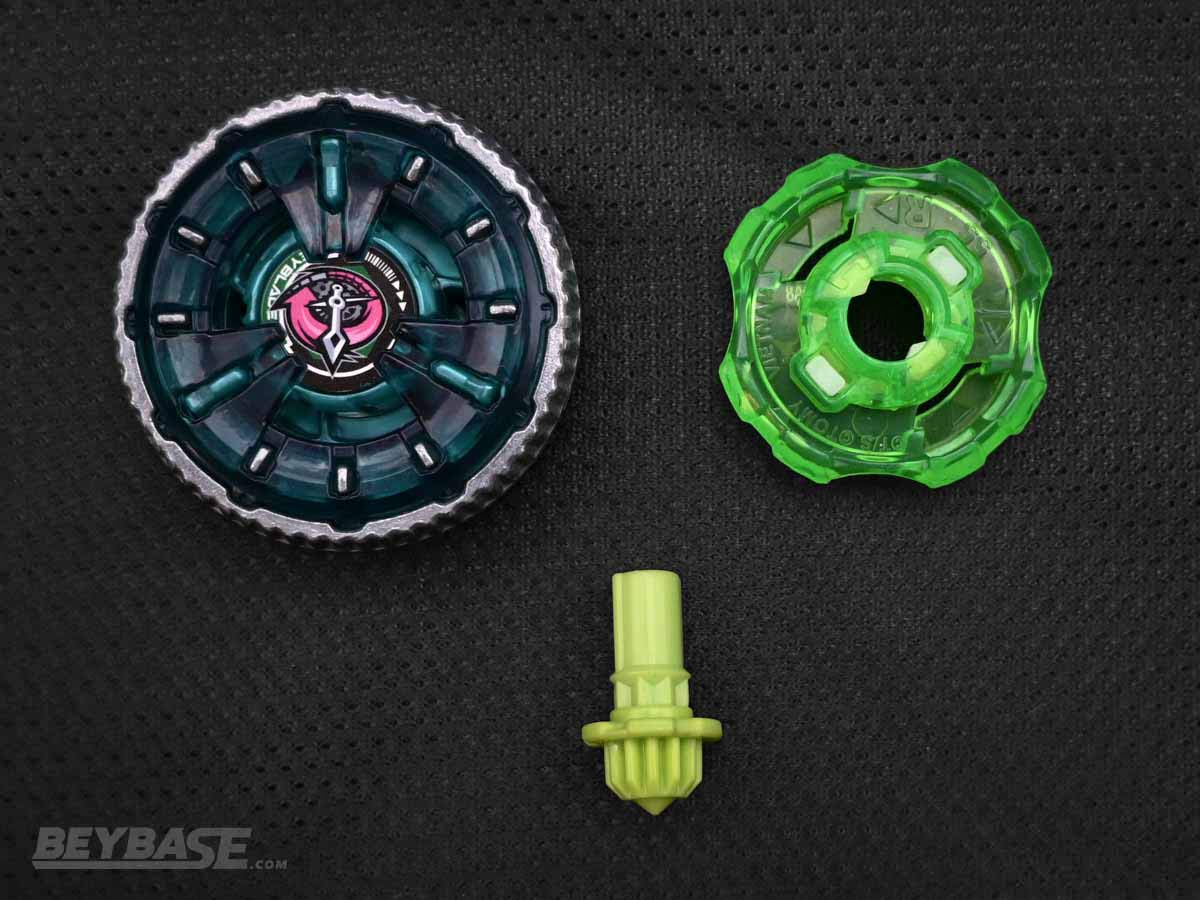
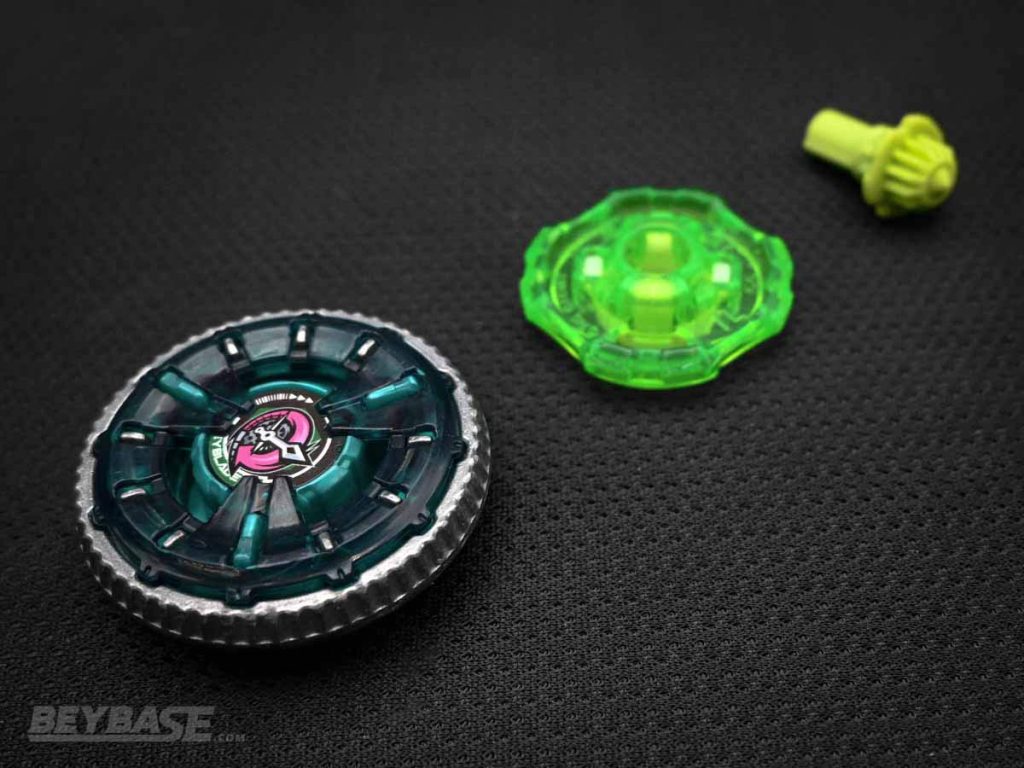
5. Clock Mirage 4-55 Under Needle
When used in the right situation, it can deliver some of the most reliable Spin Finish wins available.
Why is Clock Mirage 4-55UN good?
Best stamina combo. Clock Mirage 4-55UN is defined by one thing: unmatched stamina. In favorable matchups, it can feel almost inevitable that it will outlast both right- and left-spin opponents with ease. This makes it an incredibly potent counterpick, capable of creating decisive advantages in a game where such hard counters are relatively rare. When used in the right situation, it can deliver some of the most reliable Spin Finish wins available.
But outside of those ideal scenarios, its weaknesses are just as pronounced. Its defense is fragile, leaving it highly vulnerable to both knockouts and bursts against aggressive opponents. Because of this, it demands careful matchup selection and strategic timing. You can’t rely on it as a general-purpose option. It’s also resource-intensive to maintain due to part wear, reinforcing its role as a specialized tool rather than a staple pick.
Strengths
- Unrivalled stamina. For over a year and a half, the Wizard Rod Blade was the undisputed champion of stamina in Beyblade X. Its reign ended with the introduction of the Clock Mirage Blade, a part that seems almost specifically designed for this purpose. Clock Mirage’s stamina is unrivalled by any other Blade during this era. Clock Mirage 4-55UN can overcome not only right-spin staminas types, but left-spin ones too to win by Spin Finish. You’ll need strong shooting power, though. It’s possible, for instance, to lose by Spin Finish against opponents wielding Wizard Rod if you don’t.
- The ultimate counterpick. Beyblade X is a series with few true “counters”. Unlike past generations like Beyblade Burst where the winners and losers of a particular battle could often be decided by the matchup rather than the players, Beyblade X prioritizes attack power and is affected by factors such as part fit and other random gameplay elements that make it difficult for any Beyblade to have a 90%+ win rate against another. Clock Mirage might be the first part in Beyblade X to generate scenarios where your win rate can be that high. In this era, its unmatched stamina means that it nearly guarantees a win against the opponents it is favoured to beat.
Weaknesses
- Very poor defense. Clock Mirage 4-55UN’s biggest weakness is the relative ease with which it can be bursted. And if it doesn’t burst, it’s not so hard to knock out either. The 4-55 Ratchet and Under Needle Bit bring the Clock Mirage Blade down to a more traditional height, which helps to protect it to a degree. Contrary to popular belief, it is not totally helpless if the user is able to effectively receive attacks on the face of the Clock Mirage Blade. But all in all, the risk level is considerable when playing against aggressive opponents. This is what perhaps prevents it from being too overpowered. Clock Mirage 4-55UN is best viewed as a counterpick rather than an all-purpose answer for any opponent.
- Ideal usage scenarios are limited. Because the valley between what Clock Mirage 4-55UN specializes in and what it struggles with is vast, timing of usage is imperative. If you know nothing about your opponent or the competitive environment you’re in, it is tough to recommend. You may end up in a matchup that is very difficult to win. But if you are armed with information or are willing to design your strategy around the potential for poor matchups, it can be used to generate the type of clear advantage versus certain opponents that is not so common in Beyblade X.
- Costly to build. The plastic piece on the underside of the Clock Mirage Blade which connects with Ratchets is known to wear down incredibly quickly. The Simple Type Ratchets it is limited to also wear down with use. This makes it even easier to burst. As a result, for players seeking to use this in competitive situations we cannot recommend using anything but mint or near mint copies of the Clock Mirage Blade and 4-55 Ratchet.
Combo Variations
| Combo | Performance Up (+) | Performance Down (-) |
|---|---|---|
| Clock Mirage 7-55 Under Needle | + Defense | – Stamina |
| Clock Mirage 4-55 Low Orb |
Players’ Voice
The Clock Mirage Blade is possibly the most brilliantly designed piece in Beyblade X to this point from a gameplay design perspective. While parts such as the Wizard Rod Blade and Shark Scale Blade are controversial to some players for their versatility, the Clock Mirage Blade is on the complete opposite end of the spectrum. The risk vs. reward pay off is so clear and compelling. You burst very easily, but can outspin almost anything. This makes it into an important tool to consider under the right circumstances. If more versatile parts mainly reward skill, Clock Mirage mainly rewards knowledge. When you can thread the needle and find the right moment to pull out this combination, it’s about as close to an automatic win for that battle as there can be in Beyblade X. I’ve personally found it valuable for smaller tournaments where you are familiar with the players as well as certain situations in team battle tournaments where you know there is a good chance of running into an advantageous matchup with it.
Blader Kei
How to build Clock Mirage 4-55UN

-
Clock Mirage Blade
-
4-55 Ratchet (1 of the following)
-
Under Needle Bit (1 of the following)
Up to UX-13/BX-39
Top 5 Beyblade X Combos up to UX-13/BX-39 (Xtreme Stadium)
Each of the best Beyblade X combos for the Xtreme Stadium up to UX-13/BX-39 were selected through a survey of five experienced Beyblade players and Beyblade tournament champions around the world.
Each combination and their variations presented in each individual’s lists have demonstrated consistent positive results in many places across the globe, making them great choices to consider when deciding what Beyblades to use in tournaments focused around this era of Beyblade X.
Read the full article linked below to learn:
- What makes each of the selected combos strong and how you can win with them.
- Any weaknesses each combo possesses that you should be aware of.
BX-01 to BX-27
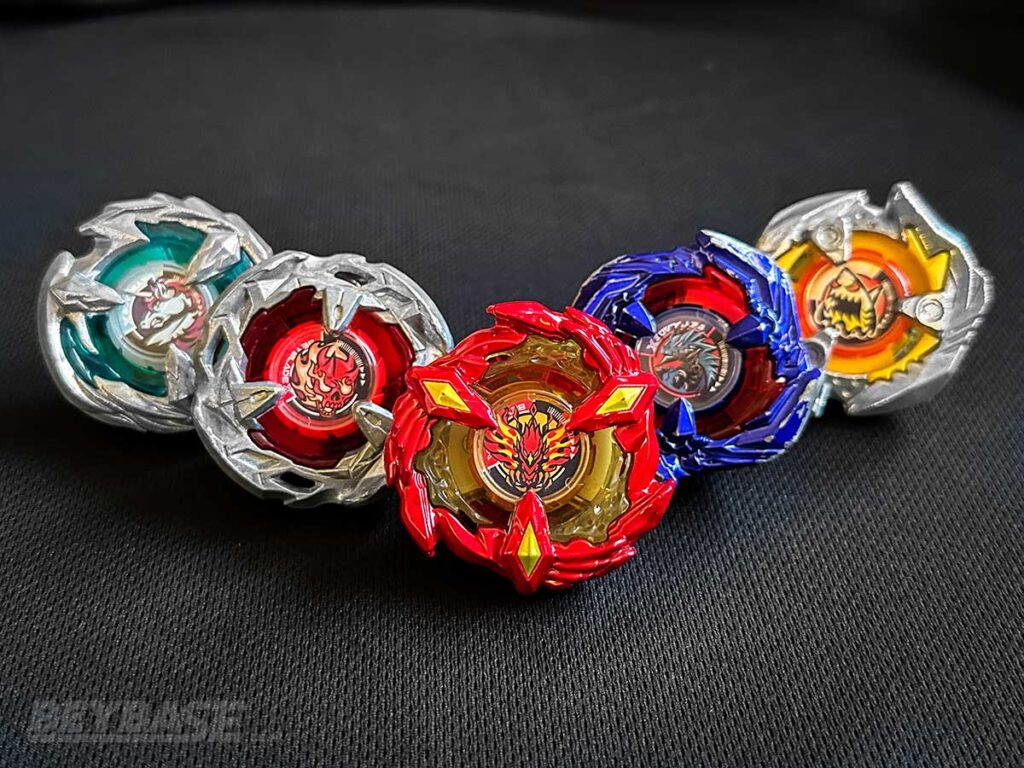

Top 5 Beyblade X Combos from BX-01 to BX-27 (Xtreme Stadium)
Each of the best Beyblade X combos for the Xtreme Stadium from BX-01 to BX-27 on this list has demonstrated winning results in tournaments worldwide. Using them will give you the best odds at tipping the scales in your favour when playing in an event using this pool of parts.
Read the full article linked below to learn:
- What makes each of the selected combos strong and how you can win with them.
- Any weaknesses each combo possesses that you should be aware of.
BX-01 to BX-12

Top 4 Beyblade X Combos up to UX-13/BX-39 (Xtreme Stadium)
Each of the best Beyblade X combos for the Xtreme Stadium from BX-01 to BX-12 represents our picks for the strongest customizations from the earliest era of Beyblade X. Built using only the parts available during the first twelve releases of the generation, these combinations helped establish the core attack, stamina, defense, and balance strategies that would shape the competitive scene moving forward.
Each combo on this list demonstrated strong performance in tournaments during the launch period of Beyblade X and offers valuable insight into how the metagame developed in its earliest months. Whether you’re looking to revisit this era or better understand the foundation of modern Beyblade X combo building, these combinations are an excellent place to start.
Read the full article linked below to learn:
- What makes each of the selected combos strong and how you can win with them.
- Any weaknesses each combo possesses that you should be aware of.
Sponsored: Order the newest Beyblades at malloftoys.com!
Heads up: If you buy something through Mall of Toys, you won’t pay any extra, but I’ll get a small commission. This helps me keep things running. Thanks for your support!
The Best Beyblade X Infinity Stadium Combos
All Lines (BX/UX/CX)
These are the best Beyblade X combos in the Infinity Stadium for tournament formats permitting all parts across Basic Line (BX), Unique Line (UX), and Custom Line (CX) tops to be used.
Up to BX-46/UX-16/CX-11
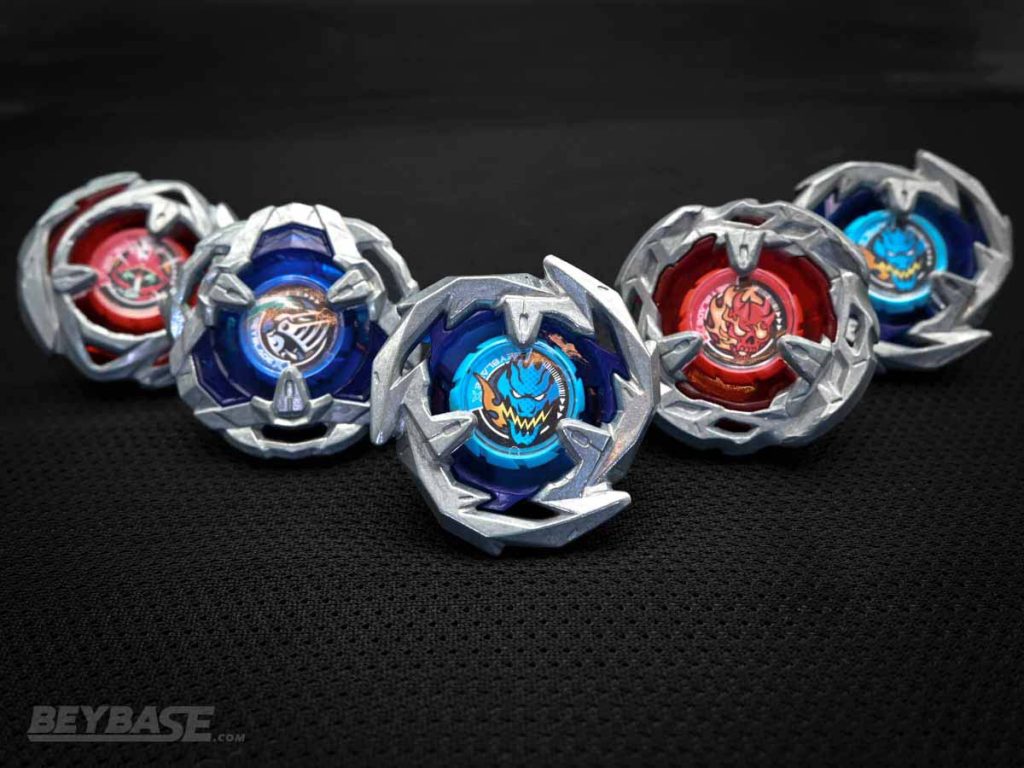
Top 3 Beyblade X Infinity Stadium Combos up to BX-46/UX-16/CX-11
Read our full article covering these combos and discover:
- A combo comparison chart that compares the general proficiency of the combos across three categories: attack, stamina, and defense.
- A full strength/weakness breakdown for each combo.
- A list of what products you need to buy in order to build each of them.
Frequently Asked Questions
How are the best combos chosen?
The best Beyblade X combo lists are devised with consideration for the following:
- Official Beyblade Battle Base (B4) Regulations (1on1 and 3on3 Match Types)
- The overall competitive environment of the target release window
- Proficiency in target stadium
- Inherent performance ceiling
- Ease of construction
- Ease of use
- Avoiding combinations with entirely overlapping roles
- No repeated Blades
- No repeated Bits
- Ratchets may be repeated, but variance is highly encouraged
- Contributor personal experiences playing and observing battles at real-life tournaments
However, due to the variance of player skill, local preferences, rules, match types, tournament context, and part manufacturing variances, first-hand experience of your own is important. In reality, many variations of the selected combos are also viable competitively depending on the aforementioned factors. We encourage you to conduct your own testing and to observe the global and local metagame as it develops to come to your own conclusions.
That being said, the combos in this article offer a solid starting point for any players planning to play in Beyblade X tournaments in the stadiums they target.
Combo lists are divided by specific product release windows in order to capture what was the strongest during the specific era covered. The best Beyblade X combos evolve over time as new products are released and new strategies are discovered.
What do the statistics on the combo comparison chart represent?
Statistics for the combo comparison chart are based on a five-star system where one star means very poor or unreliable performance for that purpose and five stars means very strong and reliable performance. “Strong” and “poor” performance are determined based on the personal experience and impressions using the combos of the players who contributed to each list.
Statistics should be taken as a general guideline and not as a full expression of the potential of the combo. Player skill and build quality can help to boost the strength and reliability of certain combos in different areas.
What are the combo variations?
The combo variations included on the lists for some Beyblades are slightly different versions of the Beyblades selected for the main list they are part of. Each one alters the performance of the Beyblade slightly. And there are many more variations beyond what is listed that can exist for each specific combination. We recommend experimenting with them and others on your own to find out what works best for you and your strategy.
Or become a BeyBase HQ member to get early article access and behind-the-scenes updates. Thank you!
Changelog
June 2026
- Article published, including brand new list covering the best Beyblade X Xtreme Stadium combos up to BX-48/UX-18/CX-12. It may be updated over time as new products are released or new strategies are discovered. The latest major changes will be noted in this changelog.