The Infinity Stadium sets a new standard for competitive Beyblade X
The release of the Infinity Stadium in BX-46 Battle Entry Set Infinity marks the introduction of a new era for competitive Beyblade X play.
The Infinity Stadium introduces an innovative, fresh take on the core gameplay of Beyblade X through the introduction of the “Infinity Dash” mechanic enabling continuous Xtreme Dashes.
Takara Tomy has indicated that they intend for it to become the second standard stadium for Beyblade X play alongside the existing Xtreme Stadium. They have gone so far as to promote its usage in official G3 tournaments for a period of time as well as hosting high-level G2, G1, and GP events using it.
While the it features a design which feels like a natural evolution of the Xtreme Stadium, in reality every detail of its design contributes to producing vastly differing gameplay. For new players and veteran players alike, the Infinity Stadium presents an exciting challenge. The mindset, strategies, shooting techniques, and types of Beyblades required to be successful are at the same time as familiar as they are divergent from the standard imposed by the Xtreme Stadium to date.
Become an Infinity Stadium expert
This article is the ultimate competitive guide for players who not only want to learn more about the Beyblade X meta in the Infinity Stadium, but want to understand how it works, and how to win Beyblade battles and tournaments in it.
Based on my first-hand experience, in this article you will learn about:
- The overall best Beyblade X Infinity stadium combos. Additional lists may be added over time as new products are released and the competitive environment evolves.
- Infinity Stadium tournament winning combos used by players in officially sanctioned and unofficial events to date.
- Strategies for how to win Beyblade X battles in the Infinity Stadium.
- The Infinity Stadium’s design and the impact it has on effective strategies and customizations.
- The history of stadium development in Beyblade X and how the Infinity Stadium fits into it.
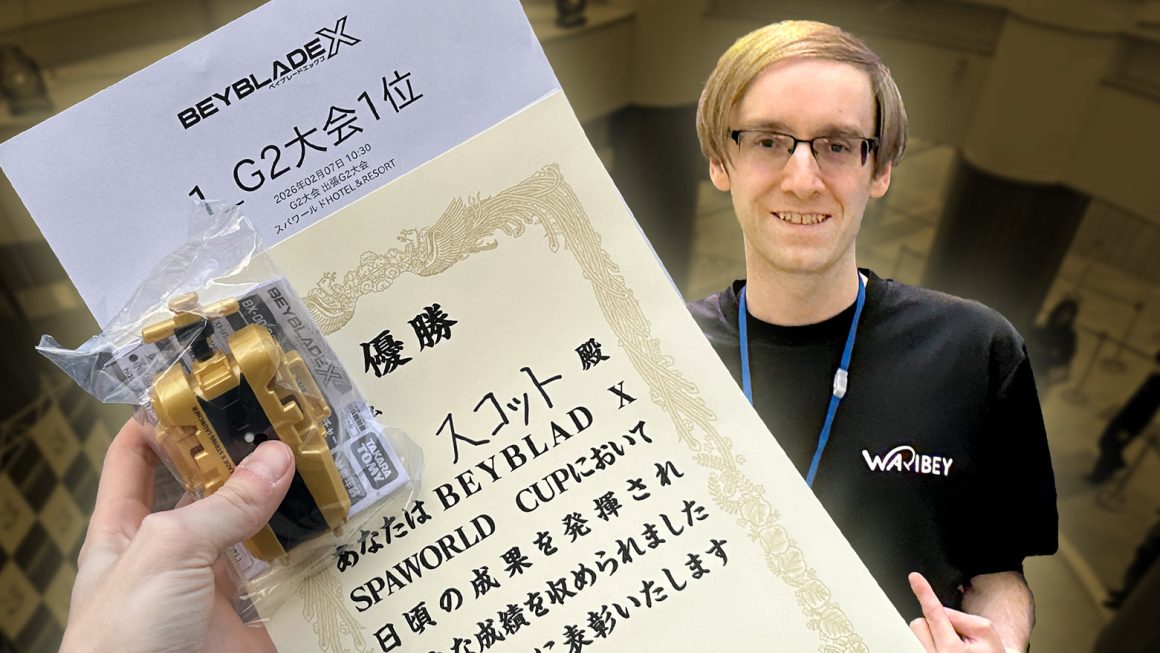
Champions aren’t born overnight. In my latest article, I break down how my pursuit of knowledge, adaptability, and reproducibility compounded into victory at a 256-player G2 tournament.
Sponsored: Order the newest Beyblades at malloftoys.com!
Heads up: If you buy something through Mall of Toys, you won’t pay any extra, but I’ll get a small commission. This helps me keep things running. Thanks for your support!
Where to Buy BX-46 Battle Entry Set Infinity

Heads up: If you buy something through some of the links on this post, you won’t pay any extra, but I’ll get a small commission. This helps me keep things running. Thanks for your support!
Best Beyblade X Infinity Stadium Combos
Below are the best Beyblade X Infinity Stadium combos. We’ve included:
- A combo comparison chart that compares the general proficiency of the combos across three categories: attack, stamina, and defense.
- A full strength/weakness breakdown for each combo.
- A list of what products you need to buy in order to build each of them.
As new products are released, additional lists may be added to reflect the state of the game during a specific period of time. As such, we have categorized the lists based on what set of products it was determined using.
Looking for the best Beyblade X Xtreme Stadium combos? View our lists here.
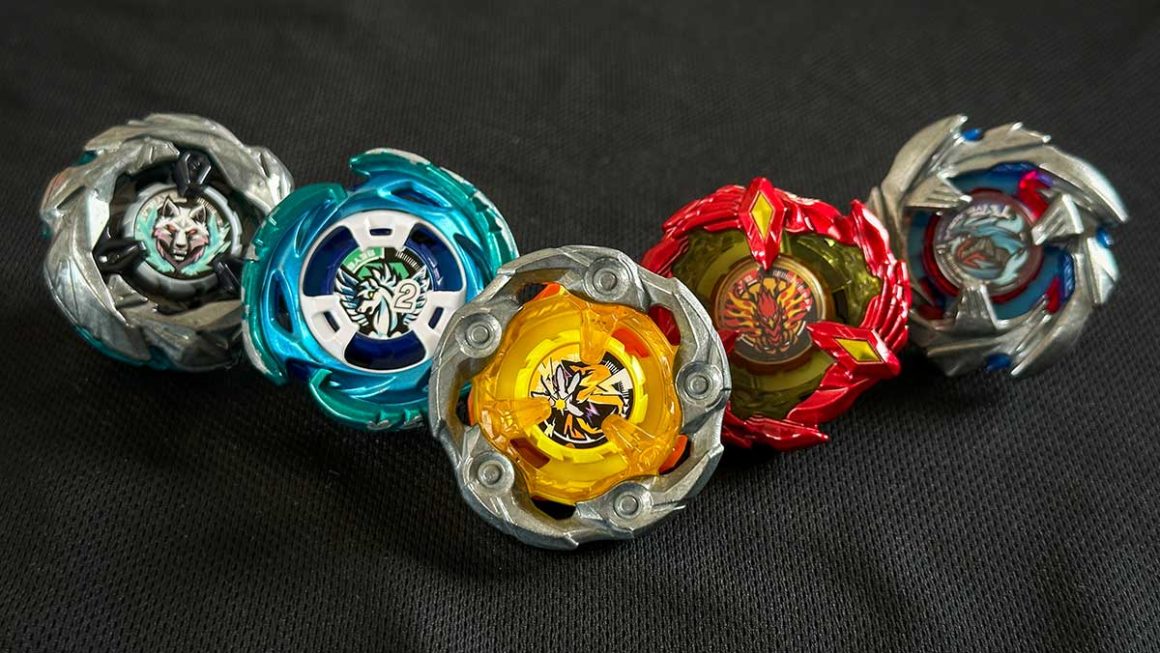
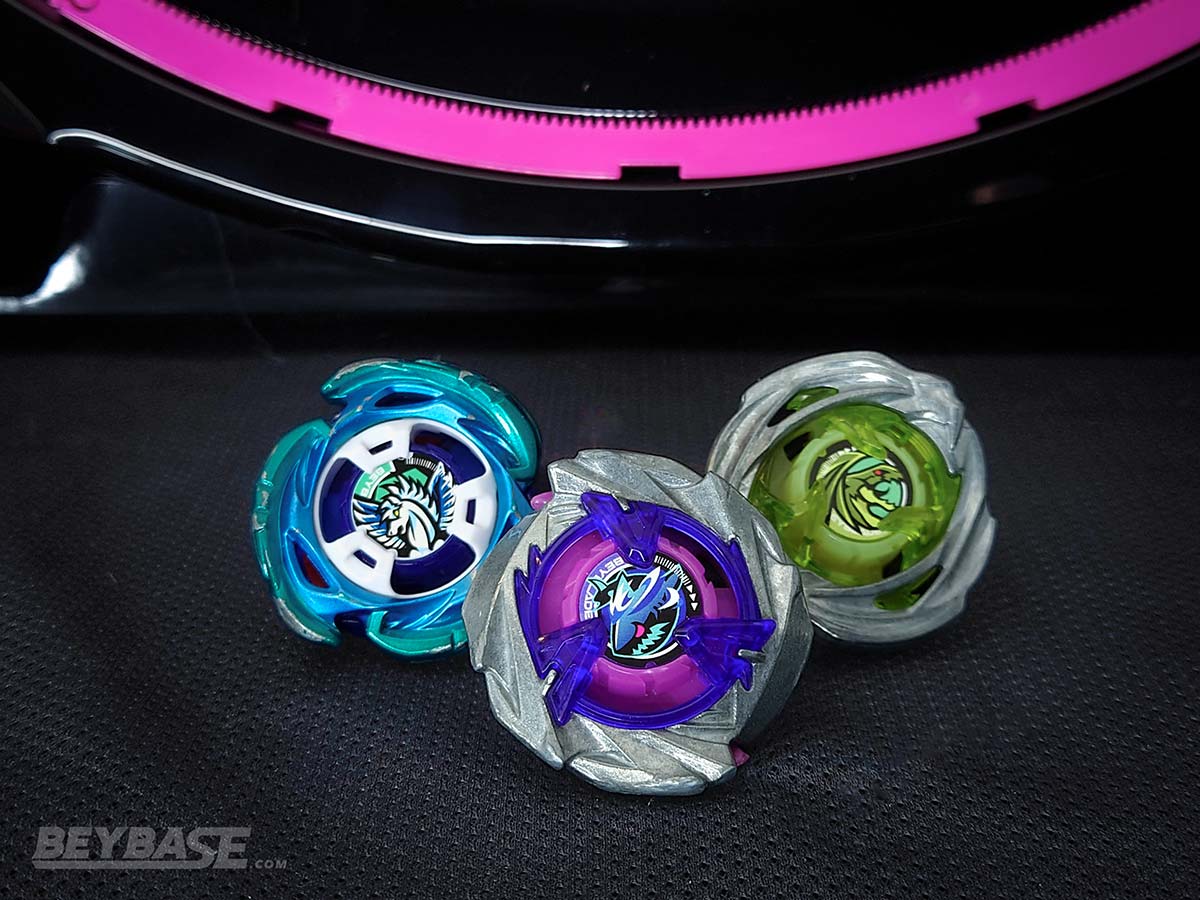
Top 3 Beyblade X Infinity Stadium Combos (Up to BX-46/UX-16/CX-11)
Combo Comparison Chart
| Combo | Statistics | Strengths | Weaknesses |
|---|---|---|---|
 Wyvern Hover 9-60 Rush | Attack: 4.5 ★ Stamina: 1.5 ★ Defense: 3 ★ | • High attack power • Unrivalled reverse potential • Controlled Xtreme Dashes | • Relatively low stamina • Lightweight • Cost-prohibitive |
 Shark Scale 1-60 Free Ball | Attack: 2.5 ★ Stamina: 3.5 ★ Defense: 3 ★ | • Easy to use • High reverse potential • Balanced performance | • Weak to strong attack players • Mid-tier stamina • Difficult to master |
 Aero Pegasus 1-70 Low Rush | Attack: 4 ★ Stamina: 2 ★ Defense: 3 ★ | • High reverse potential • High attack power • Good stamina | • Jack of all trades, master of none • Difficult to obtain • Requires shooting skill |
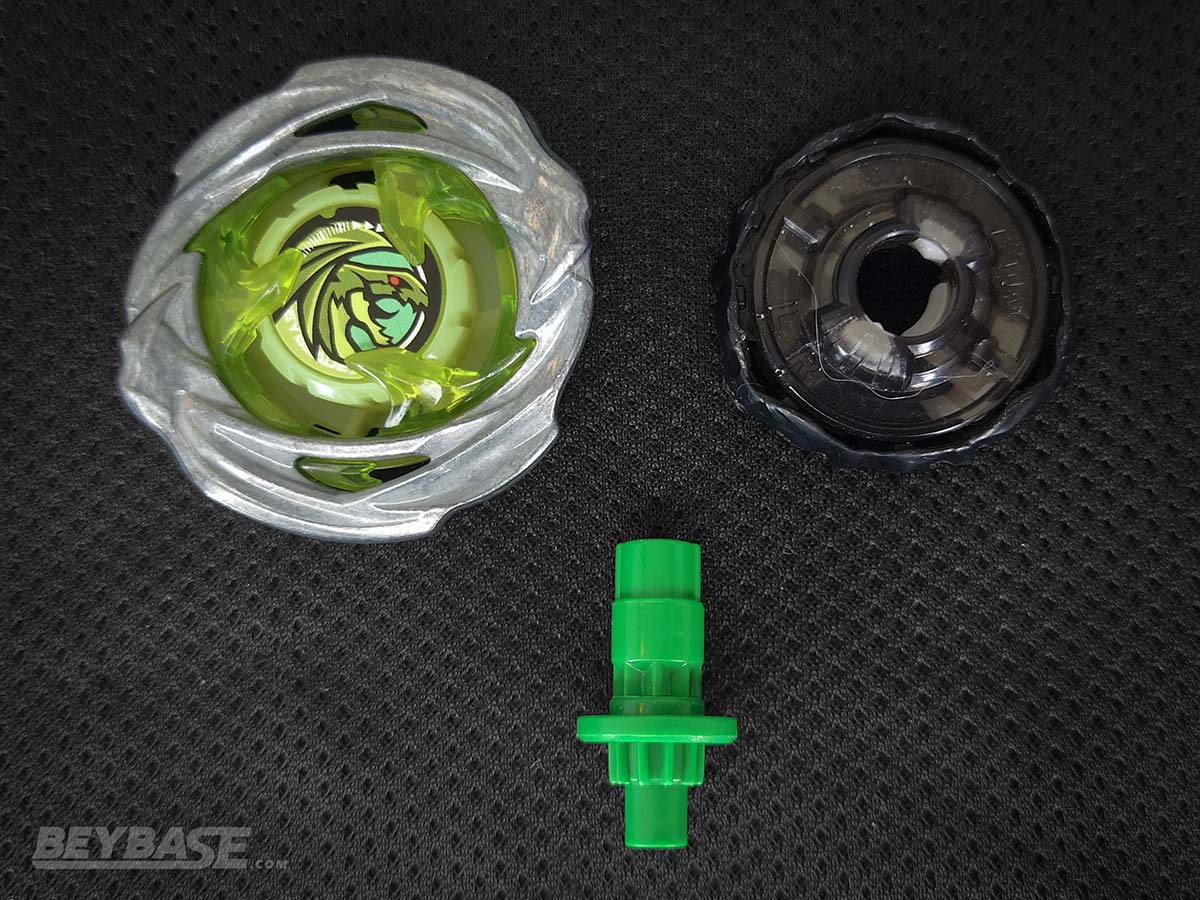
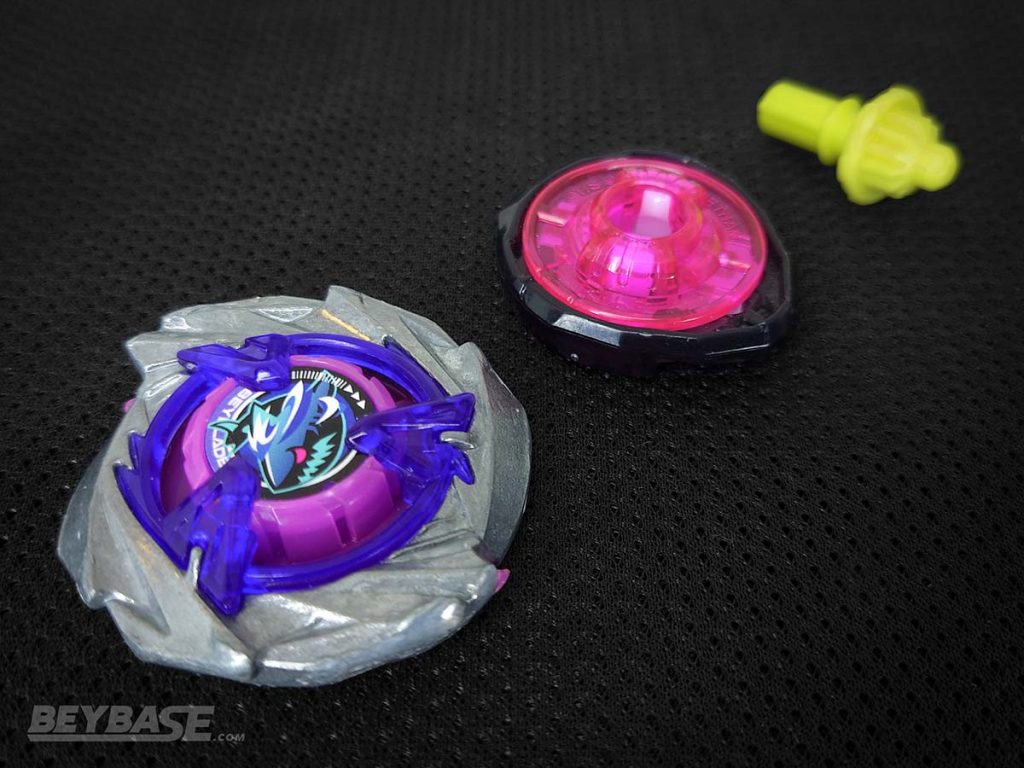
Wyvern Hover 9-60 Rush

In the hands of most players with decent shooting power, this combo feels closer to “high reward, low risk” than “high risk, high reward”. It’s that good.
Why is WH 9-60R good?
Reversing specialist. Wyvern Hover 1-60 Rush is a top tier attack type Beyblade X combo for the Infinity Stadium.
It combines the explosive attack power of the Wyvern Hover Blade with the difficult-to-burst 9-60 Ratchet and controlled, but aggressive movement of the Rush Bit to knock out virtually anything in its path.
Being relatively light, it can be knocked back by heavier opponents and by its own recoil. However, due to the oval shape of the Wyvern Hover Blade, it has the ability to ‘reverse’ (bounce back) from an Over Zone or sometimes even an Xtreme Zone with impressive consistency. The power of this cannot be understated given the frequency with which knockouts occur in the Infinity Stadium.
In the hands of most players with decent shooting power, this combo feels closer to “high reward, low risk” than “high risk, high reward”. It’s that good.
Strengths
- High attack power. The aggressive oval shape of the Wyvern Hover Blade produces strong smash attacks which can knock back even the heaviest of opponents at the time of its release
- Unrivalled reverse potential. The oval and inverted cone shape of the Wyvern Hover Blade helps it to propel itself out of the Over Zones with ease and consistency. This makes it a reliable pick in most matchups due to the relatively low chance of losing more than one point in any given battle.
- Controlled Xtreme Dashes. The Rush Bit is well-known as one of the most reliable attack type Bits in the game. The lower teeth count than normal Bits helps it to execute slower, controlled Xtreme Dashes that pack enough punch to knock out opponents without being so aggressive that the speed of the dash causes it to knock itself out.
Weaknesses
- Relatively low stamina. Compared to most other common opponents, this combination tends to be on the lower end of the spectrum in terms of stamina. The Rush Bit does help to compensate for this to a degree, but it is safe to say that your hope when using this combo should be to win by Over Finish or Xtreme Finish, or lose by Spin Finish.
- Lightweight. The Wyvern Hover Blade weighs in at around 35 grams in an environment where, at release in Japan, Blades are beginning to at the high end, weigh well over 40 grams. The relative lightweight of this combo can arguably be seen as a positive because it makes it easier for it to escape pockets, but it simultaneously can be a detriment if it doesn’t get the hit it needs to win early on. At lower rotation speeds, it can at times be harder to knock out heavier opponents.
- Cost-prohibitive. In Japan at release the Wyvern Hover Blade is only available as the “A” for prize or “Last One” prize of the DMM lottery, making it relatively expensive to obtain. In territories controlled by Hasbro, the equivalent Hover Wyvern Blade is as of writing only available in the Drop Attack Battle Set. Overall, the Hasbro version is generally a little bit cheaper to obtain, but it nevertheless is not easily available in a booster or starter in any region. Additionally, the Rush Bit can also be slightly difficult to obtain for players in regions administered by Takara Tomy due to the lack of cheaper products with the part included at this time.
How to build Wyvern Hover 9-60 Rush

-
Hover Wyvern Blade (1 of the following)
- G0842 Drop Attack Battle Set – Hover Wyvern 3-85N (Green)
- UX-00 Wyvern Hover 2-80GN (Violet) – DMM Lottery
- UX-00 Wyvern Hover 2-80GN (Metal Coat: Violet) – DMM Lottery
-
9-60 Ratchet (1 of the following)
- BX-23 Phoenix Wing 9-60GF
- F9324 Soar Phoenix Deluxe String Launcher Set – Soar Phoenix 9-60GF
- BX-46 Battle Entry Set Infinity – Cobalt Drake 9-60R
- UX-11 Impact Drake 9-60LR
- G0284 Roar Tyranno 9-60GF
- UX-05 Random Booster Shinobi Shadow Select – 02: Shinobi Shadow 9-60LF
-
Rush Bit (1 of the following)
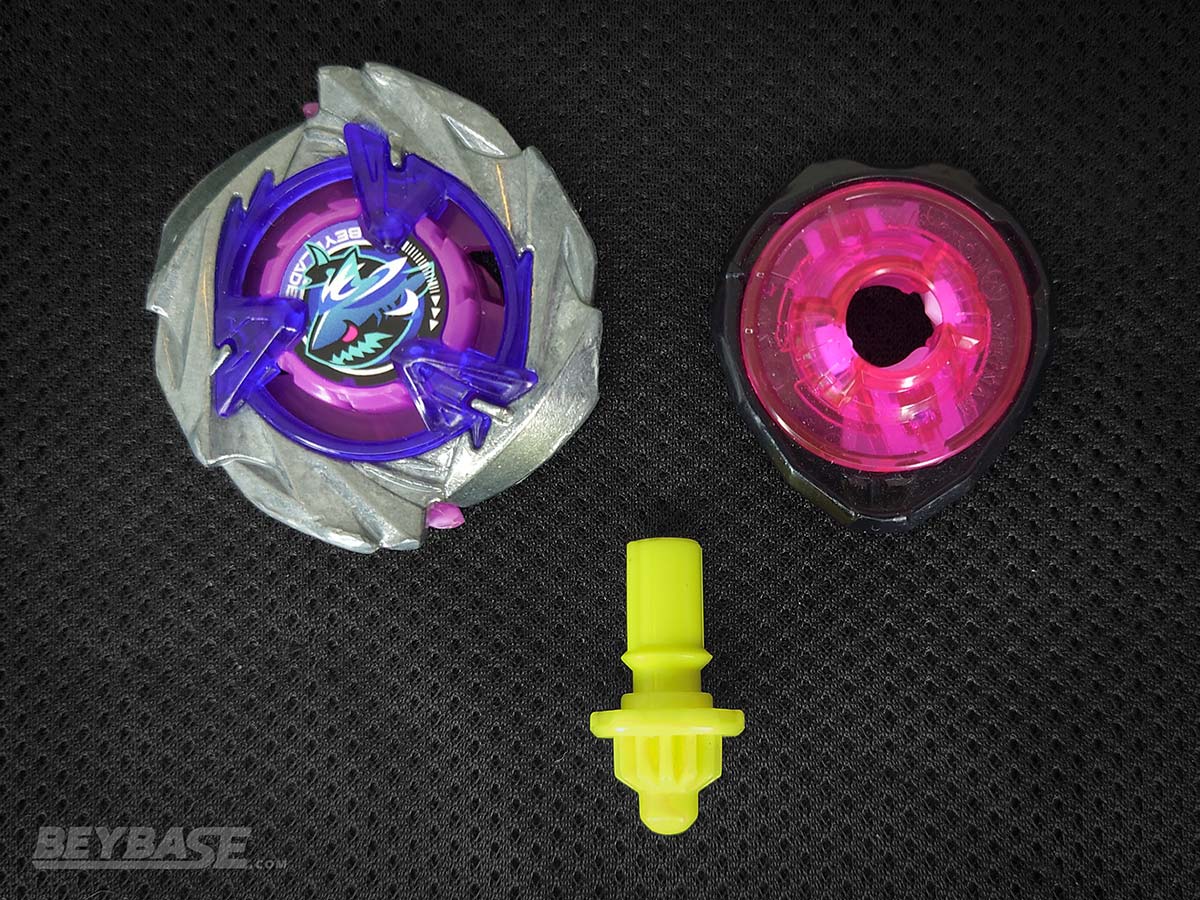
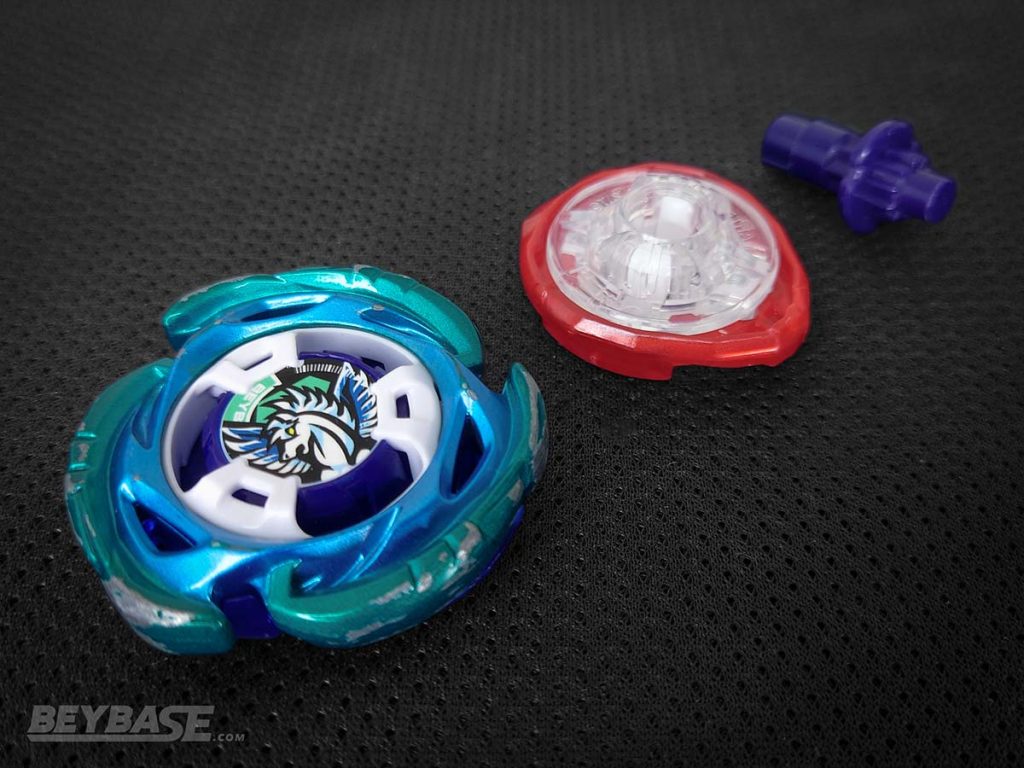
Shark Scale 1-60 Free Ball
[Shark Scale 1-60FB] combines the attack, stamina, and defense of the Shark Scale Blade with the reverse-boosting 1-60 Ratchet, and high stamina Free Ball Bit to create a stamina combination with an aggressive edge.
Why is ShSc 1-60FB good?
Best stamina combo. Shark Scale 1-60 Free Ball is a top tier stamina type Beyblade X combo for the Infinity Stadium.
It combines the attack, stamina, and defense of the Shark Scale Blade with the reverse-boosting 1-60 Ratchet, and high stamina Free Ball Bit to create a stamina combination with an aggressive edge.
ShSc 1-60FB is perfectly optimized to the high knockout frequency of the Infinity Stadium. The Blade and Ratchet enhance its reversing potential, allowing it to escape the Over Zone with consistency. The Shark Scale Blade itself not only has good stamina, but also high attack power, enabling it to knockout opponents at times even without a ton of speed behind its movement. And the free-spinning Free Ball Bit suppresses Xtreme Dashes, lowering the chances of being launched or launching itself into a pocket.
Stamina types in general face a tough environment in the Infinity Stadium, but ShSc 1-70FB strikes the balance between the high stamina required to outspin opponents with the defense required to withstand being knocked out for good.
Strengths
- Easy to use. The Infinity Stadium inherently encourages the use of attack types, but Shark Scale 1-60 Free Ball offers a certain ease of use and safety that combinations using attack type Bits cannot offer. The Free Ball Bit suppresses Xtreme Dashing and makes it unlikely for the user to self-KO. The movement it produces is calm, enabling evasive movements against attack types and just enough movement to enable attacks against opponents when the positioning and timing is right.
- High reverse potential. The Shark Scale Blade and 1-60 Ratchet both inherently have designs which increase the chances of the combination using them returning to the Battle Zone after entering an Over Zone. This offers a sort of insurance policy that this type of combination badly needs in an environment like the Infinity Stadium where it is relatively easy to be knocked out of the Battle Zone.
- Balanced performance. All three parts of this combination contribute to raising its performance across all categories: attack, stamina, and defense. It is at its heart a stamina combination, but in reality it is perhaps most accurately described as a stamina-focused balance Beyblade. There isn’t a lot it isn’t proficient in. It can outspin, knockout, and burst a lot of opponents.
Weaknesses
- Weak to strong attack players. Despite the high potential for Shark Scale 1-60 Free Ball to return to the Battle Zone after being knocked into an Over Zone, the reality is that it doesn’t always happen. And may be less likely to happen if Over Finishes are ruled after a shorter countdown by the judge in the event you’re participating in (as opposed to waiting until it stops spinning entirely). The Infinity Stadium is biased towards attack types in many ways and despite the best efforts of each part in this combination to combat that, there isn’t a lot that can be done to win consistently over time if your opponent can shoot well. In a 1on1 Match Type situation using the default B4 rules which required 4 points to win for instance, it may be difficult to achieve victory against an attack type. That being said, in situations such as the 3on3 Match Type where you only need to use it for one battle before moving on, it can still be effective as the lowered battle count reduces the risk of suffering a loss to a higher point win condition.
- Mid-tier stamina. The Shark Scale Blade has impressive stamina considering that it is an attack type, but it doesn’t have top tier stamina ultimately. If your opponent is using a pure stamina type, Shark Scale may lose if it cannot score a Burst, Over, or Xtreme Finish against it. That being said, the stamina user themselves is taking a risk because generally speaking stamina types are round and therefore have a tougher time escaping from an Over Zone.
- Difficult to master. Although Shark Scale 1-60 Free Ball is easy to use, it is in a sense hard to master. The reason is because if you want to maximize the potential of this combination, you need to be proficient at not only shooting with power, but shooting with precision. In order to avoid becoming the victim of an opposing attack type, it is vital to be able to read where your opponent is intending to shoot their Beyblade. In doing so, you can adjust your launch positioning and timing to increase the chances of avoiding them or being able to absorb the impact of an attack in a way which likely would not knock you out.
How to build Shark Scale 1-60 Free Ball

-
Shark Scale Blade
-
1-60 Ratchet (1 of the following)
-
Free Ball Bit (1 of the following)
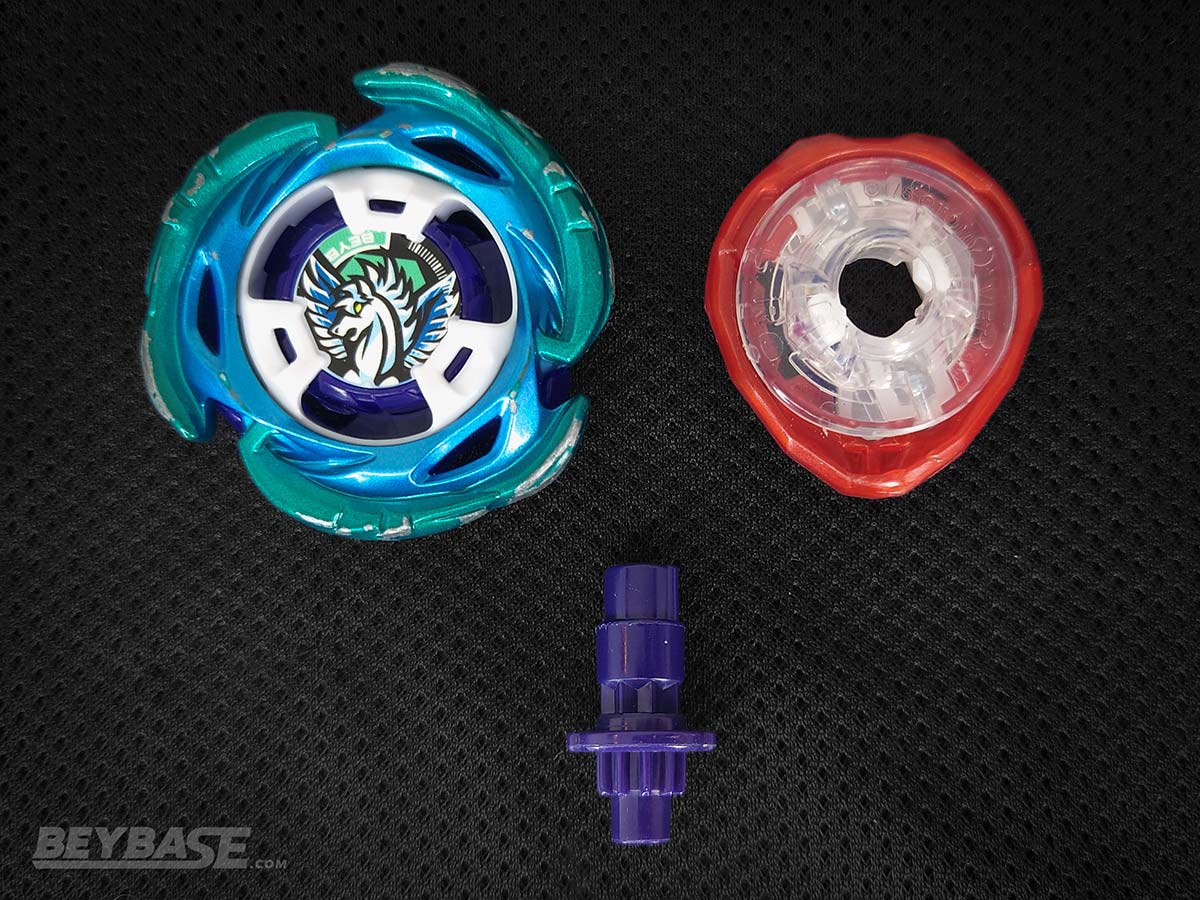
Aero Pegasus 1-70 Low Rush
Aero Pegasus 1-70LR has everything needed to be successful in the Infinity Stadium. It has strong attack power, decent stamina, high reverse potential, and movement which is both aggressive and controlled
Why is AP 1-70LR good?
Best all-around combo. Aero Pegasus 1-70 Low Rush is a top tier attack type Beyblade X combo for the Infinity Stadium.
It combines the jack of all trades Aero Pegasus Blade with the reverse-boosting 1-60 Ratchet, and high-speed, high attack power Low Rush Bit to create a tenacious attack type combination that can defeat anything in its path. While it may not have the highest stats in any one area, it combines the attack, stamina, and defense that it does have to effectively match up against an extremely wide range of opponents.
AP 1-70LR has everything needed to be successful in the Infinity Stadium. It has strong attack power, decent stamina, high reverse potential, and movement which is both aggressive and controlled enough to knockout opponents without overextending and putting itself at risk too often.
Strengths
- High reverse potential. The aggressive designs of the Aero Pegasus Blade and 1-70 Ratchet combine to afford this combination a high chance to return to the Battle Zone from an Over or even Xtreme Zone. This offers a sense of safety, which is important for the Infinity Stadium where it is relatively easy to be knocked out or knock yourself out.
- High attack power. All three parts contribute to the attack power of this combination, but in particular the Low Rush Bit allows it to execute powerful, fast, precise strikes that most opponents cannot withstand.
- Good stamina. The Aero Pegasus Blade is one of the strongest Blades of its era due to the combination of both attack power and stamina that it possesses. The Low Rush Bit too is a part which offers strong aggression, but not max aggression. This affords it a level of stamina that many attack type Bits do not offer. If AP 1-70LR doesn’t score a knockout or burst, there is a decent chance it can win by Spin Finish. Especially against many attack type opponents.
Weaknesses
- Jack of all trades, master of none. The Aero Pegasus Blade is a fundamentally strong part, but it faces stiff competition in this era of Beyblade X from the likes of Wyvern Hover and Shark Scale when you compare their performance to it in specific areas. Not to mention the heavyweight CX Blades using the Emperor Lock Chip, Valkyrie Lock Chip, and Heavy Assist Blade. In this way, it could be said that there are better options available if you want to maximize reverse potential, attack power, or weight. Although the effect of any shortcomings may be reduced when playing the 3on3 Match Type, this might be an issue for the 1on1 Match Type if you are looking to max out a particular stat for your combination. AP 1-70LR is effective for the balance of its strengths, not for its specialty in one particular area.
- Difficult to obtain. The original Double Metal Coat Aero Pegasus 3-70A from the Beyblade X app’s Rare Bey Get Battle lottery is no longer available for redemption via the Takara Tomy Mall website. A silver version has been announced, but as of writing the release date and method to obtain it has not been revealed. As a result, it is difficult and often cost-prohibitive to obtain the key part required for this combination: the Aero Pegasus Blade.
- Requires shooting skill. It is important for users of this combination to understand how Beyblades move in this stadium in order to effectively use it. This goes for both how your own Beyblade will move, but also how your opponent’s may move and where it may land based on your opponent’s shooting position and tendencies. It is easy to end up attacking on the wrong side of the Infinity Stadium or to end up in a vulnerable position if you do not take care of your launch power, positioning, and timing effectively.
How to build Aero Pegasus 1-70 Low Rush

-
Aero Pegasus Blade
- UX-00 Aero Pegasus 3-70A (Double Metal Coat: Blue/Green) – Rare Bey Get Battle
-
1-70 Ratchet
-
Low Rush Bit (1 of the following)
- UX-11 Impact Drake 9-60LR
- UX-18 Random Booster Vol. 8 – 06: Weiss Tiger 4-80LR
- G0842 Drop Attack Battle Set – Impact Drake 9-60LR
Best Combos List FAQs
How are the best combos chosen?
Lists are devised with consideration not only for performance, but also ease of construction, and in some cases varying player preferences. We also considered our own personal experiences playing and observing battles at real-life tournaments when choosing the combos.
However, due to the variance of player skill, local preferences, rules, match types, tournament context, and part manufacturing variances, first-hand experience of your own is important. In reality, many variations of the below combos are also viable competitively depending on the aforementioned factors. We encourage you to conduct your own testing and to observe the global and local metagame as it develops to come to your own conclusions.
That being said, these combos offer a solid starting point for any players planning to play in Beyblade X tournaments using the Infinity Stadium.
What do the statistics on the combo comparison chart represent?
Statistics for the combo comparison chart are based on a five-star system where one star means very poor or unreliable performance for that purpose and five stars means very strong and reliable performance. “Strong” and “poor” performance are determined based on our own personal experience and impressions using the combos.
Statistics should be taken as a general guideline and not as a full expression of the potential of the combo. Player skill and build quality can help to boost the strength and reliability of certain combos in different areas.
Beyblade X Infinity Stadium Tournament Winning Combos
The combos listed below are Infinity Stadium tournament winning Beyblade X combos used by players in tournaments we have witnessed first-hand or learned about through friends that attended them.
The best Beyblade X Infinity Stadium combos listed above were selected through an amalgamation of these experiences listed below as well as my experience talking with other players.
Certain Beyblade combinations and parts have inherent strengths and weaknesses, but every player also has their own set of circumstances, experiences, and preferences which can affect the choices they make and what they feel is strong. We encourage all players to consider my picks above, the combinations listed below, as well their own personal experience when determining what will give them the best chance to win.
Data Notes
- All data is drawn from tournaments played under official Beyblade X regulations using the 1on1 Match Type to 4 points for the qualifying rounds and 3on3 Match Type to 4 points for the finals. Any exceptions will be noted below.
- Some of the combos listed for 3on3 may not have seen play or won battles, but were included in the player’s deck.
- Data is not always complete for each of the top three players. We’ve included what we were able to record on the day of each event.
- All data is from our personal experience unless otherwise noted.
November 2025
X-TREME CUP G1 Team Battle Osaka
Tournament Details
- Participants: ~128 Teams (~384 Players)
- Match Type: Team Battle
- Tournament Format: Single Elimination
- Data Source: PXBeys
Winning Combinations (Team Battle)
| Player | Blade | Ratchet | Bit |
|---|---|---|---|
| 1st Place | Wyvern Hover | 1-60 | Taper |
| Aero Pegasus | 7-60 | Rush | |
| Shark Scale | 1-70 | Low Rush | |
| 2nd Place | Emperor Blast Free | 9-70 | Hexa |
| Wyvern Hover | 9-60 | Rush | |
| Shark Scale | 1-60 | Free Ball | |
| 3rd Place | Wyvern Hover | 1-60 | Taper |
| Aero Pegasus | 7-60 | Rush | |
| Shark Scale | 1-70 | Low Rush | |
| 4th Place | Wyvern Hover | 1-60 | Kick |
| Phoenix Wing | 7-60 | Low Flat | |
| Shark Scale | 9-60 | Point |
X-TREME CUP G1 Team Battle Nagoya
Tournament Details
- Participants: ~128 Teams (~384 Players)
- Match Type: Team Battle
- Tournament Format: Single Elimination
- Data Source: PXBeys
- Finals Video
Winning Combinations (Team Battle)
| Player | Blade | Ratchet | Bit |
|---|---|---|---|
| 1st Place | Wyvern Hover | 9-60 | Rush |
| Phoenix Wing | 3-60 | Low Flat | |
| Shark Scale | 1-60 | Low Rush | |
| 2nd Place | Wyvern Hover | 9-60 | Free Ball |
| Valkyrie Blast Heavy | 1-70 | Low Rush | |
| Shark Scale | 1-60 | Low Orb | |
| 3rd Place | Wyvern Hover | 1-70 | Rush |
| Shark Scale | 1-60 | Low Orb | |
| Wizard Rod | Operate | ||
| 4th Place | Aero Pegasus | 1-70 | Low Rush |
| Wyvern Hover | 3-60 | Rush | |
| Shark Scale | 1-60 | Elevate |
G3 Tournament in Fukushima #4
Tournament Details
- Participants: 8 Players
- Match Type: 1on1 (Top 8), 3on3 (Top 4)
- Tournament Format: Single Elimination
Winning Combinations (1on1)
| Player | Blade | Ratchet | Bit |
|---|---|---|---|
| 1st Place | Shark Scale | 1-60 | Orb |
| 2nd Place | Clock Mirage | 4-55 | Under Needle |
Winning Combinations (3on3)
| Player | Blade | Ratchet | Bit |
|---|---|---|---|
| 1st Place | Shark Scale | 1-60 | Orb |
| Wizard Rod | 9-60 | Low Orb | |
| Samurai Calibur | 1-70 | Free Ball | |
| 2nd Place | Cobalt Dragoon | 1-60 | Elevate |
| Shark Scale | 1-70 | Under Needle | |
| Perseus Blast Heavy | 6-70 | Ball | |
| 3rd Place | Shark Scale | 1-60 | Orb |
| Wizard Rod | 9-60 | Low Orb | |
| Samurai Calibur | 1-70 | Free Ball |
G3 Tournament in Fukushima #3
Tournament Details
- Participants: 6 Players
- Match Type: 1on1 (Top 6), 3on3 (Top 3)
- Tournament Format: Single Elimination
Winning Combinations (1on1)
| Player | Blade | Ratchet | Bit |
|---|---|---|---|
| 2nd Place | Aero Pegasus | 1-60 | Low Rush |
Winning Combinations (3on3)
| Player | Blade | Ratchet | Bit |
|---|---|---|---|
| 1st Place | Phoenix Wing | 7-60 | Rush |
| Wizard Rod | 9-60 | Kick | |
| Shark Scale | 1-70 | Low Rush | |
| 2nd Place | Aero Pegasus | 1-60 | Low Rush |
| Shark Scale | 1-70 | Free Ball | |
| Wyvern Hover | 9-60 | Rush | |
| 3rd Place | Wyvern Hover | 1-60 | Kick |
| Clock Mirage | 4-55 | Under Needle | |
| Shark Scale | ?-?? | ? |
October 2025
G2 Tournament in Tokyo, Japan
Tournament Details
- Participants: 80+ Players
- Match Type: 1on1, 3on3 (Top 4)
- Tournament Format: Single Elimination
Winning Combinations (3on3)
| Player | Blade | Ratchet | Bit |
|---|---|---|---|
| 1st Place | Cobalt Dragoon | ?-?? | Elevate |
| Aero Pegasus | ?-?? | Rush | |
| Shark Scale | 1-70 | Free Ball | |
| 2nd Place | Shark Scale | 9-60 | Free Ball |
| Aero Pegasus | 7-60 | Kick | |
| Phoenix Wing | 7-70 | Rush | |
| 3rd Place | Aero Pegasus | 1-60 | Low Rush |
| Shark Scale | 1-70 | Rush | |
| Wizard Rod | 9-60 | Ball |
G3 Tournament in Fukushima #2
Tournament Details
- Participants: 8 Players
- Match Type: 1on1 (Top 8), 3on3 (Top 4)
- Tournament Format: Single Elimination
Winning Combinations (1on1)
| Player | Blade | Ratchet | Bit |
|---|---|---|---|
| 1st Place | Shark Scale | 1-60 | Under Needle |
| 2nd Place | Shark Scale | 1-70 | Free Ball |
Winning Combinations (3on3)
| Player | Blade | Ratchet | Bit |
|---|---|---|---|
| 1st Place | Wizard Rod | 9-60 | Low Rush |
| Shark Scale | 1-60 | Under Needle | |
| Silver Wolf | 1-80 | Low Orb | |
| 2nd Place | Wizard Rod | 1-60 | Wedge |
| Shark Scale | 1-70 | Free Ball | |
| Wyvern Hover | 9-60 | Low Rush |
G3 Tournament in Fukushima #1
Tournament Details
- Participants: 8 Players
- Match Type: 1on1 (Top 8), 3on3 (Top 4)
- Tournament Format: Single Elimination
Winning Combinations (1on1)
| Player | Blade | Ratchet | Bit |
|---|---|---|---|
| 1st Place | Shark Scale | 3-60 | Low Orb |
| 2nd Place | Cobalt Dragoon | 5-60 | Elevate |
Winning Combinations (3on3)
| Player | Blade | Ratchet | Bit |
|---|---|---|---|
| 1st Place | Shark Scale | 3-60 | Low Orb |
| Cobalt Dragoon | 5-60 | Elevate | |
| Aero Pegasus | 1-60 | Rush | |
| 2nd Place | Cobalt Dragoon | 5-60 | Elevate |
| Shark Scale | 3-60 | Low Orb | |
| Dran Buster | ?-?? | Zap | |
| 3rd Place | Shark Scale | 9-60 | Kick |
| Clock Mirage | 4-55 | Under Needle | |
| Wizard Rod | 3-60 | Ball |
G3 Tournament in Iwate, Japan
Tournament Details
- Participants: 48 Players
- Match Type: 1on1 (Xtreme Stadium), 3on3 (Top 4, Infinity Stadium)
- Tournament Format: Single Elimination
Winning Combinations (Infinity Stadium)
| Player | Blade | Ratchet | Bit |
|---|---|---|---|
| 1st Place | Dran Buster | 1-60 | Under Flat |
| Aero Pegasus | 1-70 | Low Rush | |
| Shark Scale | 3-60 | Low Orb | |
| 2nd Place | Shark Scale | 1-70 | Low Rush |
| Valkyrie Blast Wheel | 9-60 | Hexa | |
| Aero Pegasus | 7-60 | Rush |
Fan-Organized Unofficial Tournament in Iwate, Japan
Tournament Details
- Participants: 16 Players
- Match Type: 3on3
- Tournament Format: Single Elimination
Winning Combinations (3on3)
| Player | Blade | Ratchet | Bit |
|---|---|---|---|
| 1st Place | Wizard Rod | 6-70 | Free Ball |
| Shark Scale | 9-60 | Under Needle | |
| Clock Mirage | M-85 | Ball | |
| 2nd Place | Wizard Rod | 1-60 | Wedge |
| Shark Scale | 9-60 | Low Rush | |
| Scorpio Spear | 1-70 | Under Needle | |
| 3rd Place | Aero Pegasus | 2-60 | Low Rush |
| Shark Scale | 1-60 | Hexa |
Champions aren’t born overnight. In my latest article, I break down how my pursuit of knowledge, adaptability, and reproducibility compounded into victory at a 256-player G2 tournament.
Sponsored: Order the newest Beyblades at malloftoys.com!
Heads up: If you buy something through Mall of Toys, you won’t pay any extra, but I’ll get a small commission. This helps me keep things running. Thanks for your support!
How to Win Infinity Stadium Beyblade X Battles
Understanding how to win Beyblade X battles in the Infinity Stadium takes time and experience. But here are some tips based on my personal experience playing in tournaments which may tilt the scales in your favour:
Be aggressive
The Infinity Stadium rewards smart, aggressive play. Unlike the Xtreme Stadium, there isn’t anywhere players can reliably “hide” their Beyblade because both sides of the stadium have two Over Zones and an Xtreme Zone. They are plentiful and wide open.
Aggressively designed parts also tend to do well in the Infinity Stadium because they stand a better chance of escaping from the Over Zone or Xtreme Zone after being knocked into it.
The players who understand how to mitigate risk as well as when to take a risk will be the ones who win more often.
Focus on shooting technique and power
The positioning, placement, angle, timing, and power of your shot is important. The same can be said for the Xtreme Stadium, but this feeling is heightened in the Infinity Stadium due to the ease with which Over and Xtreme Finishes can occur.
Because of this, predicting the trajectory of you and your opponent’s top will help to increase your chances of victory. Adjusting your shooting power and angle depending on the situation will also help.
There are many ways to shoot, so you should experiment to find what works best for you and your selected Beyblades.
PXBeys on YouTube has put together a video outlining some shooting techniques that may act as a valuable starting point for new players:
Build for evasion and reverse potential
Due to the high frequency of knock outs, “defense” in the Infinity Stadium is expressed primarily in two ways. Through the ability of your Beyblade:
- To reverse from an Over Zone or Xtreme Zone.
- To dodge opponents through effective placement and movement.
It is important, generally speaking, to build Beyblades in the Infinity Stadium to have these abilities.
Increasing reverse potential
The first is relatively easy to achieve. Increasing the chances of your Beyblade returning to the Battle Zone from an Over Zone or Xtreme Zone means:
- Choosing a Blade that isn’t circular. Circular Blades don’t tend to generate enough vibration inside of a pocket to be able to pry themselves out.
- Using one-sided Ratchets like the 1-60 Ratchet, 1-70 Ratchet, or 1-80 Ratchet.
- Using a Bit with a flat or ball-shaped tip. Unlike Bits with sharp tips, Bits with flat or ball-shaped tips produce movement, increasing the chances of them ‘jumping’ out.

Increasing evasion potential
There are two aspects to increasing the evasion potential of your Beyblade.
The first is through your Bit choice. Bits with flat or ball-shaped tips produce movement which enables them to proactively dodge or attack opponents.
The second is through shot placement, timing, and trajectory.
Although the double-sided Xtreme Line can increase the chances for attacking through the “Infinity Dash” gimmick, it simultaneously makes the four corners of the stadium in front of the Over Zones into pseudo, temporary “safe” areas at times.
The apex of the Xtreme Line on each side can protect you if your opponent is Xtreme Dashing on the opposite side of the Xtreme Line compared to where your Beyblade is positioned.
If you can predict which side of the stadium they will move on primarily at the beginning of battle, you can use this to your advantage to generate some moments of safety away from them.
When we first started playing in the Infinity Stadium, our initial instinct was to try and make stillness into an asset. Our hypothesis was that because it is so easy to be knocked out, the centre of the stadium might actually be the safest area. This led me to try out every docile Bit you can imagine, from Wedge to Needle, Under Needle, Spike, and more.
While there is some merit to this strategy if your anticipation and placement is stronger than your opponent, or if your opponent has a tendency to take risks with their shots that may cause them to self-KO, in general it seems difficult to consistently dodge and absorb attacks without moving. Even very heavy combinations which aim to stand their ground can run into trouble withstanding hits from top tier attackers in this stadium. The Infinity Stadium is simply that dangerous for stationary combinations.
Bits with sharper tips also tend to have an increased chance of getting stuck in the gaps between the Xtreme Line and the plastic base of the Stadium Bottom. This adds an element of unpredictability and unreliability to their usage.
While the use of Bits with rubber tips such as Rubber Accel and Merge does also have some potential, in my experience to date they aren’t consistent enough to be viable competitively. Often because their stamina is too low or matchup spread is too narrow for Match Types like 3on3 and 1on1. However, to be honest this is an area we need to spend more time investigating.
Adapt to your opponents
Aggression is often rewarded in the Infinity Stadium, but what happens when everybody understands that?
If you’re in such an environment, it is worth considering how you intend to overcome opponents who have a strategy and Beyblades which are equally as aggressive as you.
One way to separate yourself is through shooting technique and power, but this can only take you so far.
It is also worth considering building combinations to have higher stamina at the cost of some aggression.
Practically, this could mean the difference between using something like the Low Rush Bit or Rush But and using the Taper Bit or Kick Bit. The latter two have higher stamina than the former two, enabling a new win condition for attack type mirror matches. But every part has its own strengths and weaknesses. Taper and Kick for instance don’t have as much attack power as Low Rush and Rush. So, you will both gain and lose something by going down this route.
As the metagame develops worldwide as well as on a local level, it is important to remain vigilant and think about what changes you can make to produce an advantage for yourself in each moment.
Sponsored: Order the newest Beyblades at malloftoys.com!
Heads up: If you buy something through Mall of Toys, you won’t pay any extra, but I’ll get a small commission. This helps me keep things running. Thanks for your support!
About the Infinity Stadium
What is the Infinity Stadium?
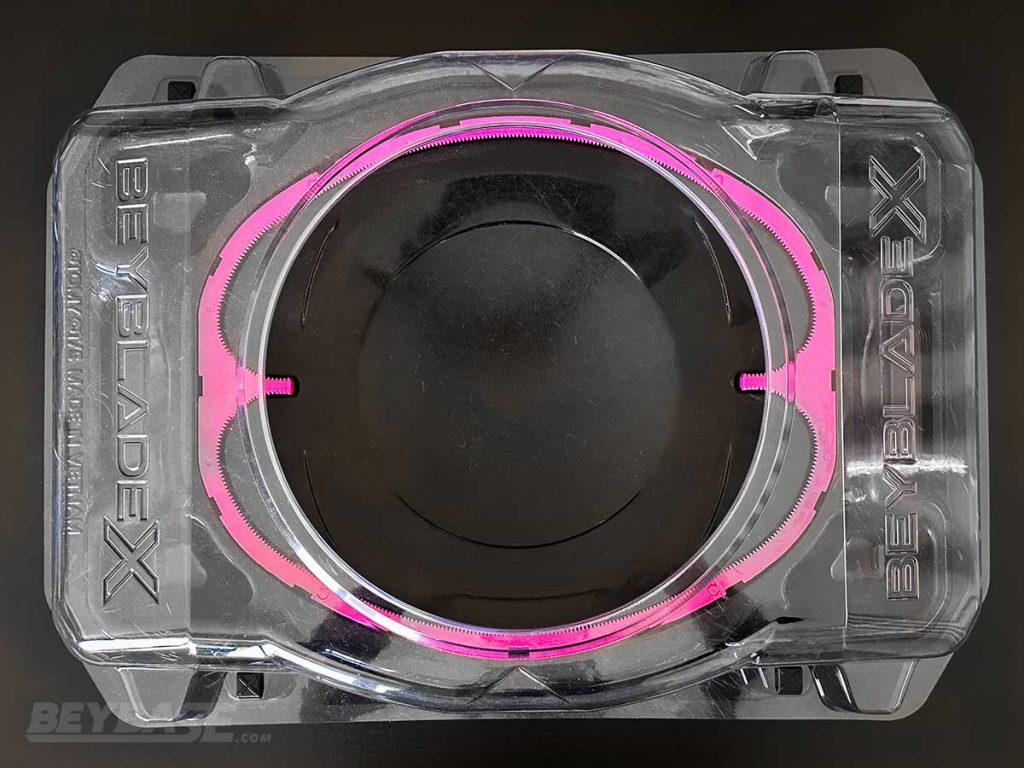
The Infinity Stadium is a Beyblade stadium designed for use with Beyblade X tops. It was first released with the BX-46 Battle Entry Set Infinity and comes bundled with the stadium, Cobalt Drake 9-60R and Tackle Goat 7-70T.
It features a large rectangular design with four Over Zones, two Xtreme Zones, stadium cover, and a double-sided Xtreme Line rail enabling the “Infinity Dash” gimmick.
The points awarded for win conditions are the same as the Xtreme Stadium (1 point for Spin Finish, 2 points for Over Finish or Burst Finish, 3 points for Xtreme Finish).
Infinity Dash
“Infinity Dash” is the act of riding the Xtreme Line in a continuous loop, sweeping multiple times through the central area of the stadium before engaging with the Xtreme Line again on the opposite side of the stadium.
Infinity Stadium vs. Xtreme Stadium Differences
The Infinity Stadium is considered by Takara Tomy to be the second standard stadium for the series alongside the Xtreme Stadium.
The design is an evolution of the concept presented with the original Beyblade X Xtreme Stadium. In contrast to the Infinity Stadium, the Xtreme Stadium has two Over Zones, one Xtreme Zone, and an overall smaller square design.
A wide range of smaller details in the stadium design have also been adjusted which encourage significantly different performance in comparison to the Xtreme Stadium.
Here are a few highlights:
1. Over Zones shape

The Over Zones of the Infinity Stadium are not only shaped slightly differently overall, but their walls are all sloped inwards to a degree. The slope of the wall facing the interior of the stadium is especially pronounced. This contributes to the ability of Beyblades with irregular shapes to bounce back into the Battle Zone more easily than the Xtreme Stadium’s Over Zones, which feature walls with 90 degree angles.
Unlike the Xtreme Stadium, there is also no extended gap beyond the Over Zone’s pocket, meaning that Beyblades cannot exit the stadium completely.
2. Xtreme Zones shape

The Xtreme Zones of the Infinity Stadium actually shares more in common with the Xtreme Zone of the Hasbro Xtreme Stadium rather than the Takara-Tomy Xtreme Stadium. It is narrower in width than the Takara-Tomy Xtreme Stadium’s Xtreme Zone. And it features a pocket design which prevents Beyblades from flying outside of the stadium after entering it. This and the narrow width of the Xtreme Zones make it closer in design to the Xtreme Zone of Hasbro’s Xtreme Stadium.
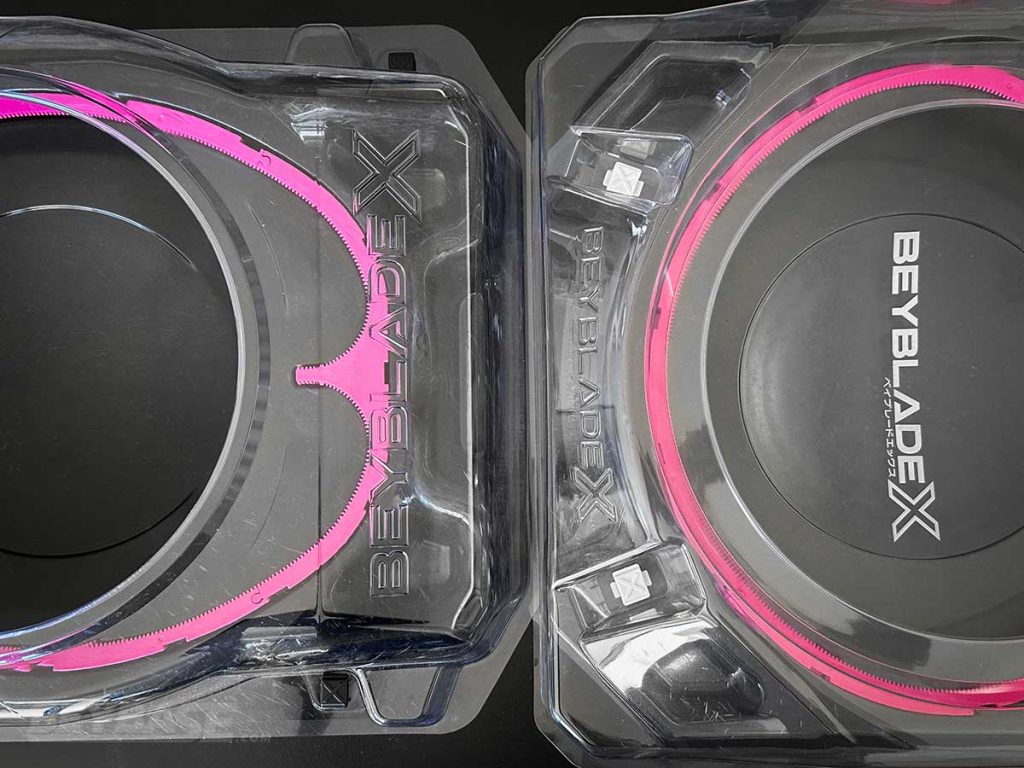
3. Stadium Cover shape
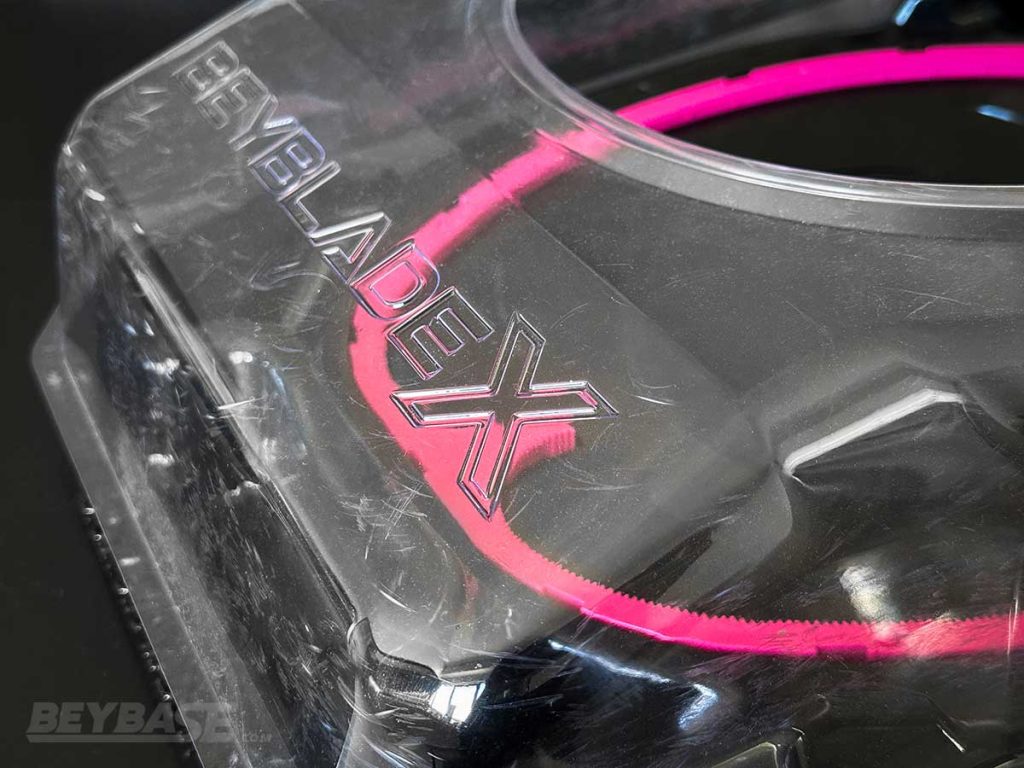


The shape of the Infinity Stadium itself being rectangular changes the overall shape of the Stadium Cover in comparison to the Xtreme Stadium, but there are some less obvious differences present as well.
For example:
- The angle of the cover on each end of the stadium (where the “Beyblade X” logo is stamped). It is less steep than the angle on the Xtreme Stadium.
- The lip of the circular entry point in the middle of the Stadium Cover is inverted, pointing upwards. In the Xtreme Stadium, it slopes inward. The new design prevents the occurrence of Beyblades landing in this area or being launched up into this area before or after the battle starts, which often causes some confusion ruling-wise among players and judges when playing in the Xtreme Stadium.
- The height of the space between the Stadium Bottom and the Stadium Cover in front of the Xtreme Zones and Over Zones is slightly taller on the Infinity Stadium in comparison to the Xtreme Stadium. This makes it easier for Beyblades to be knocked out.
- The side walls of the Infinity Stadium’s Stadium Cover between the two sides with the Over and Xtreme Zones are slightly segmented to create a overall curved shape. The Xtreme Stadium’s walls on the sides without the Over Zones and Xtreme Zones are all completely straight.
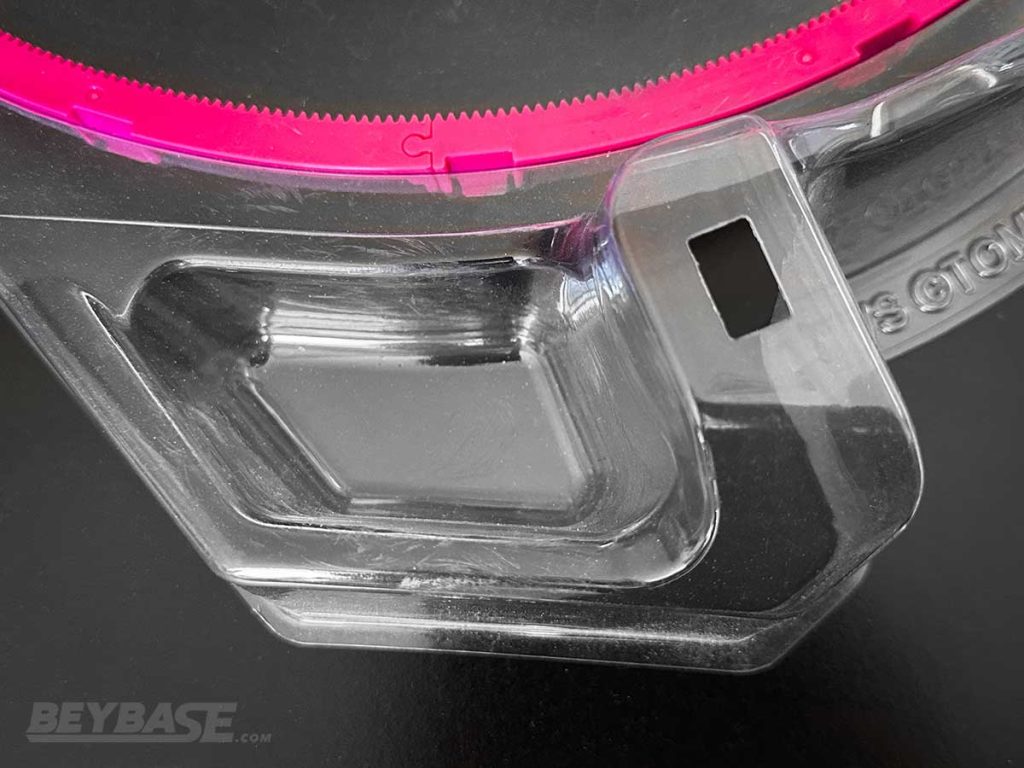
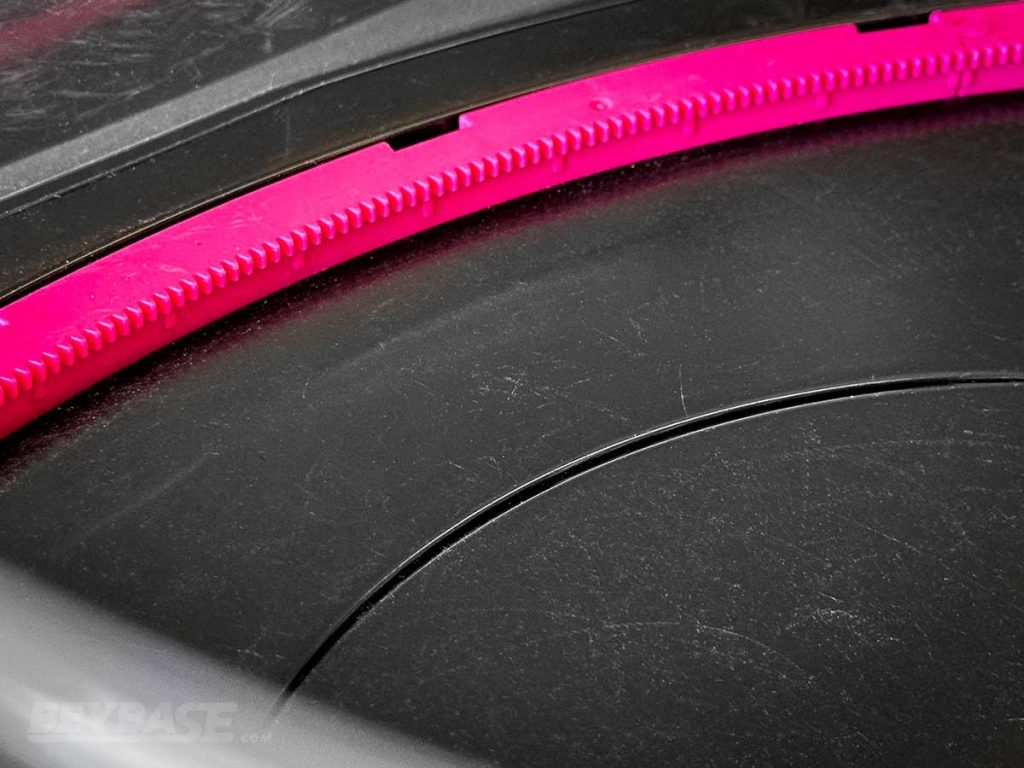
4. Over Zone entry point


Between each Over Zone and the Xtreme Line in front of it is a very narrow flat space. This entry point differs from the Xtreme Stadium, which has a small ridge in front of each Over Zone after passing beyond the Xtreme Line.
In practice, this makes it much easier for Beyblades to be knocked out in the Xtreme Stadium.
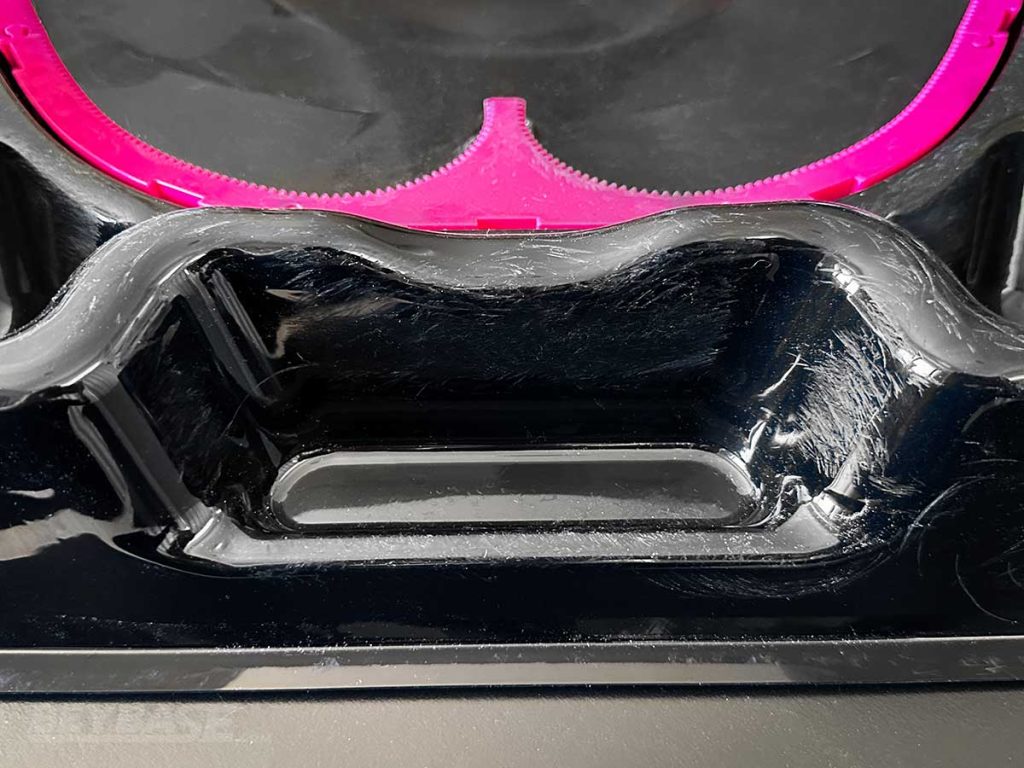
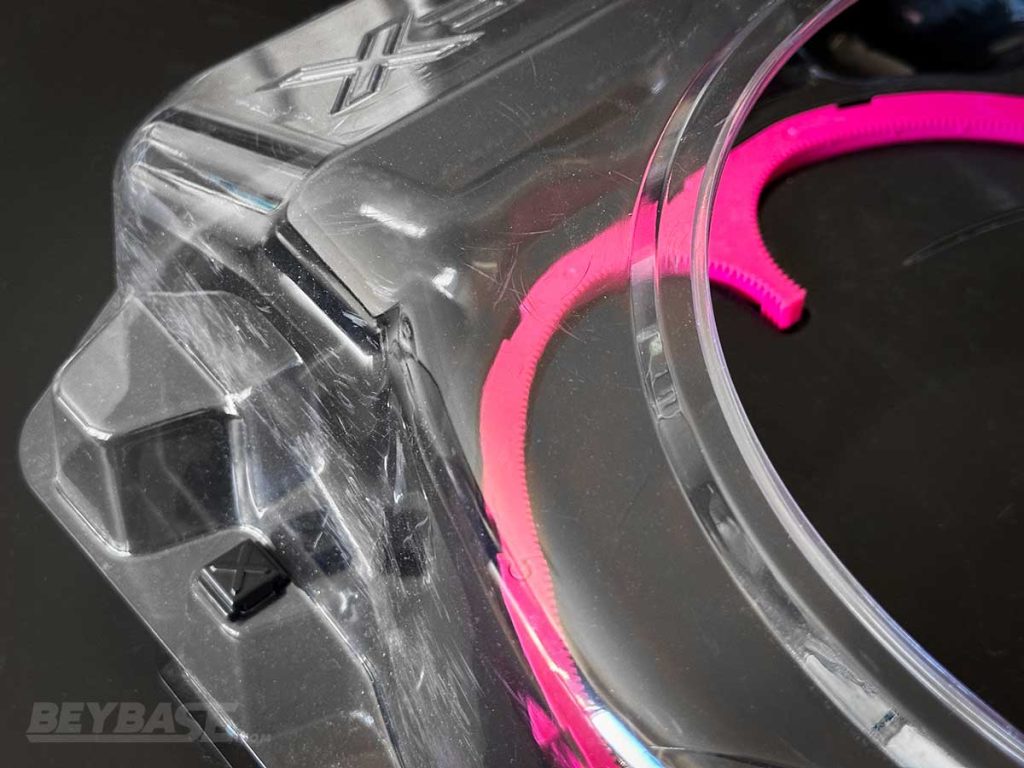
5. Xtreme Line apex gears
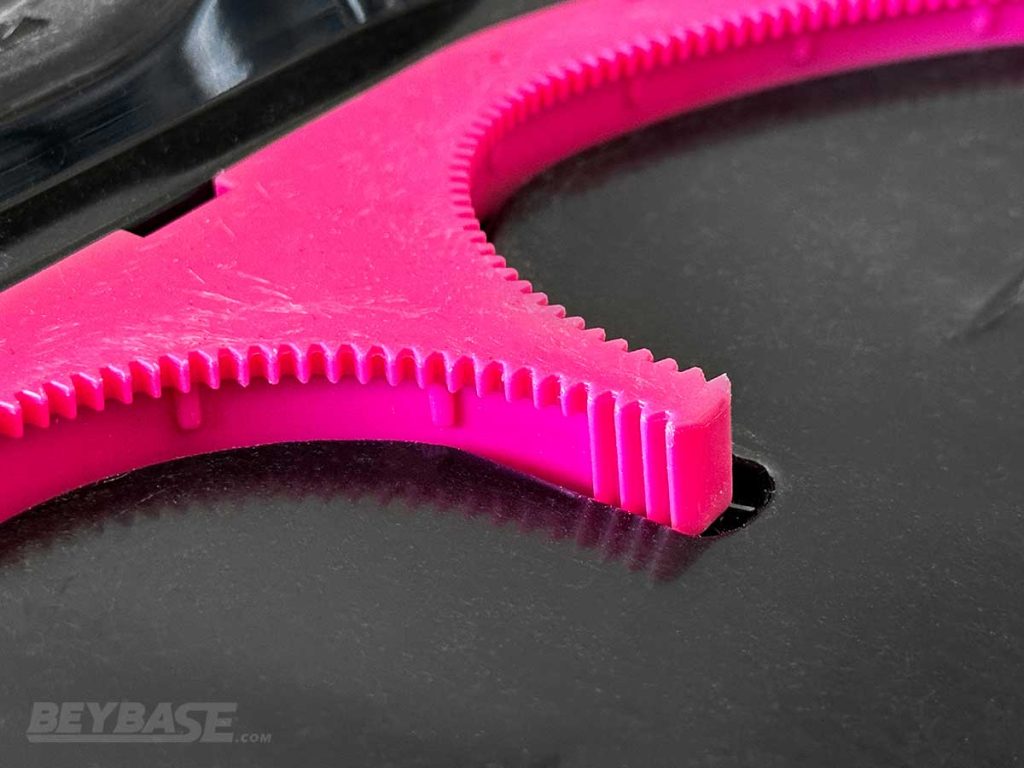
At the apex of each Xtreme Line, the gears extend down to the stadium floor. Before this point, the gears of the Xtreme Line are shorter and raised from the floor.
In contrast, the Xtreme Stadium’s Xtreme Line features the shorter raised gears around its entire perimeter, including the apex of the Xtreme Line.
This change may have been made in order to increase the chances of engagement with the Xtreme Line and acceleration when spinning in this area.
The distance between each side of the Xtreme Line apex is also shorter, meaning Beyblades can hypothetically impact each other even when they are on opposite sides of the Xtreme Line.
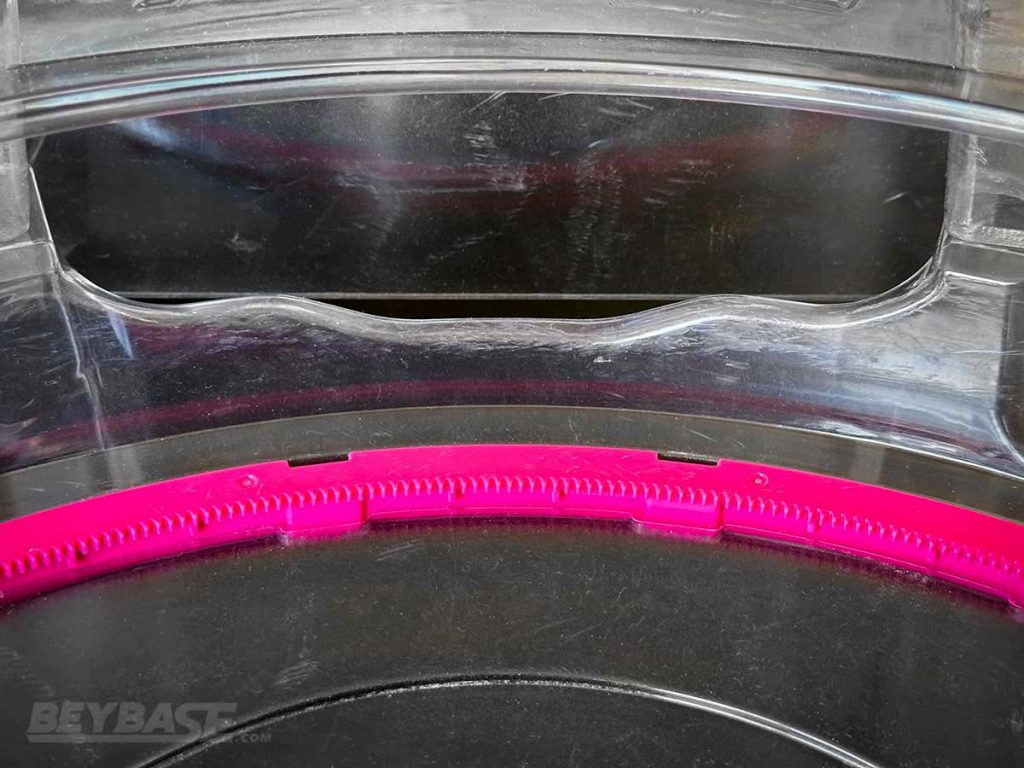
6. Battle Zone perimeter flat area
The perimeter of the Battle Zone features a small flat track before transitioning to the angled bowl shape that leads towards the centre. In this sense, this aspect is reminiscent of stadiums like the Beyblade Burst Dash Stadium.
In contrast, the Xtreme Stadium features a bowl shape throughout, starting from the perimeter down to the centre.
In practice, this makes it easier for Beyblades to “stall” in this area if launched carefully. Depending on the situation and positioning of your opponent’s Beyblade, this can be used to:
- Effectively avoid opponents (especially if they are Xtreme Dashing on the opposite side of the stadium).
- Or, it can leave you exposed to the Xtreme Dash of an opponent on the same side and increase your chances of being knocked out.
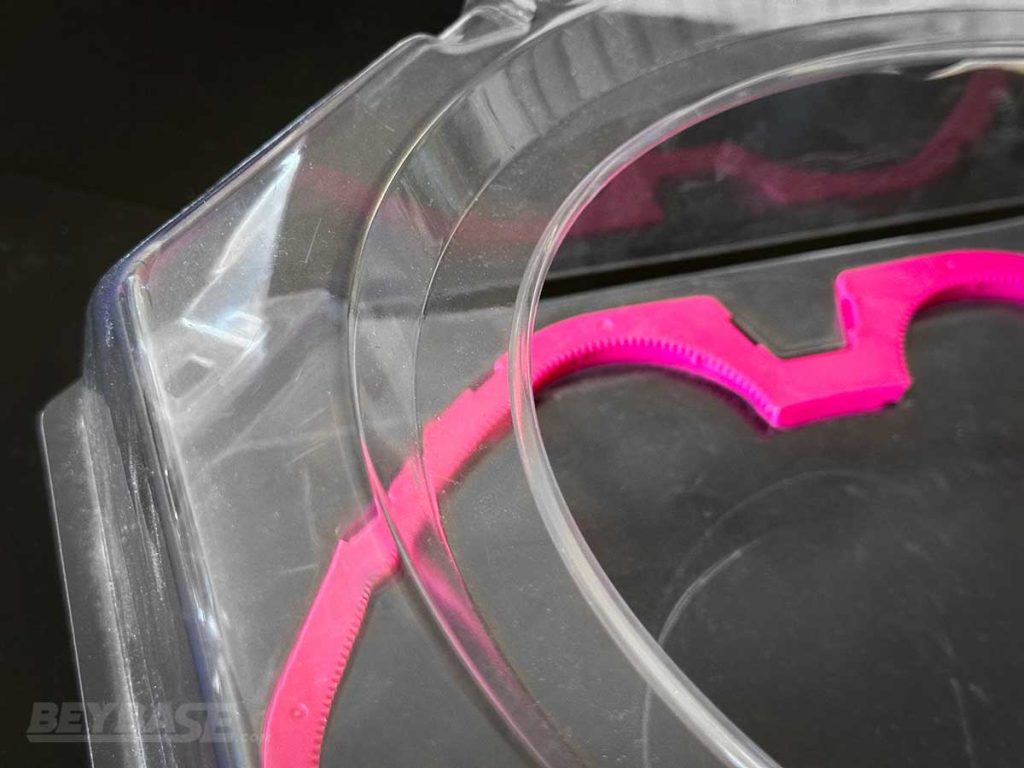
7. Short ridges in the four corners of the Battle Zone

In the four corners of the Battle Zone in front of the Xtreme Line are short ridges.
They slightly assist in preventing Beyblades from hitting the Xtreme Line or entering the Over Zone and can also guide Beyblades back towards the centre or towards the other side of the Battle Zone.
However, because they are relatively short their effectiveness only typically comes into play when the speed of the Beyblade moving towards them or being knocked towards them is slow, controlled, and clean.
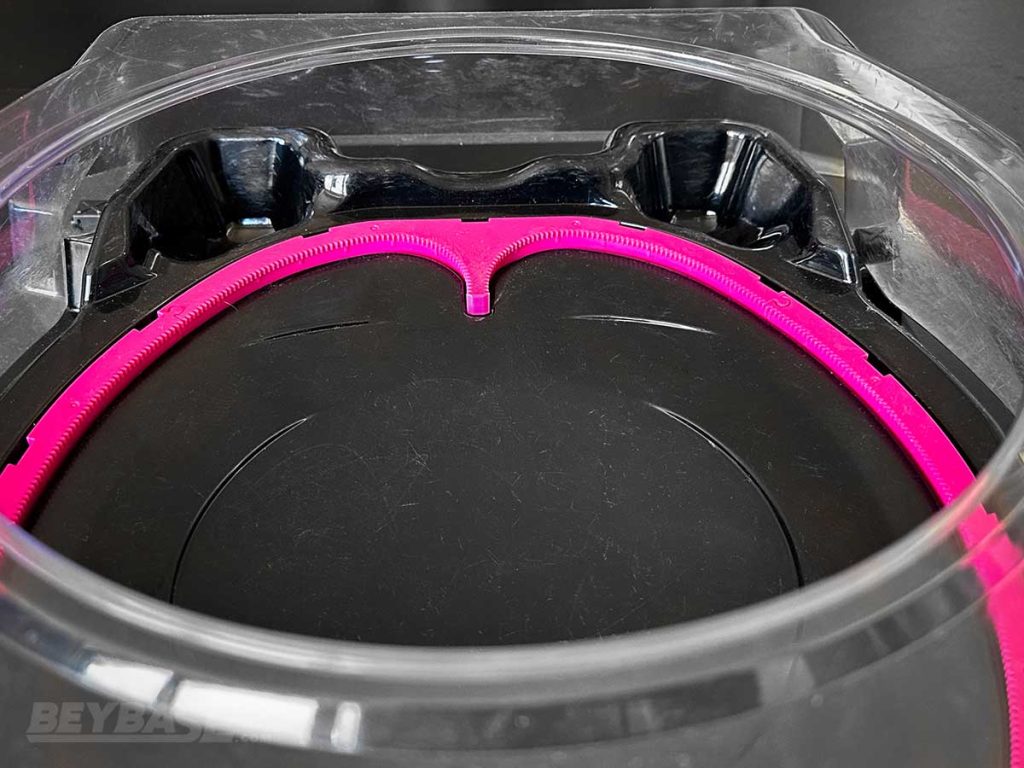
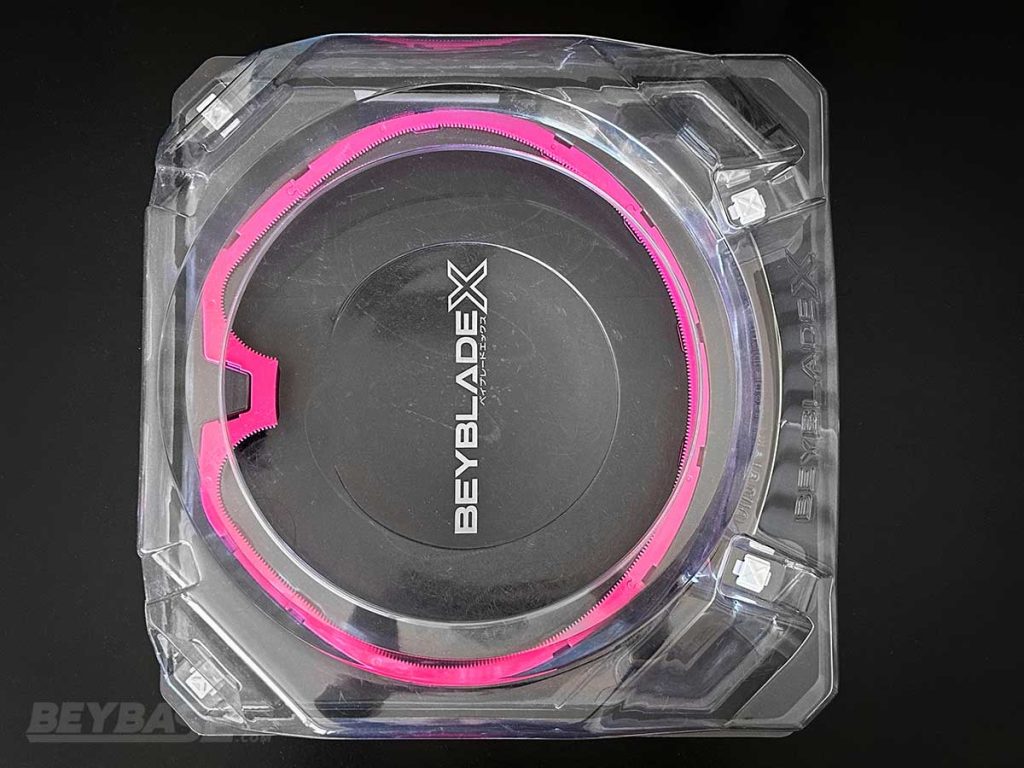
8. Uneven Xtreme Line hole distribution
Unlike the uneven Xtreme Stadium, although the Infinity Stadium appears to be symmetrical, there is a small difference due to the Xtreme Line.
The Xtreme Line features holes distributed around its outer perimeter. However, the number of holes on each side of the Xtreme Line is different: one side has six while the other has seven.
It is not entirely uncommon for Beyblades to become lodged into these holes during battle for a brief or extended period. As such, players may prefer to play on the side which they feel their Beyblade has a lower chance of getting stuck on, based on their launching strategy.
9. Opening between Over Zone and Xtreme Zone
In the Infinity Stadium, it is possible to jump directly between the Over Zone and Xtreme Zone (and vice versa).
The reason is because the holes on the Infinity Stadium’s Stadium Cover that are used to connect it to the Stadium Bottom are all located around its perimeter, away from any of the Xtreme or Over Zones.
On the Xtreme Stadium two of these holes are positioned directly between the Over Zones and the Xtreme Zone. In practice, Beyblades in the Xtreme Stadium often bounce off the narrow walls created by these, which helps them to avoid being knocked out.
In the Infinity Stadium the space above the Over and Xtreme Zones is completely open due to the lack of interruptions by these connecting holes. This makes it easier for Beyblades to be knocked out and even jump directly between the two zones at times.
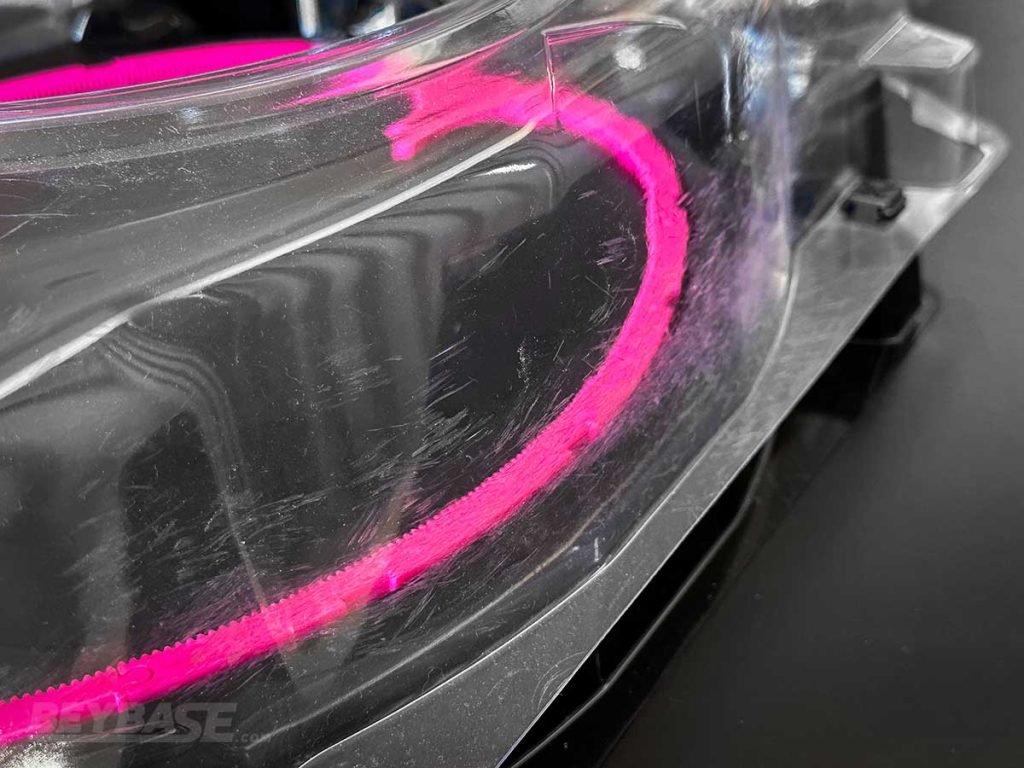
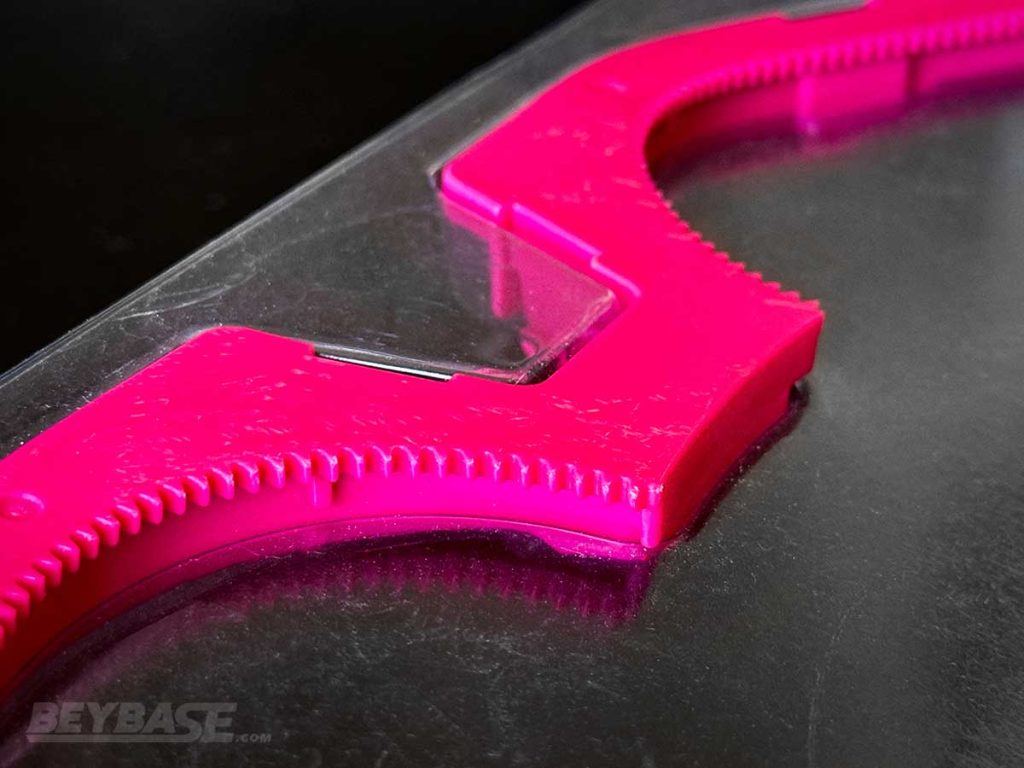
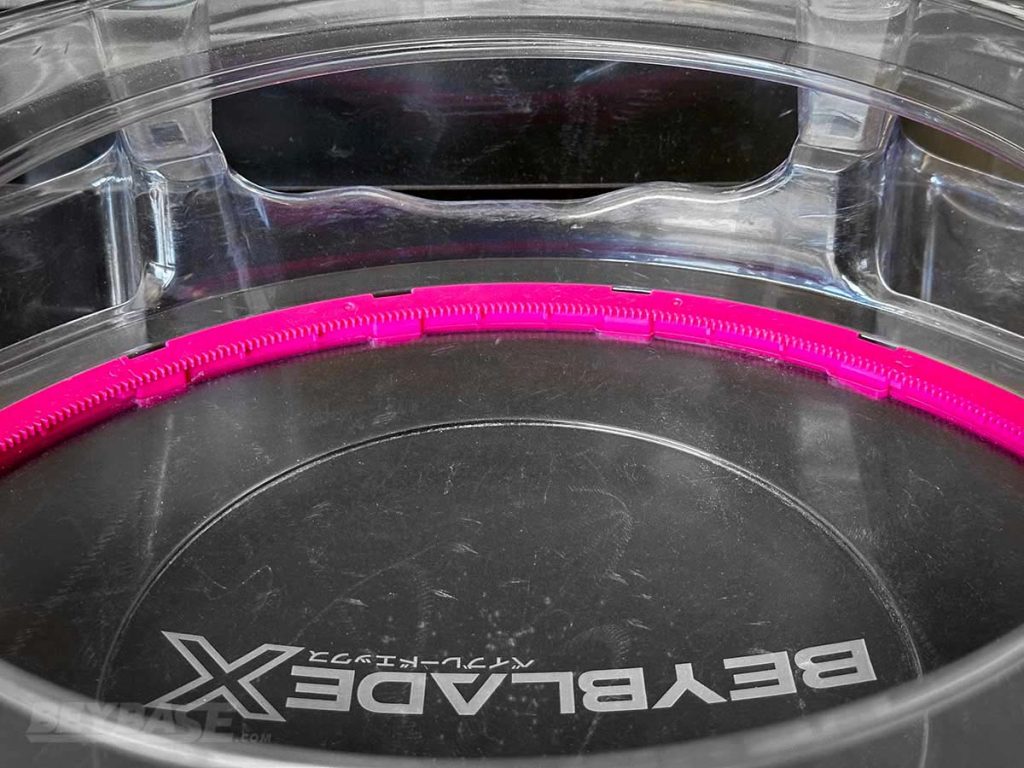
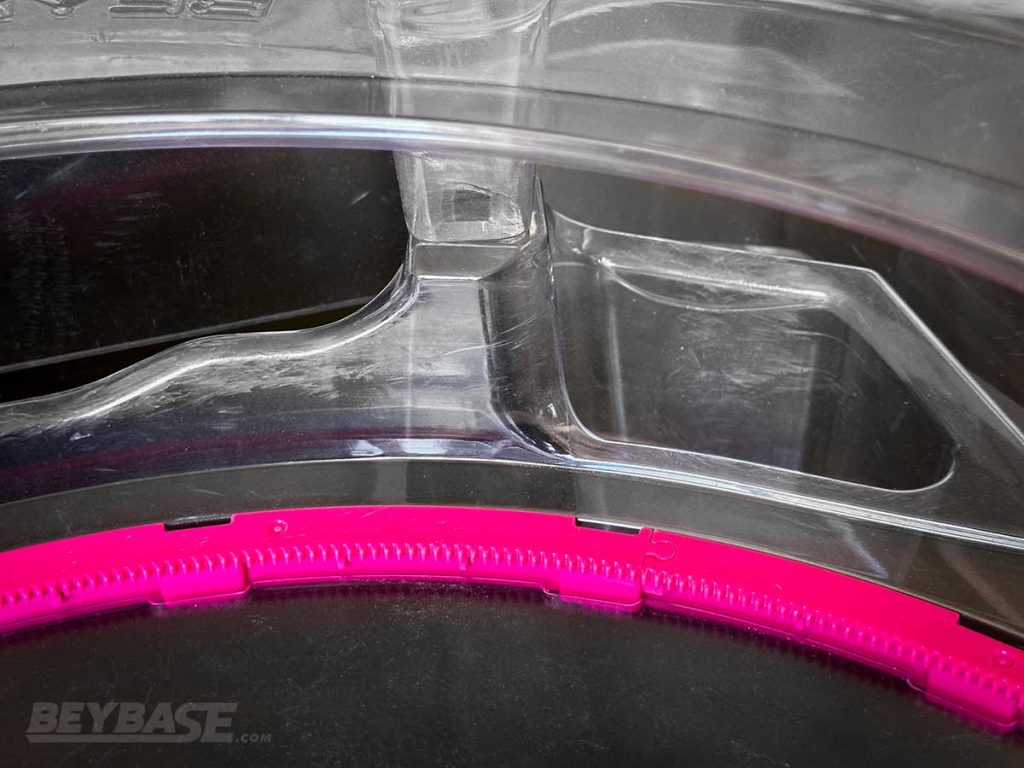
10. Gap between Stadium Bottom and Xtreme Line


Between the primary piece of the Stadium Bottom that has the stadium floor, Over Zones, and Xtreme Zones and the Xtreme Line which is attached to it, there are gaps which are big enough for Bits to get stuck.
Although this does occur to a smaller degree on the Xtreme Stadium, it is much more prominent on the Infinity Stadium and often impacts gameplay.
Is the Infinity Stadium a good stadium?
Yes, it is a good stadium. But before we can elaborate on what that means, we have to look at the stadium which started it all: the Xtreme Stadium.
With the introduction of the original Xtreme Stadium, the Xtreme Dash gimmick became the core selling point for the Beyblade X series. It helped to produce exhilarating battles as Takara-Tomy intended, increasing the ease of use and power of attack types.
In many ways, it can be seen as an evolution of many different concepts expressed through stadiums released during the Beyblade Burst series.
The emergent strategies of the Xtreme Stadium
Over time, strategies emerged in the competitive environment that aimed to avoid or reduce the effect of the Xtreme Line.
For example, the “Reverse Xtreme Dash”, as it has become colloquially known, is one such strategy. Or, the concept of “receiving” attacks by aiming to be hit on the “face” or top of the Blade towards the side of the Xtreme Stadium with no Over Zones or Xtreme Zone.
Strategies like these added great depth to the game. But they also simultaneously attempt to nullify the core selling point of the series.
We can only speculate as to exactly how the Beyblade X development team feels about this. That being said, the fact that they went so far as to ban the Wizard Rod Blade between April and October 2025 for a period and have now also introduced the Infinity Stadium and mandated its use for official tournaments between October 2025 and January 2026 gives us a clue.
The ‘course correcting’ Infinity Stadium
All in all, the level of care put into the design of the Infinity Stadium is clear. When comparing it to the Xtreme Stadium you can see how many details were adjusted. And there is no doubt that it is successful in doing what it has been designed to do. Attack type Beyblades feel powerful.
The Infinity Stadium literally doubles down on the Xtreme Dash gimmick and has many other design tweaks that push it in this direction. This has made it clear that the intended direction Takara-Tomy wants the game to lean is towards the types of exhilarating battles produced when the Xtreme Line is “properly” used.
In a way, when you look at this stadium it feels like they might have been trying to course correct Beyblade X’s trajectory competitively. From a certain perspective it can be argued that the banning of the Wizard Rod Blade and introduction of this stadium represent an effort by Takara Tomy to steer the public towards the type of exciting gameplay they want to see from Beyblade X.
Whether this is a problem or not is a matter of perspective. As a secondary stadium option, it is not a problem.
But if it is intended to be the “second standard stadium”, for some players, that may be problematic. The reason is because the Infinity Stadium leans so heavily towards attack bias to the point that stamina and defense-based strategies are heavily smothered.
If they intend to make other stadiums which have a bias towards stamina and/or defense, there is no issue. Or maybe they have come to view the standard Xtreme Stadium as having an unintended bias towards stamina/defense, which in a way it does.
The Xtreme Stadium feels closer to offering a “neutral” environment which promotes more skill-based methods of play, allowing players to express themselves. There are skill-based elements to the Infinity Stadium, but it seems to rely more on the luck of positioning, timing, and reversing than the Xtreme Stadium. The balance between skill and luck is just a little bit off.
For high level competitive players, this might feel slightly unsatisfying. I don’t believe the Beyblade X competitive environment prior to the release of the Infinity Stadium had reached a point anywhere close to where it would justify the development of a “solution” like this.
Even without the Infinity Stadium and in spite of the strategies developed by players, attack types were still very much viable in competitive play.
The problem, if there was one, may have been the 1on1 Match Type. The qualifying rounds of the 2024 X-TREME CUP GP G1 tournaments in Japan were dominated by Wizard Rod. But if you look at the 3on3 Match Type, across many high level events there was a clear variety of combinations on display.
Considering this, the Infinity Stadium feels less like a response to a genuine competitive need and more of a product and marketing play.
Takara Tomy previously released the Double Xtreme Stadium and Wide Xtreme Stadium, which felt the same way. Both of them ultimately saw very little fanfare and play in tournaments. But in comparison to these two stadiums, the Infinity Stadium is nevertheless much closer to being fundamentally sound and viable competitively.
Innovation combats stagnation
Beyblade X is over two years old now.
While competitive players might not have had any particularly strong desire for a new competitive playing environment, the Infinity Stadium ultimately has succeeded in creating an innovative, fresh take on the already revolutionary standard Xtreme Stadium. It levels the playing field between veterans and newcomers, so to speak.
As long as the Xtreme Stadium is not completely left behind by Takara Tomy’s official event support, there is absolutely room for more than one ‘standard’ stadium in the Beyblade X metagame moving forward. It’s been done before in previous generations.
As much as competitive players might not like to hear it, their needs aren’t what should be the only driving force behind the development of the series. There needs to be a balance between products and initiatives which appease them and those which appease and attract newcomers.
If Beyblade X is going to continue attracting new players and maintain its momentum over time, innovations like this are necessary. Especially those which help to express the type of unique excitement that has made Beyblade X attractive to so many people, both new and old.
Changelog
December 2025
- This Infinity Stadium Player’s Guide was originally published in December 2025. It may be updated over time as new products are released or new strategies are discovered. The latest major changes will be noted in this changelog.
Or become a BeyBase HQ member to get early article access and behind-the-scenes updates. Thank you!