Affiliate Disclosure: If you buy something through some of the links on this post, you won’t pay any extra, but we’ll get a small commission. This helps us keep things running. Thanks for your support!
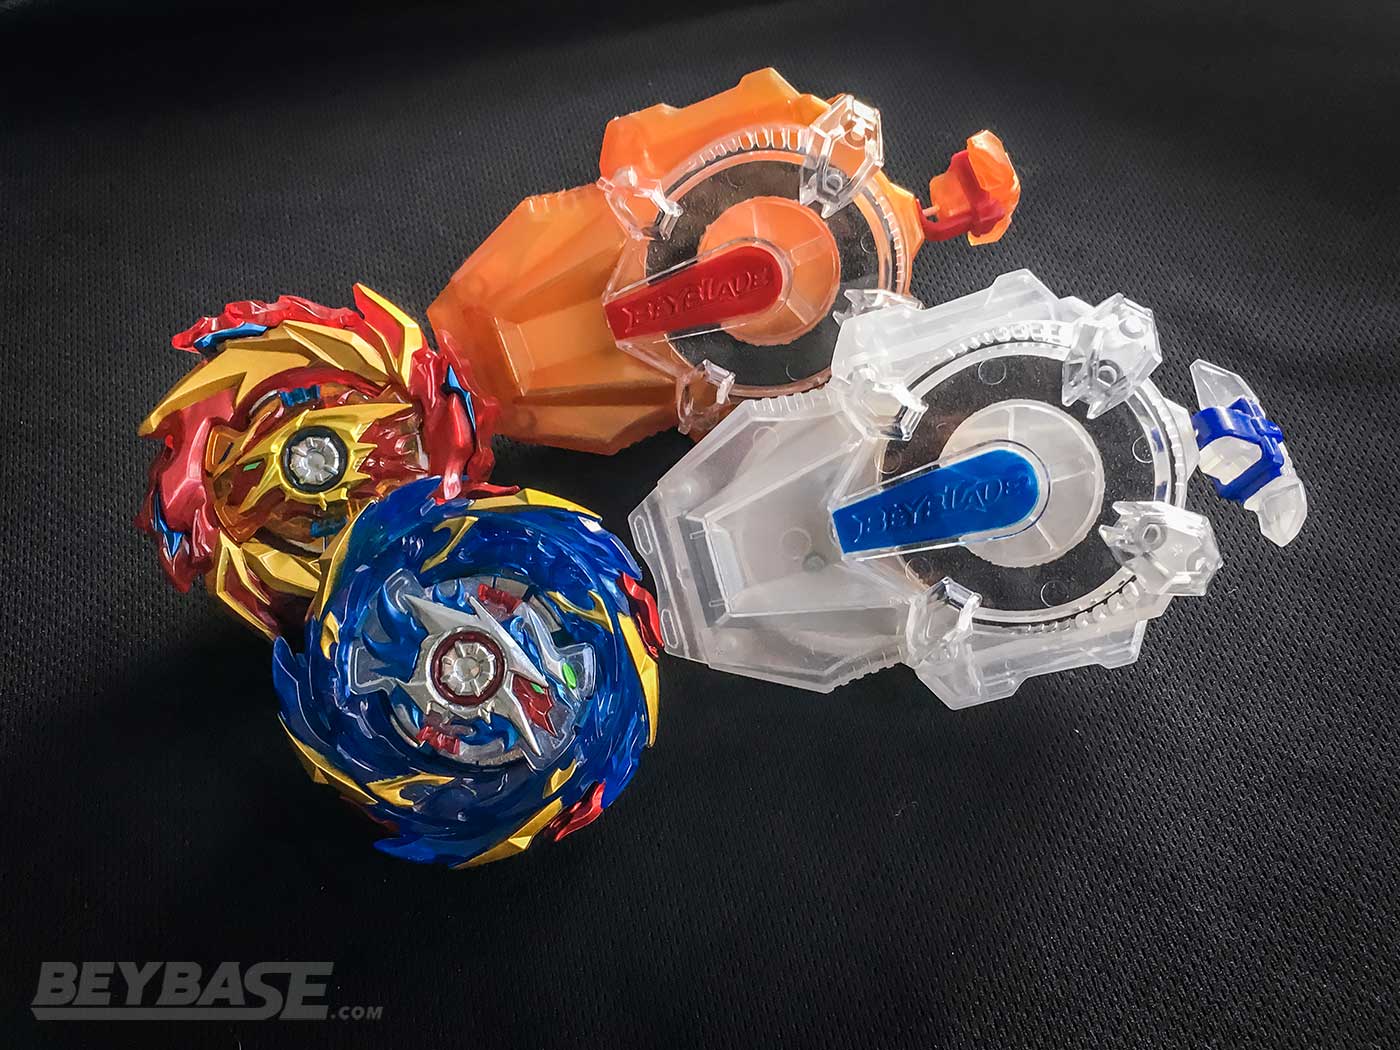
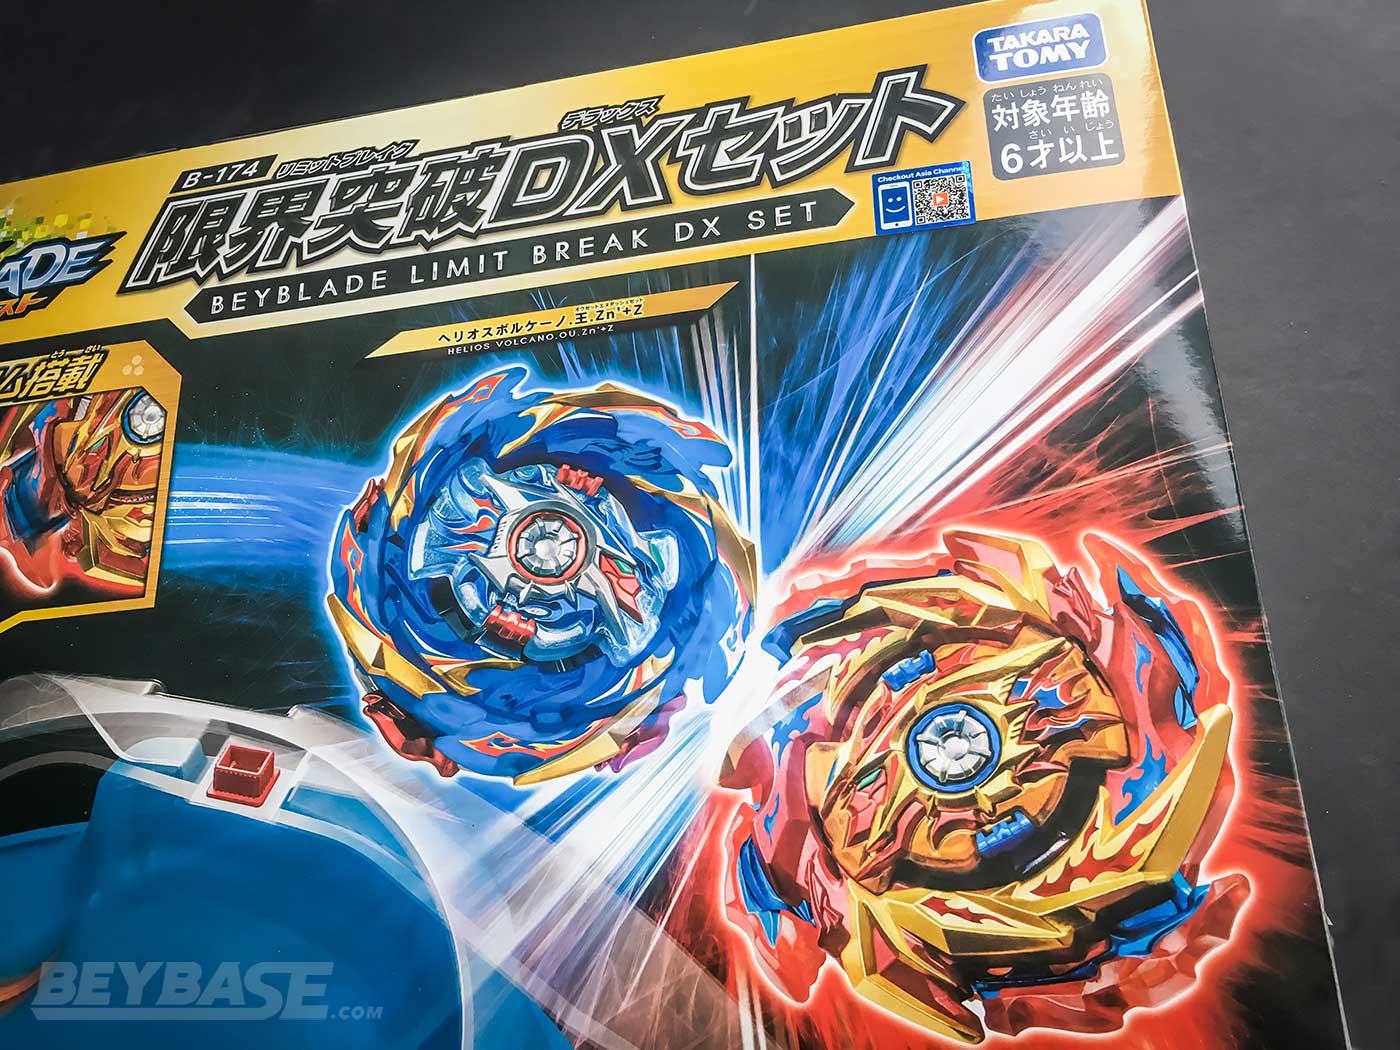
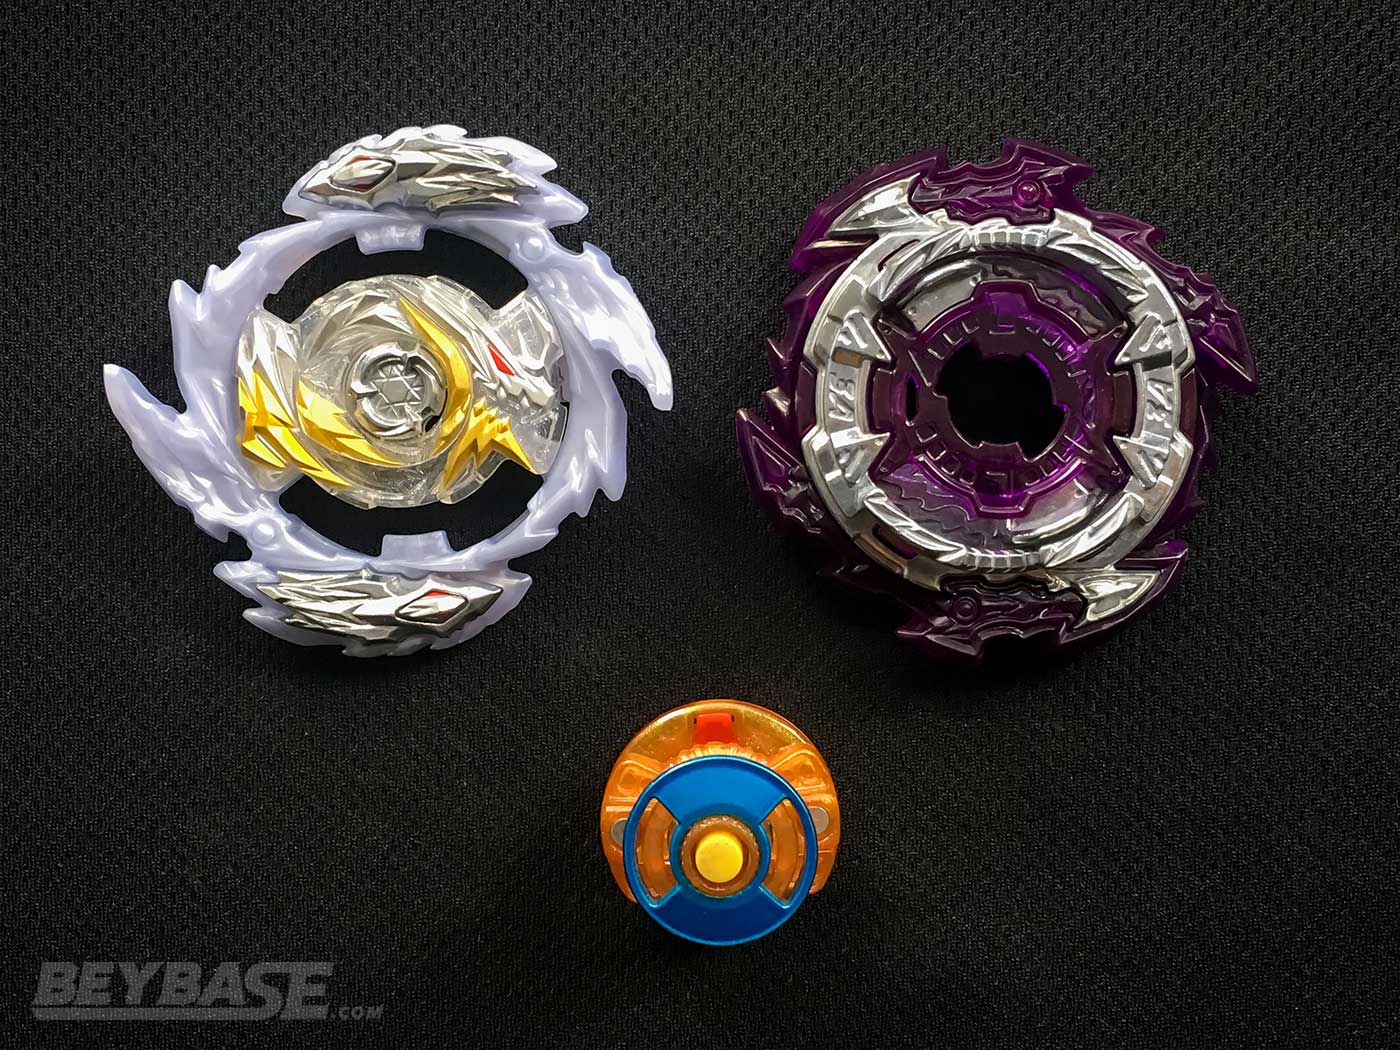
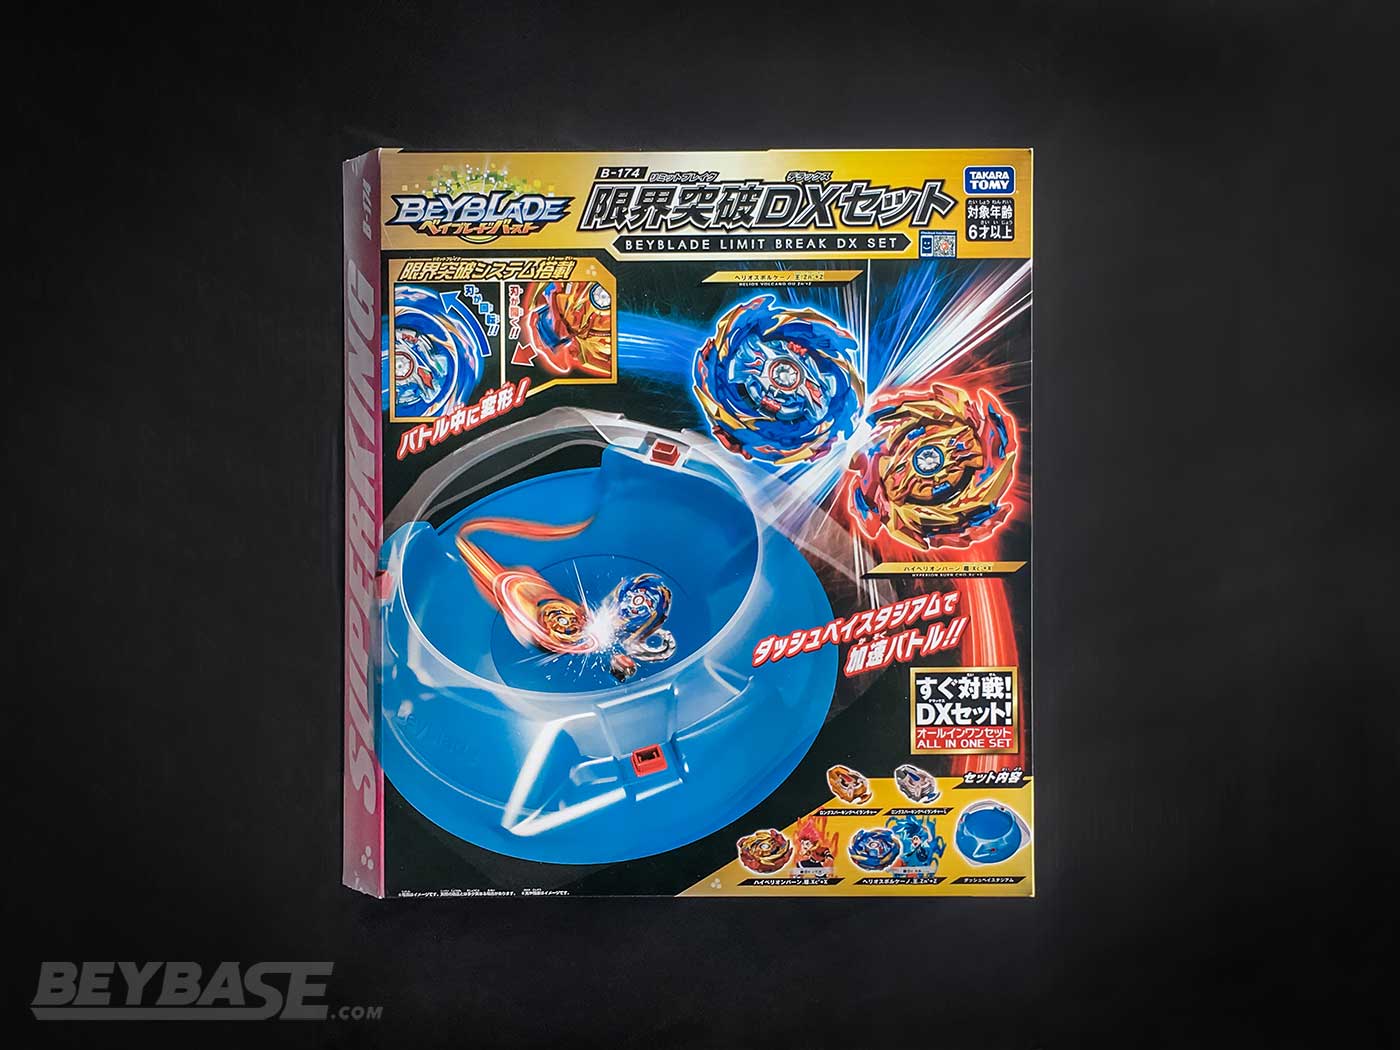
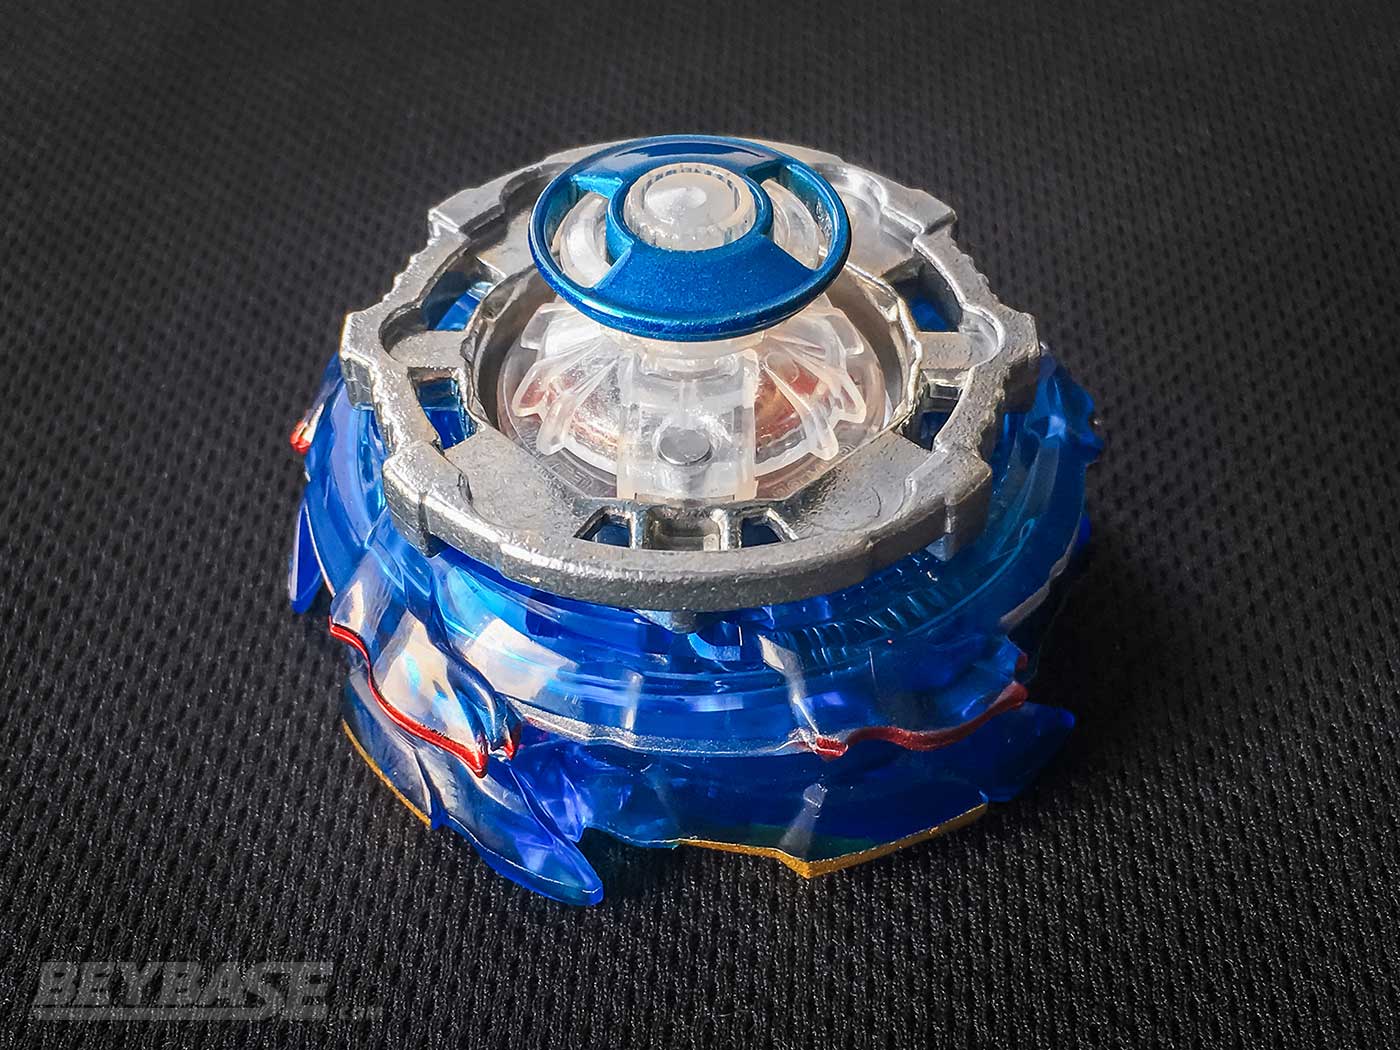
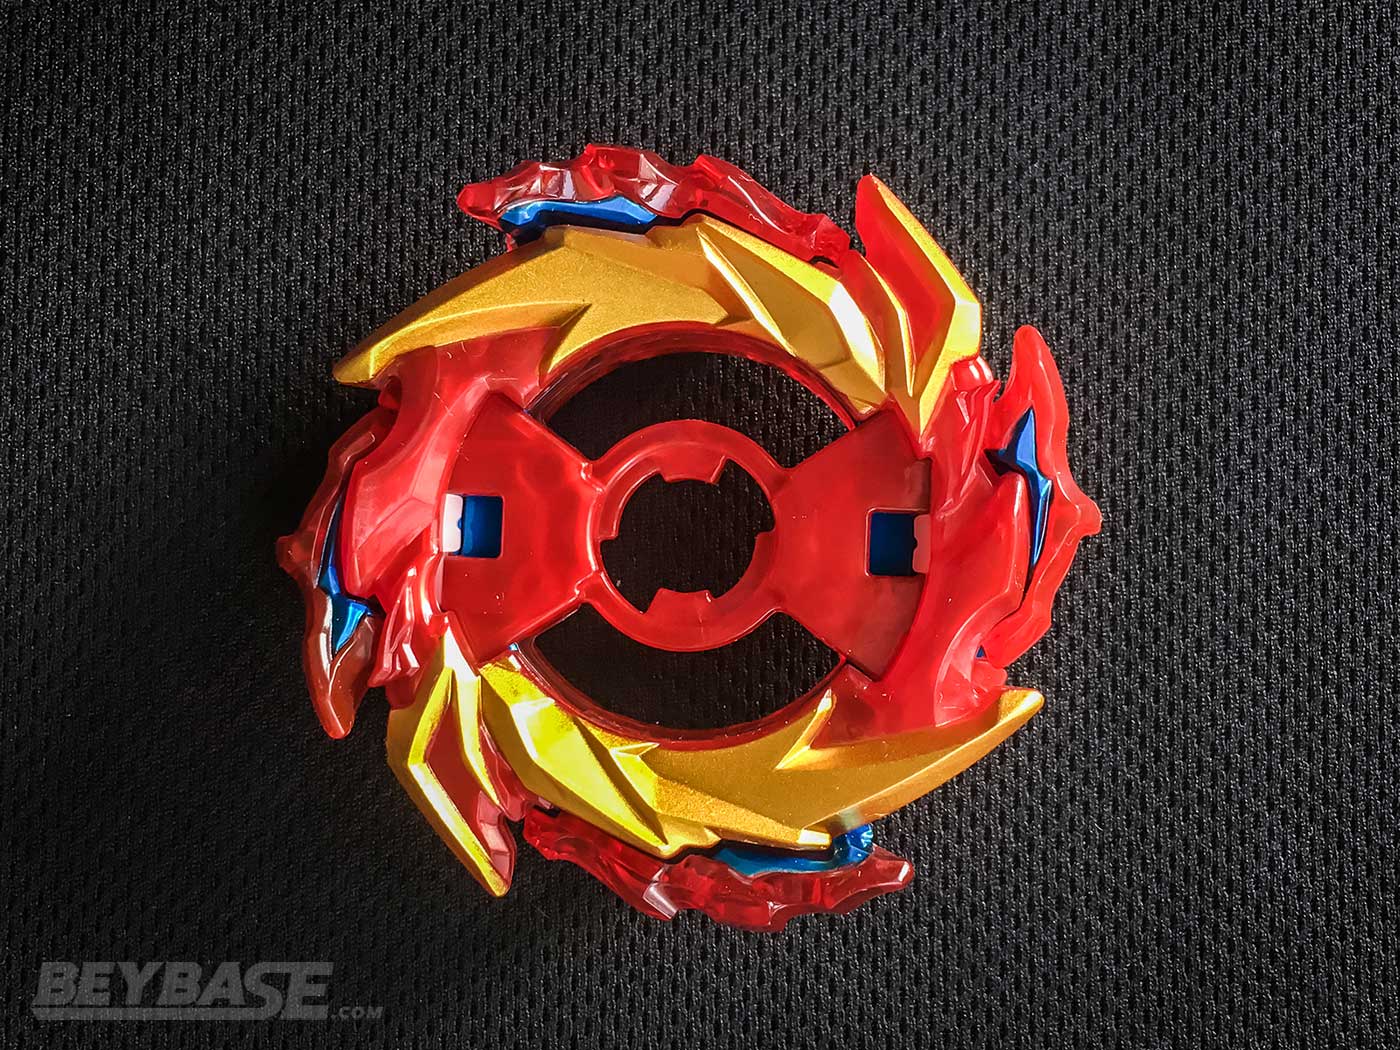
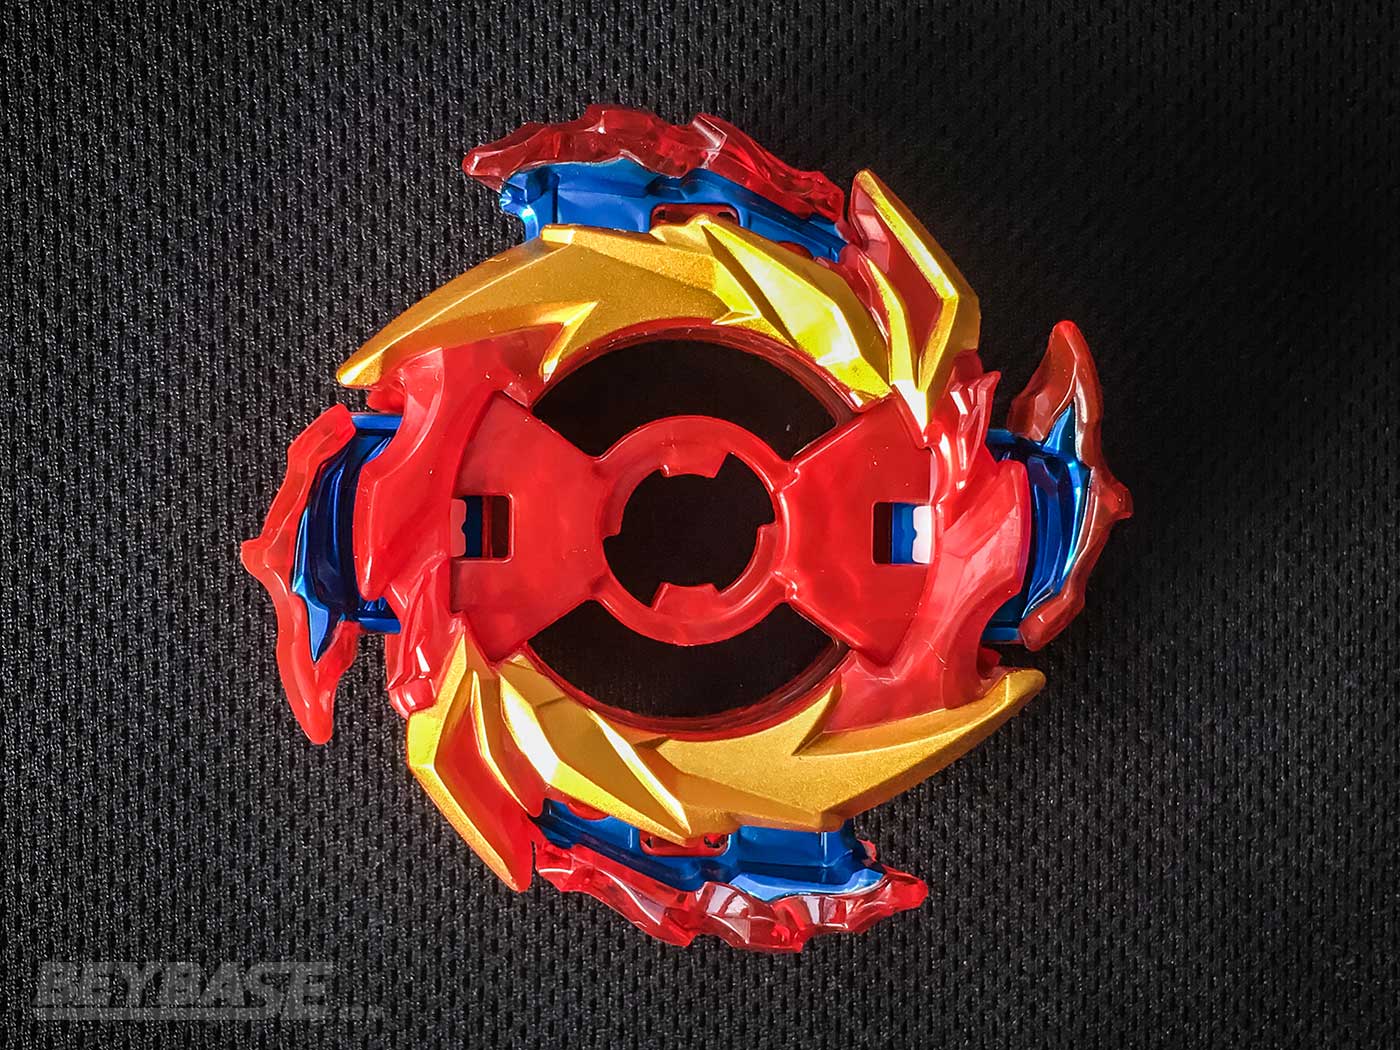
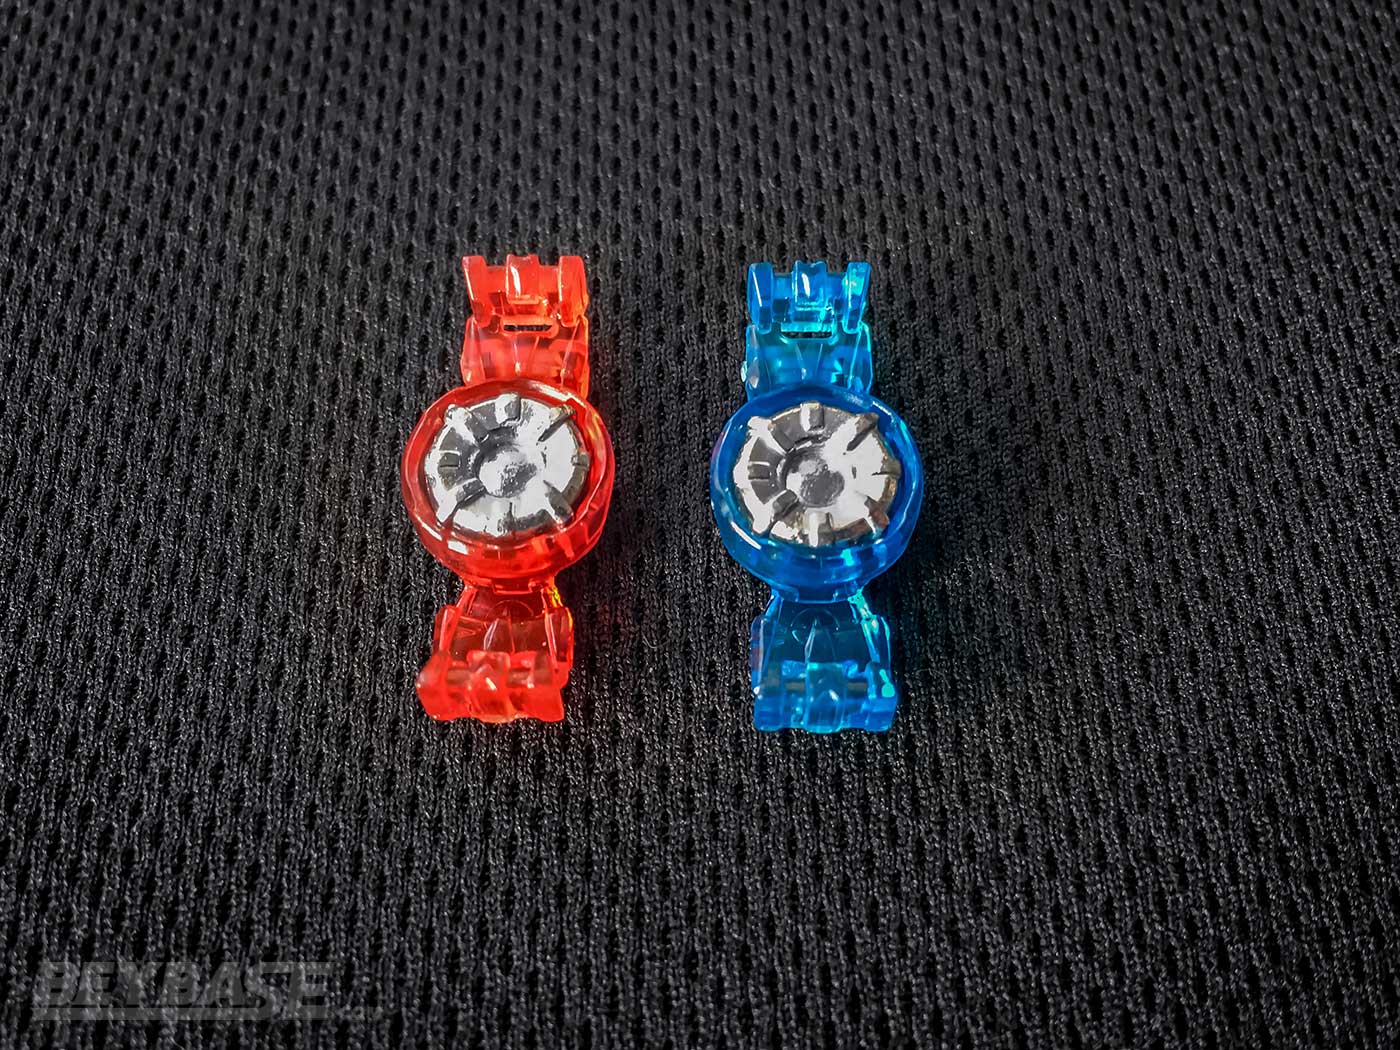
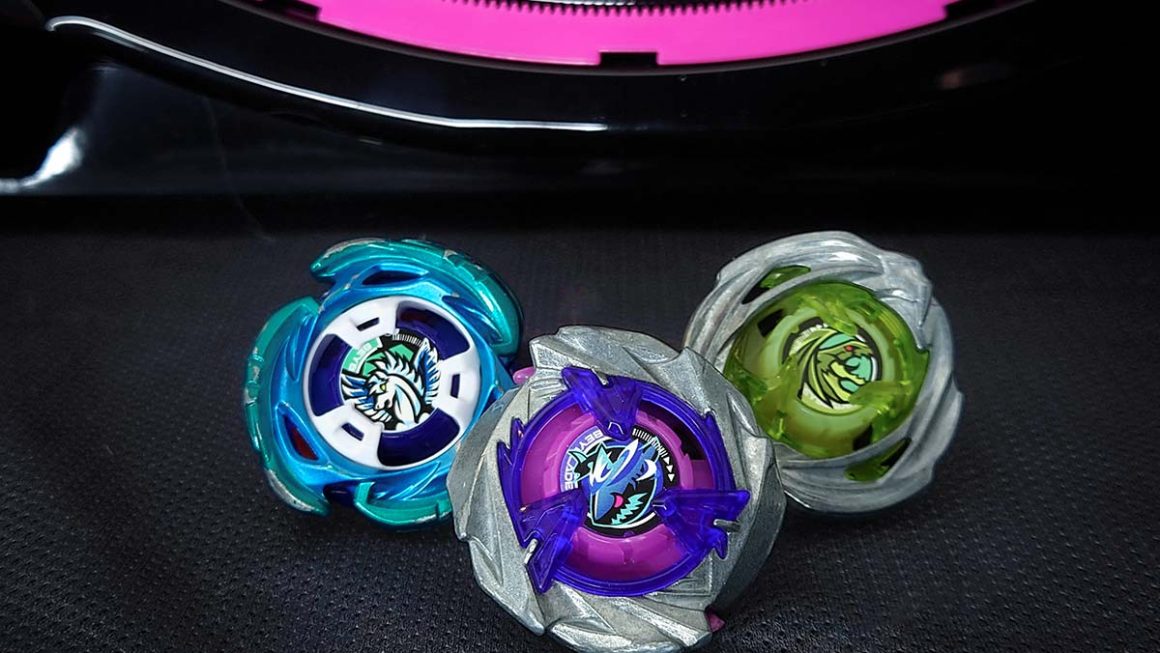
The B-174 Beyblade Limit Break DX Set by Takara-Tomy has practically everything you need to begin playing Beyblade Burst with the two included Beyblades, two launchers, and stadium.
It will even allow you to perform at a relatively high level competitively too thanks to the power of Helios Volcano Ou Zone’+Z as a stock combo.
As a series, Beyblade Burst is well into its fifth year now. With this set, it shows no signs of slowing down.
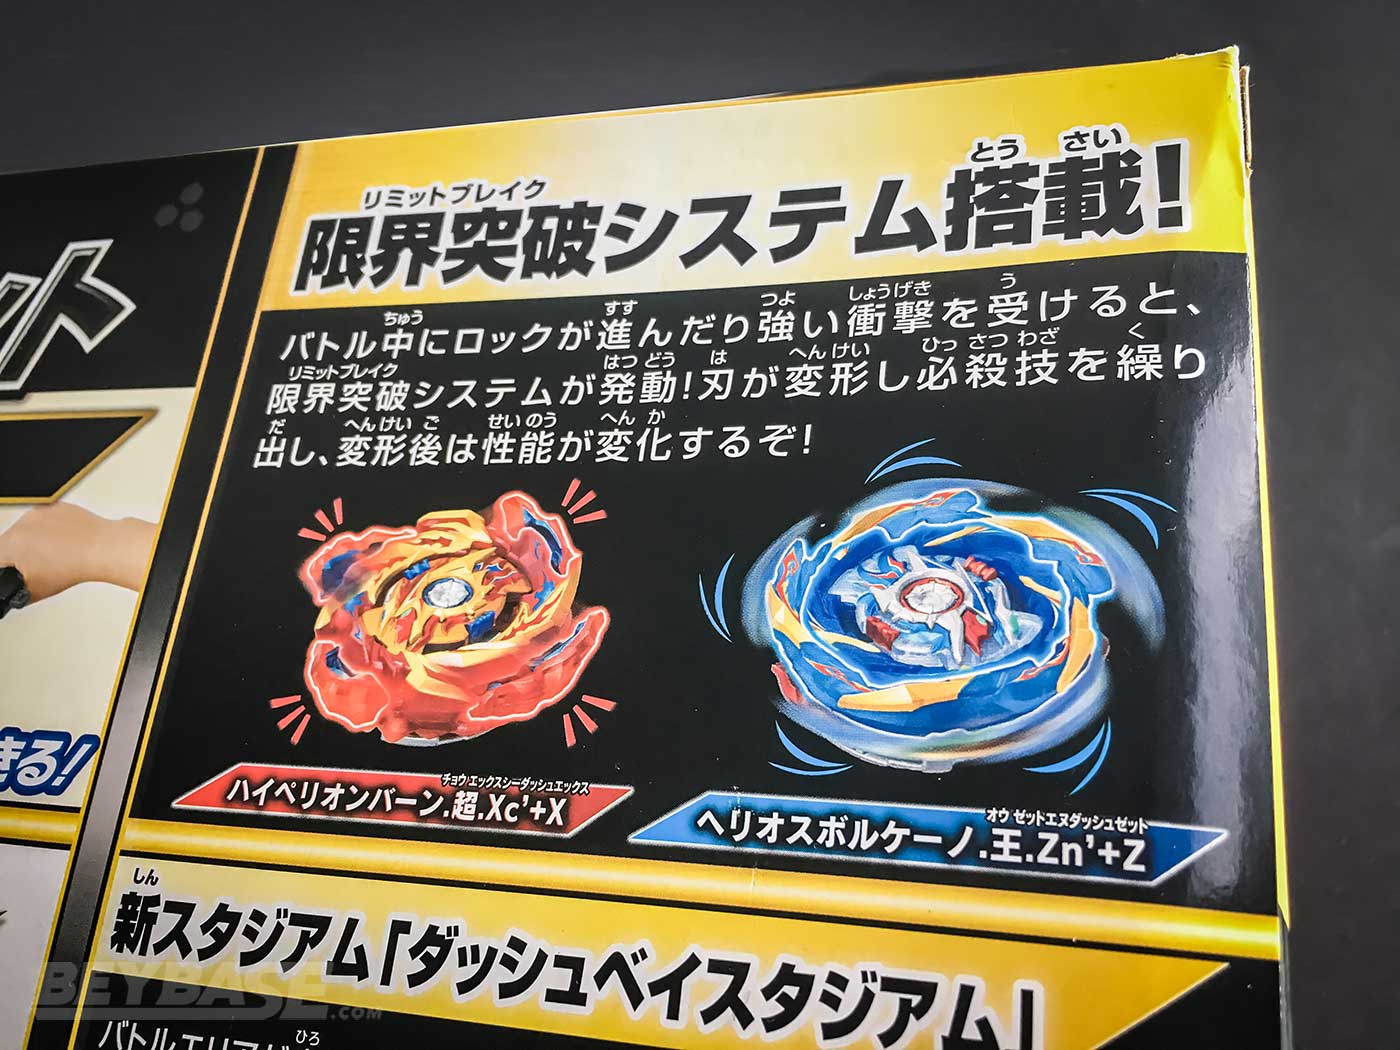
The name “limit break” is actually quite apt. Not only because of the inventive gimmicks built into the included Burn and Volcano Rings, but because Takara-Tomy has continued to push the series limits with each new release.
And this time, it’s with not only the Beyblades themselves, but with the environment they play in: the new Dash BeyStadium!
But are they pushing it in the right direction?
Read on to find out the top five things you need to know about this new release!
Product Details
- Brand: TAKARA-TOMY
- Product Code: B-174
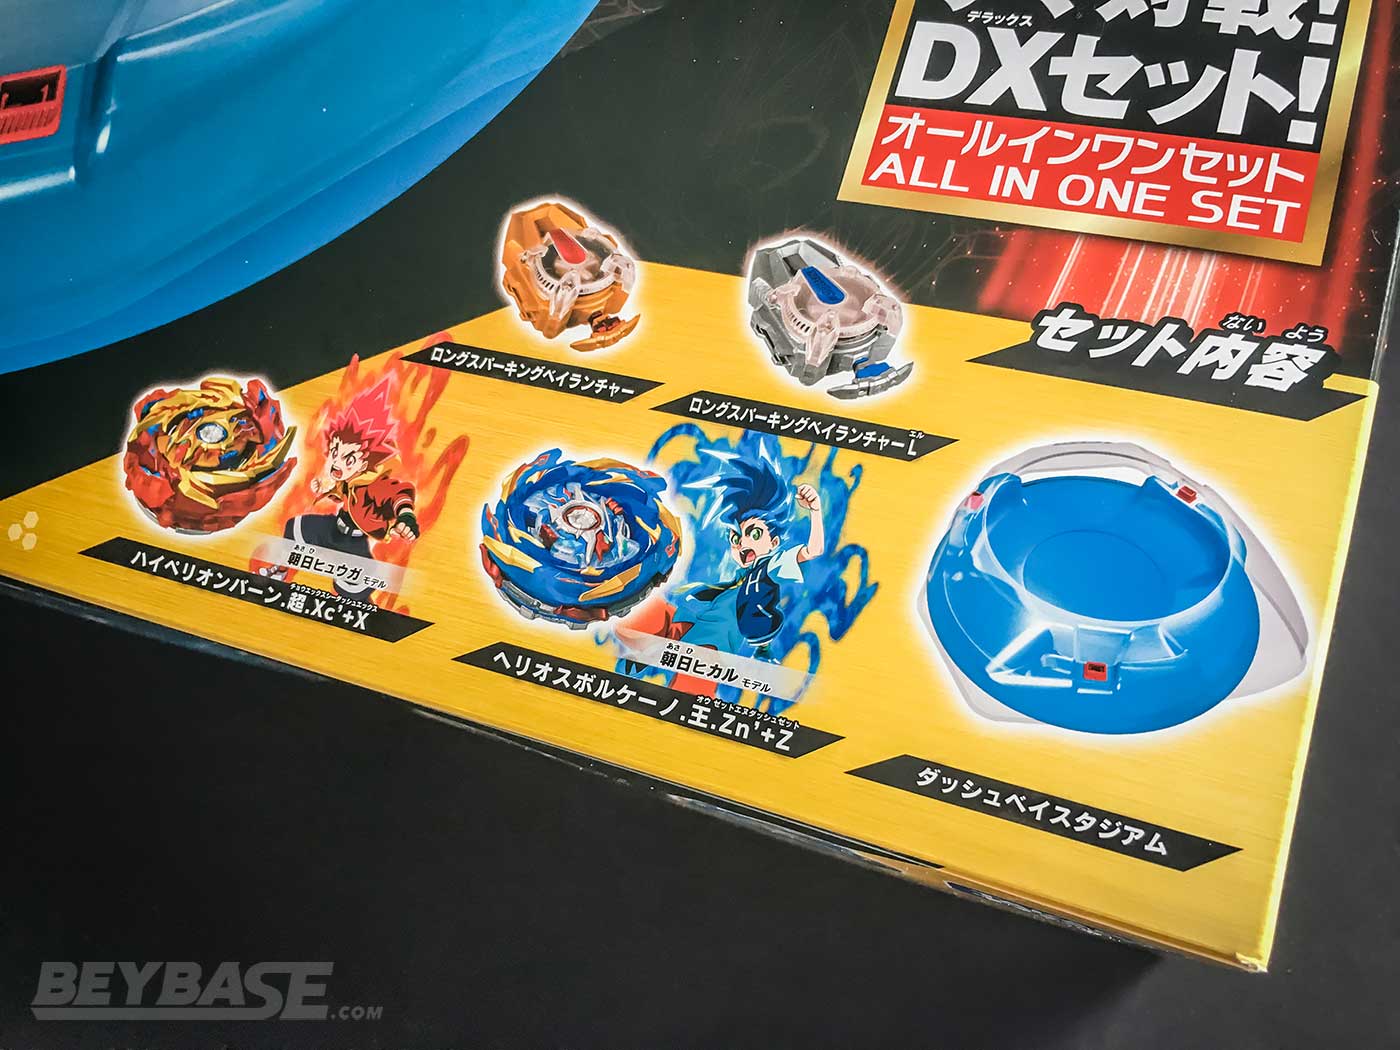
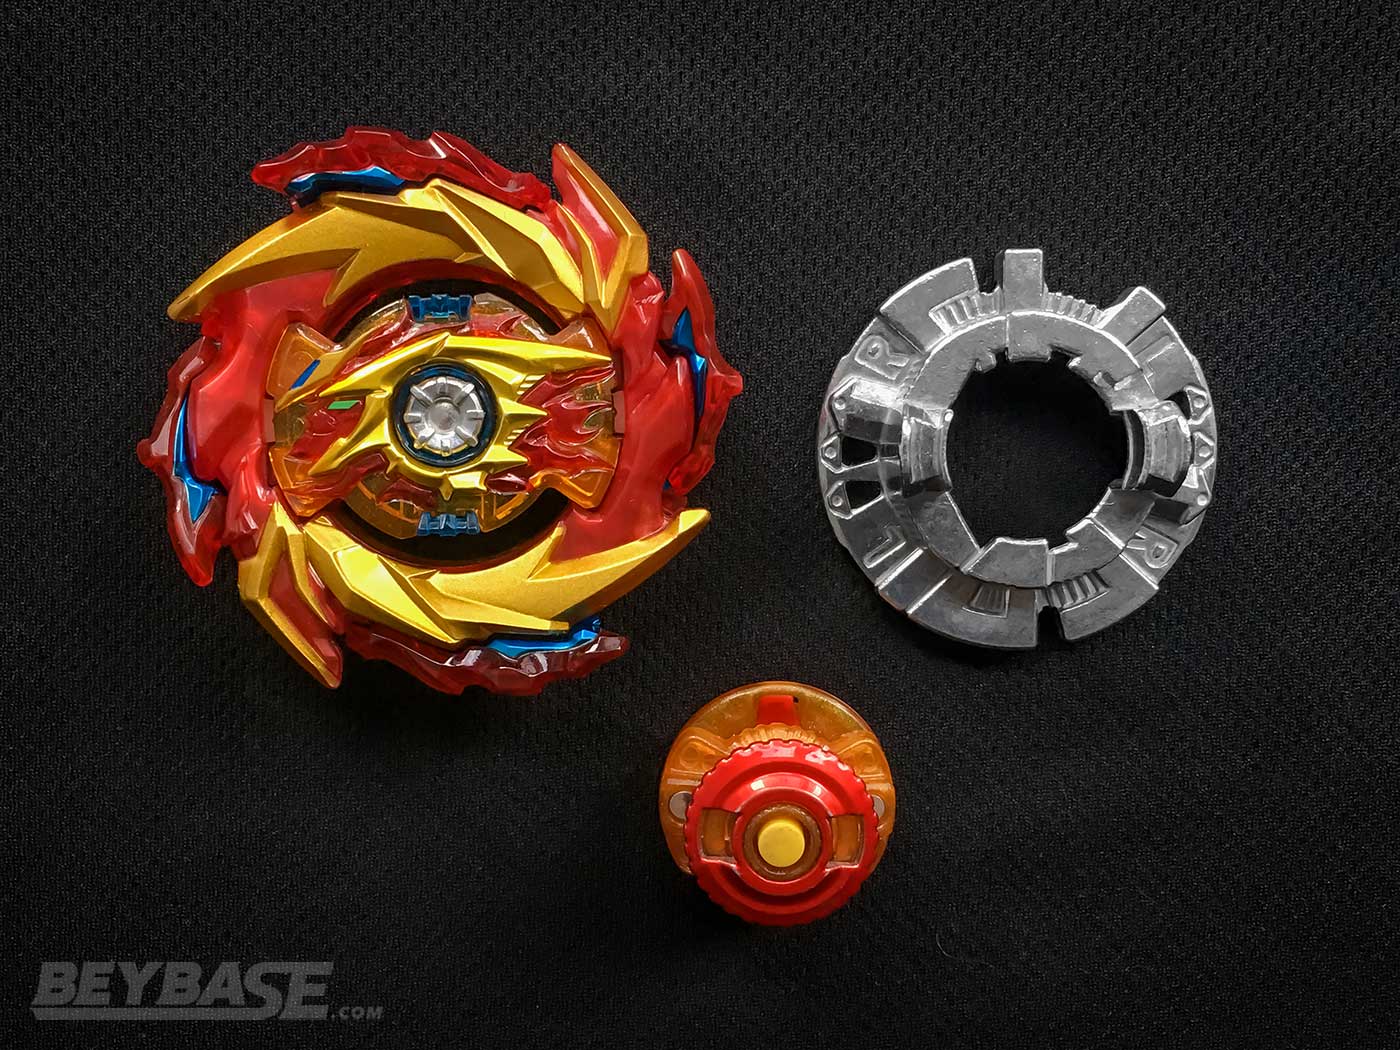
- Product Contents:
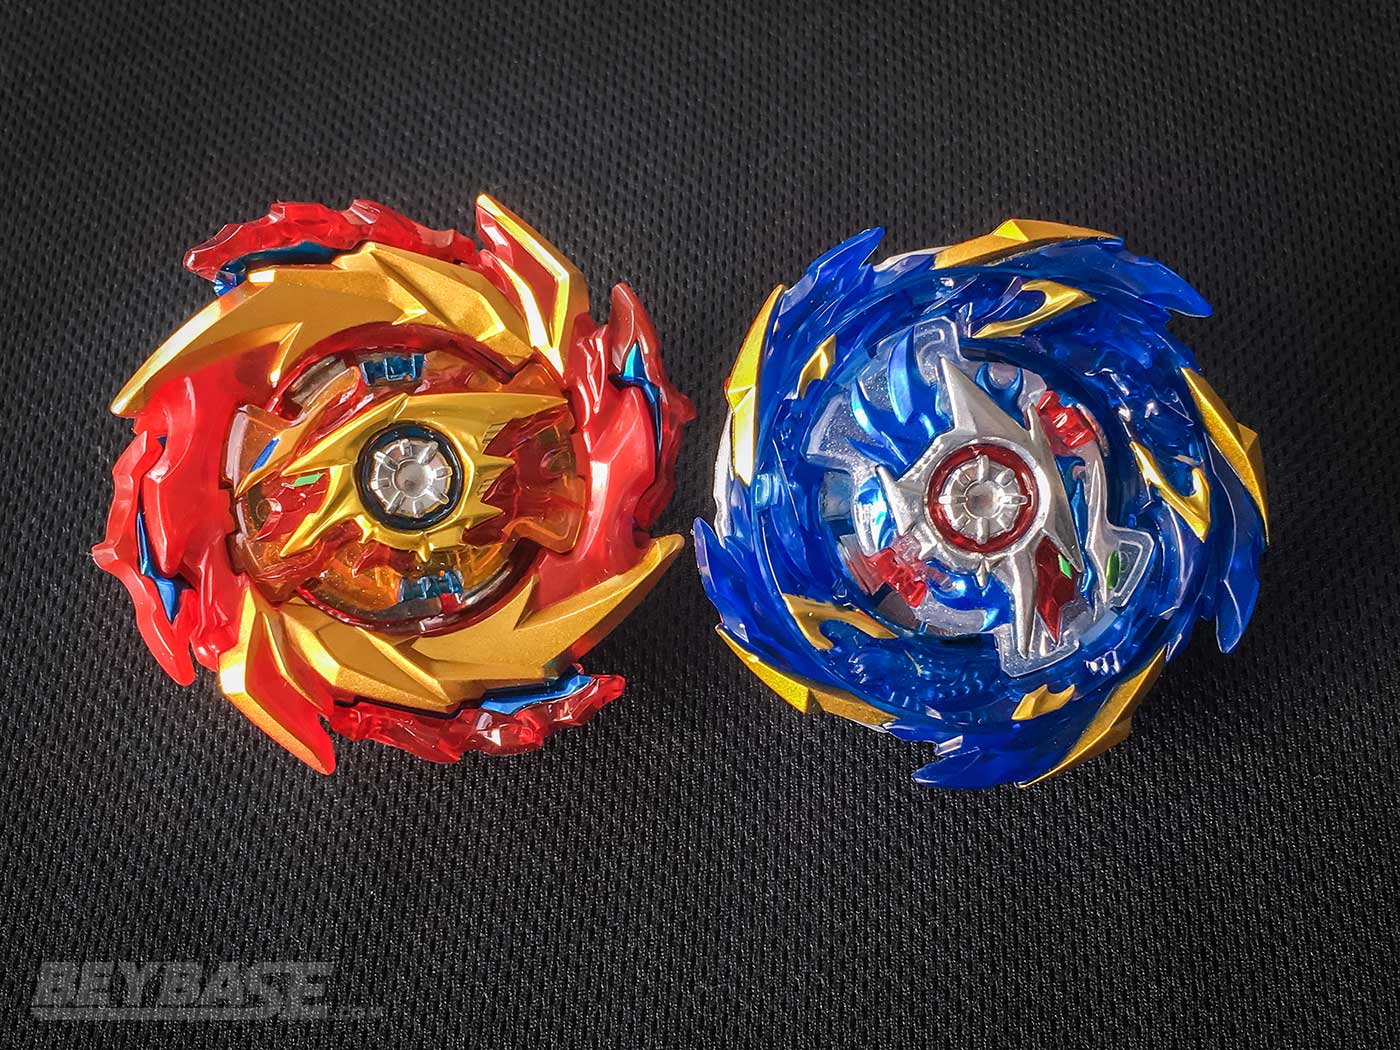
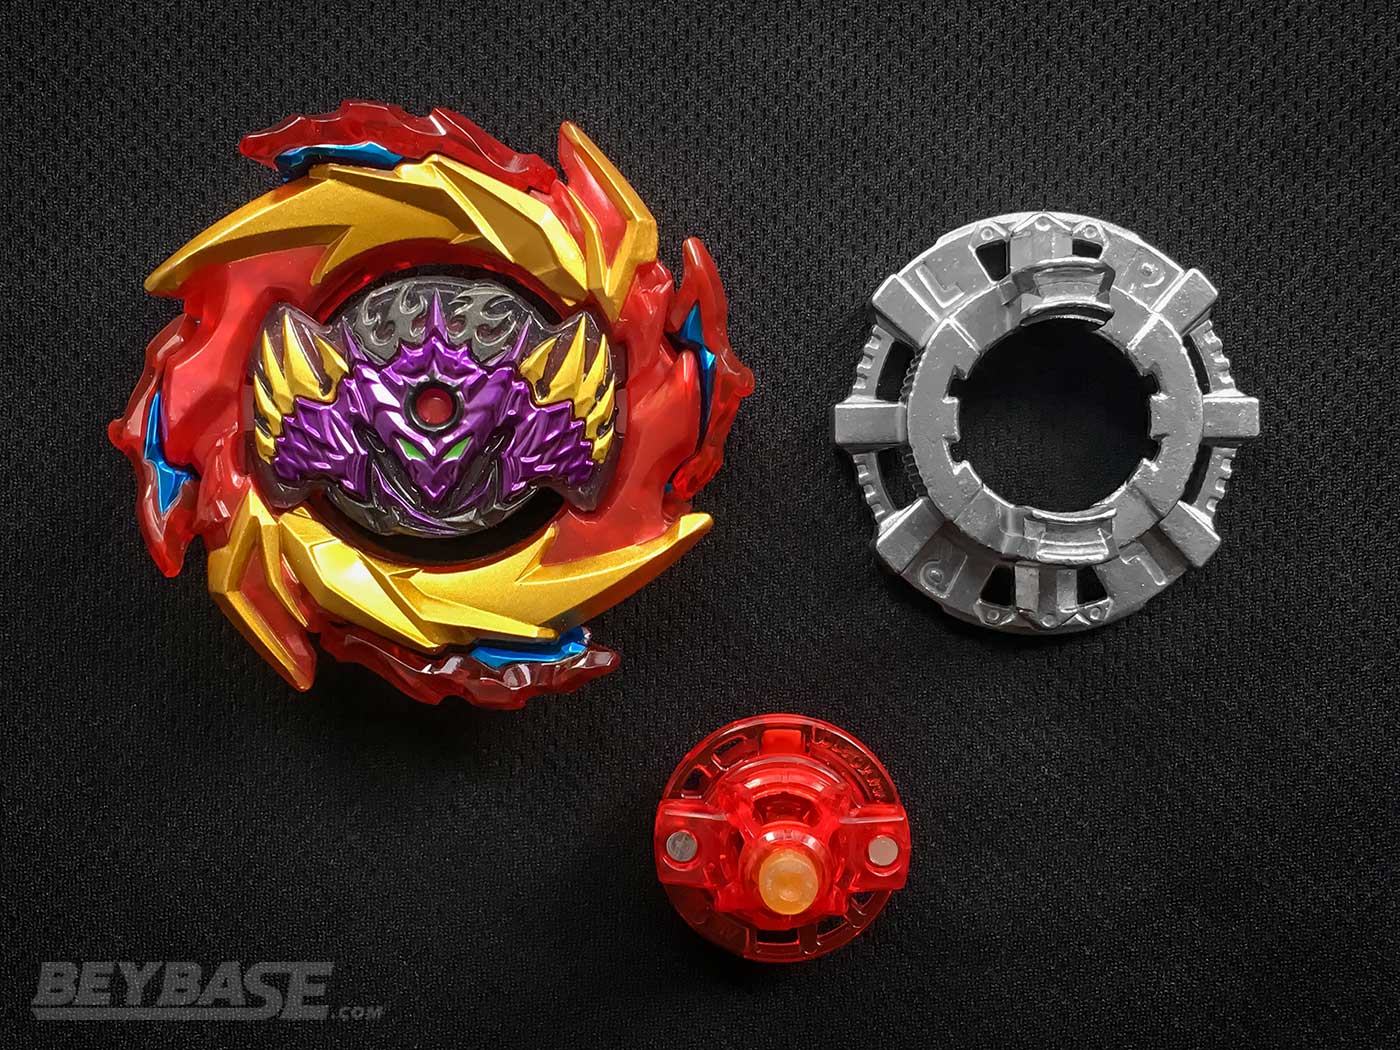
- Hyperion Burn Cho Xceed’+X
- Helios Volcano Ou Zone’+Z
- Dash Beystadium
- Long Sparking BeyLauncher L
- Long Sparking BeyLauncher R
- System: Sparking Layer System
- Series: Beyblade Burst Sparking (Superking)
Part Weights
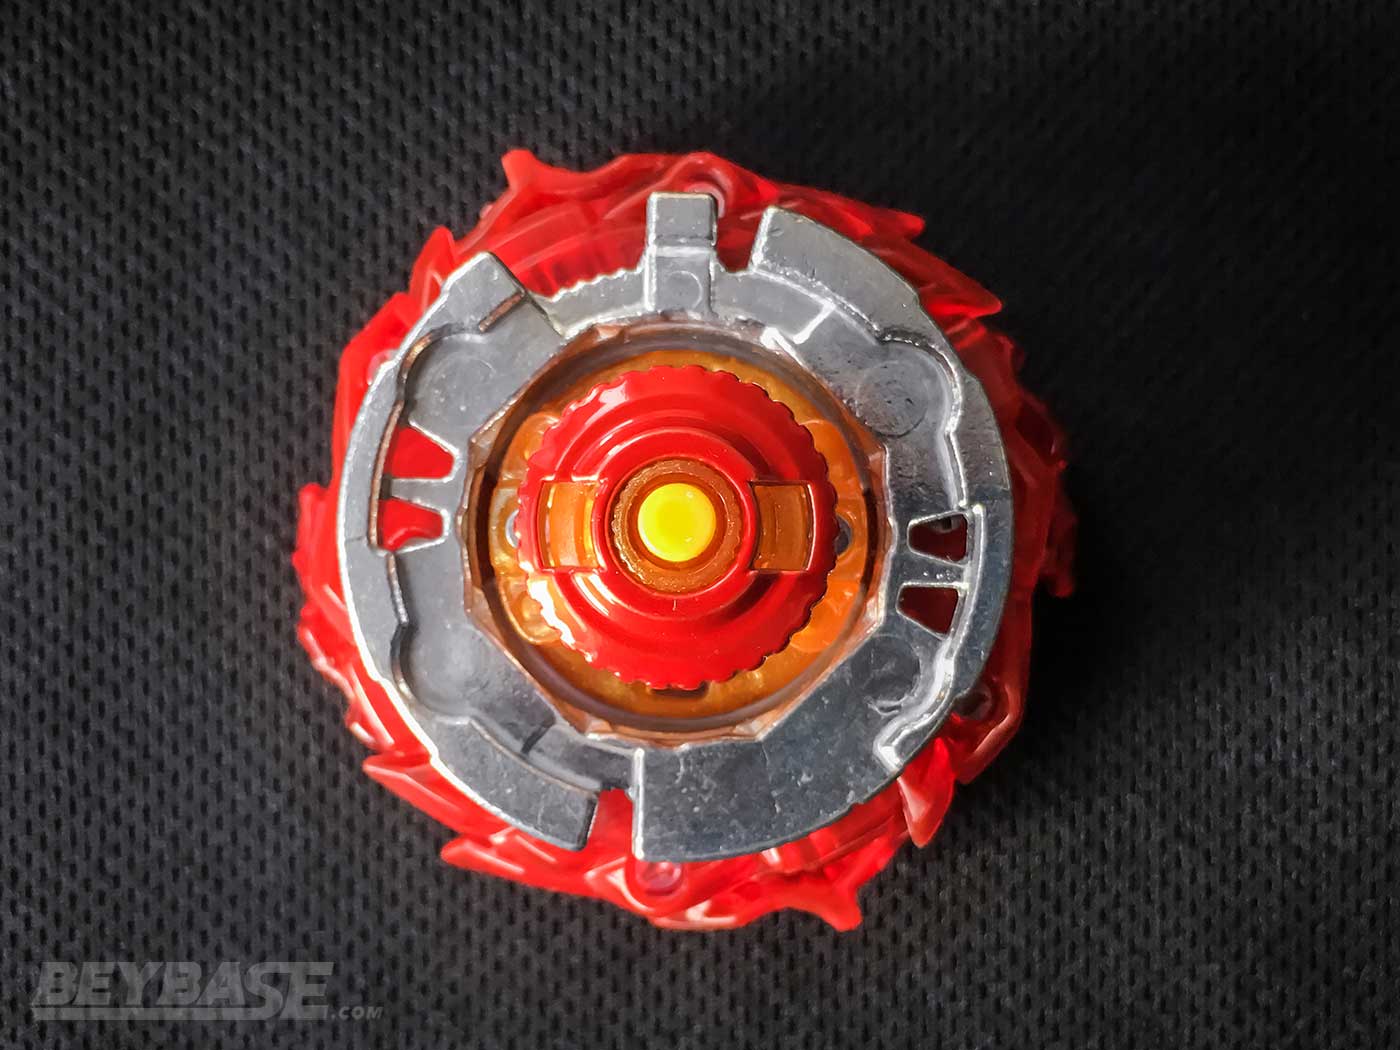
- Metal Chip Core: 1.41g
- Hyperion 2 Sparking Chip: 5.68g
- Burn Ring: 24.54g
- 超 (Cho) Disk: 31.36g
- Xceed’+X Driver: 10.53g
- Helios 2 Sparking Chip: 5.46g
- Volcano Ring: 21.10g
- 王 (Ou) Disk: 30.26g
- Zone’+Z Driver: 8.93g
Where to Buy B-174 Beyblade Limit Break DX Set
Heads up: If you buy something through some of the links on this post, you won’t pay any extra, but I’ll get a small commission. This helps me keep things running. Thanks for your support!
Champions aren’t born overnight. In my latest article, I break down how my pursuit of knowledge, adaptability, and reproducibility compounded into victory at a 256-player G2 tournament.
Sponsored: Order the newest Beyblades at malloftoys.com!
Heads up: If you buy something through Mall of Toys, you won’t pay any extra, but I’ll get a small commission. This helps me keep things running. Thanks for your support!
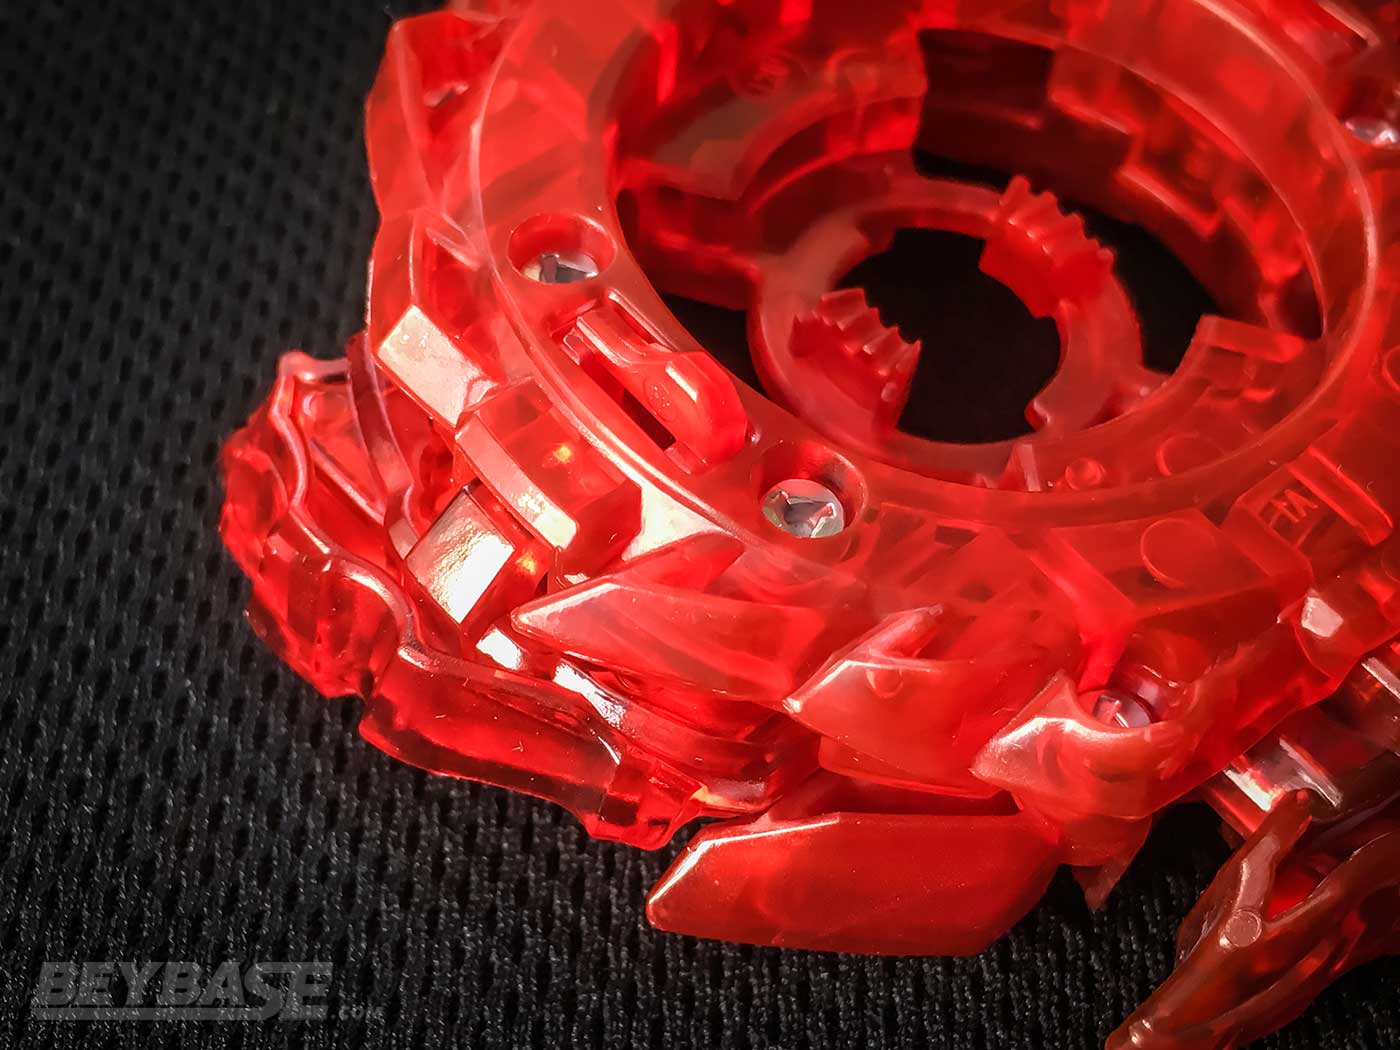
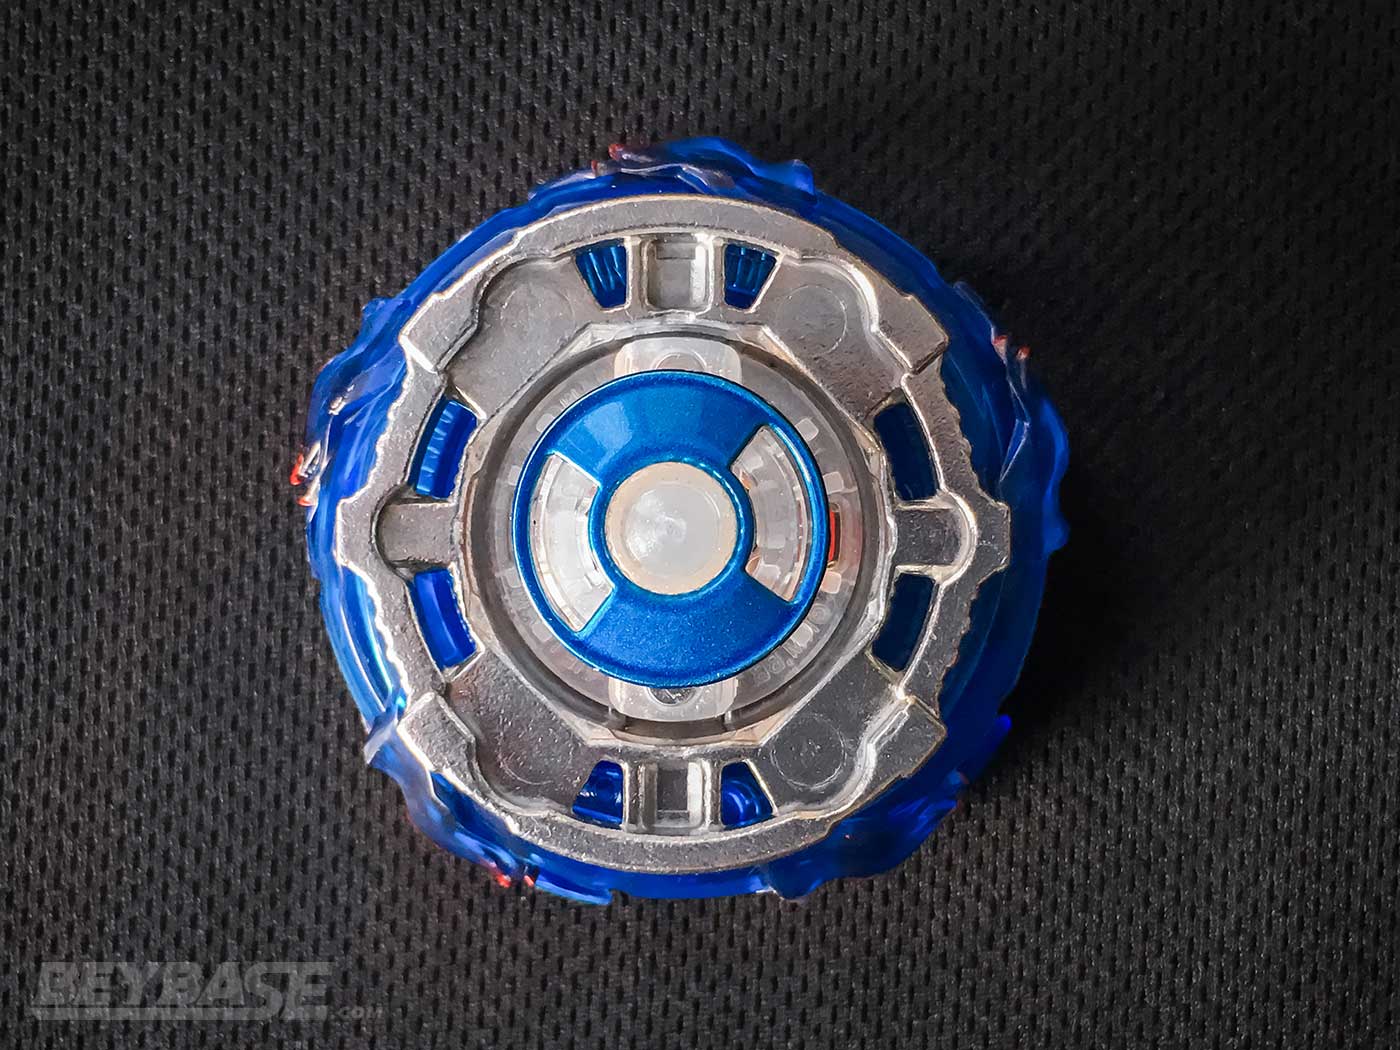
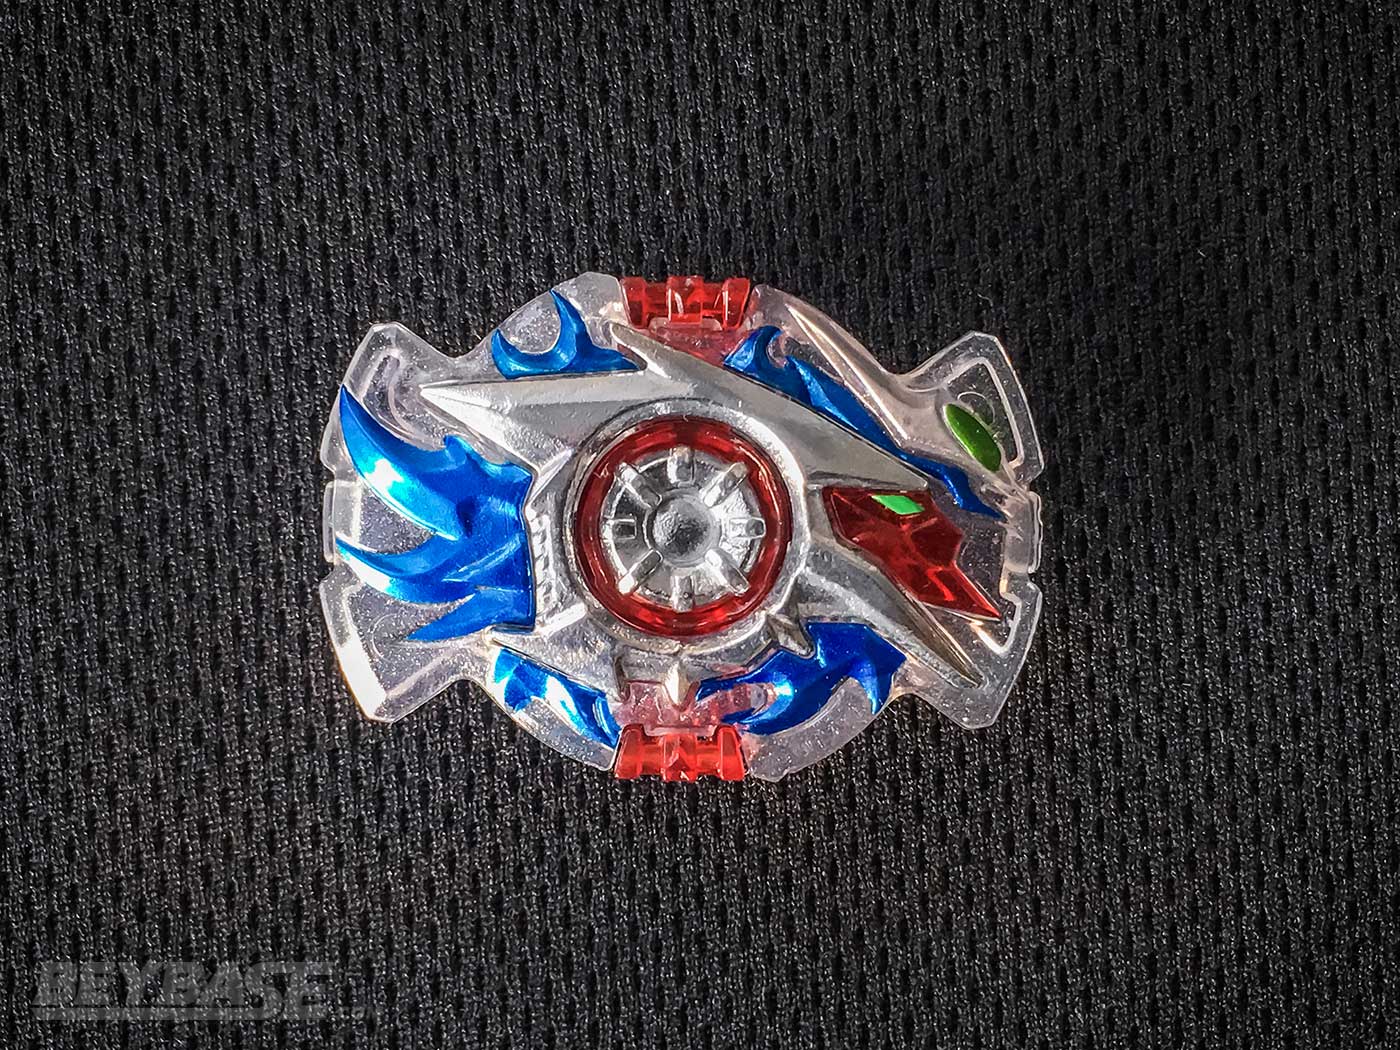
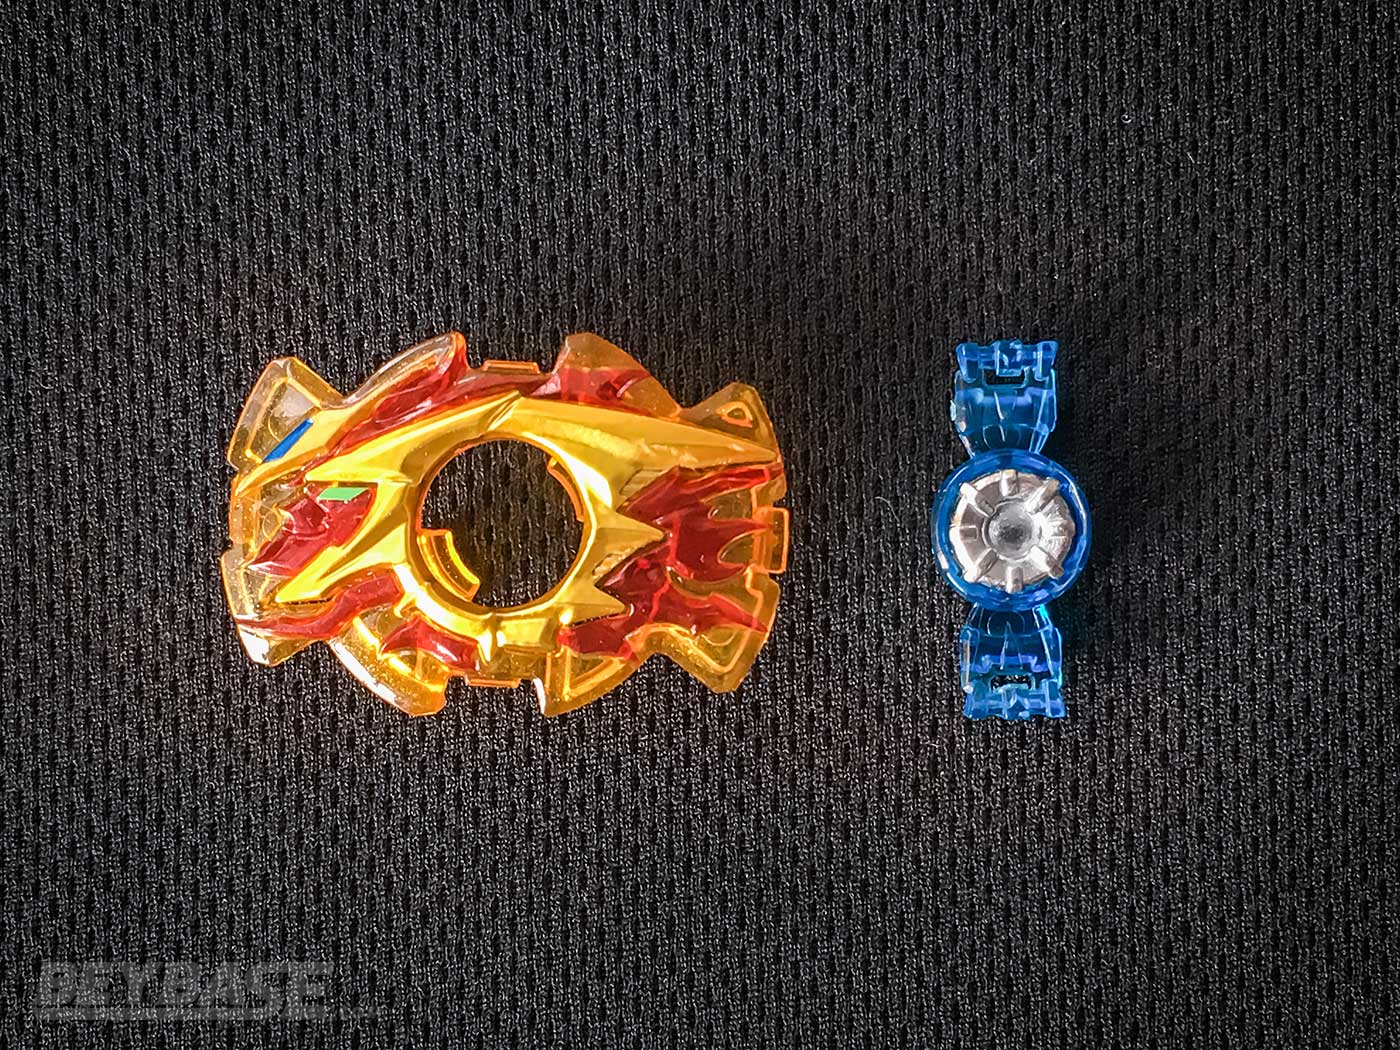
1. Burn and Volcano’s Limit Break Gimmicks Are Lackluster But The Rings Are Still Competitively Viable … Sometimes
The Limit Break Gimmicks & How They Work
Reminiscent of Hasbro’s line of “Stealth Battlers” from their “Extreme Top System” back in 2012, the brand new Burn and Volcano Rings included with the Limit Break DX Set have gimmicks activated during battle.
These create some type of movement or expansion in the Ring itself and aim to add additional attack, defense, or stamina in some capacity.
Hasbro’s Stealth Battlers were uncustomizable and made of plastic, unlike their metal counterparts in the main line Beyblade: Metal Masters series. However, Takara-Tomy has smartly designed these new Rings to be compatible with some of the existing line of parts in the main line Beyblade Burst. Specifically, Sparking Chips and Drivers.
The gimmicks are activated through the use of one or two switches on the underside of the Rings, which are in turn pushed inwards to activate the gimmick by a raised piece around the perimeter of the new Limit Break Disks (Cho and Ou) at a certain point during the battle when the Beyblade has begun to lose some clicks and become closer to bursting.
I’ll talk more about the Limit Break Disks and how they affect the Limit Break gimmicks of these Rings in the second section below.
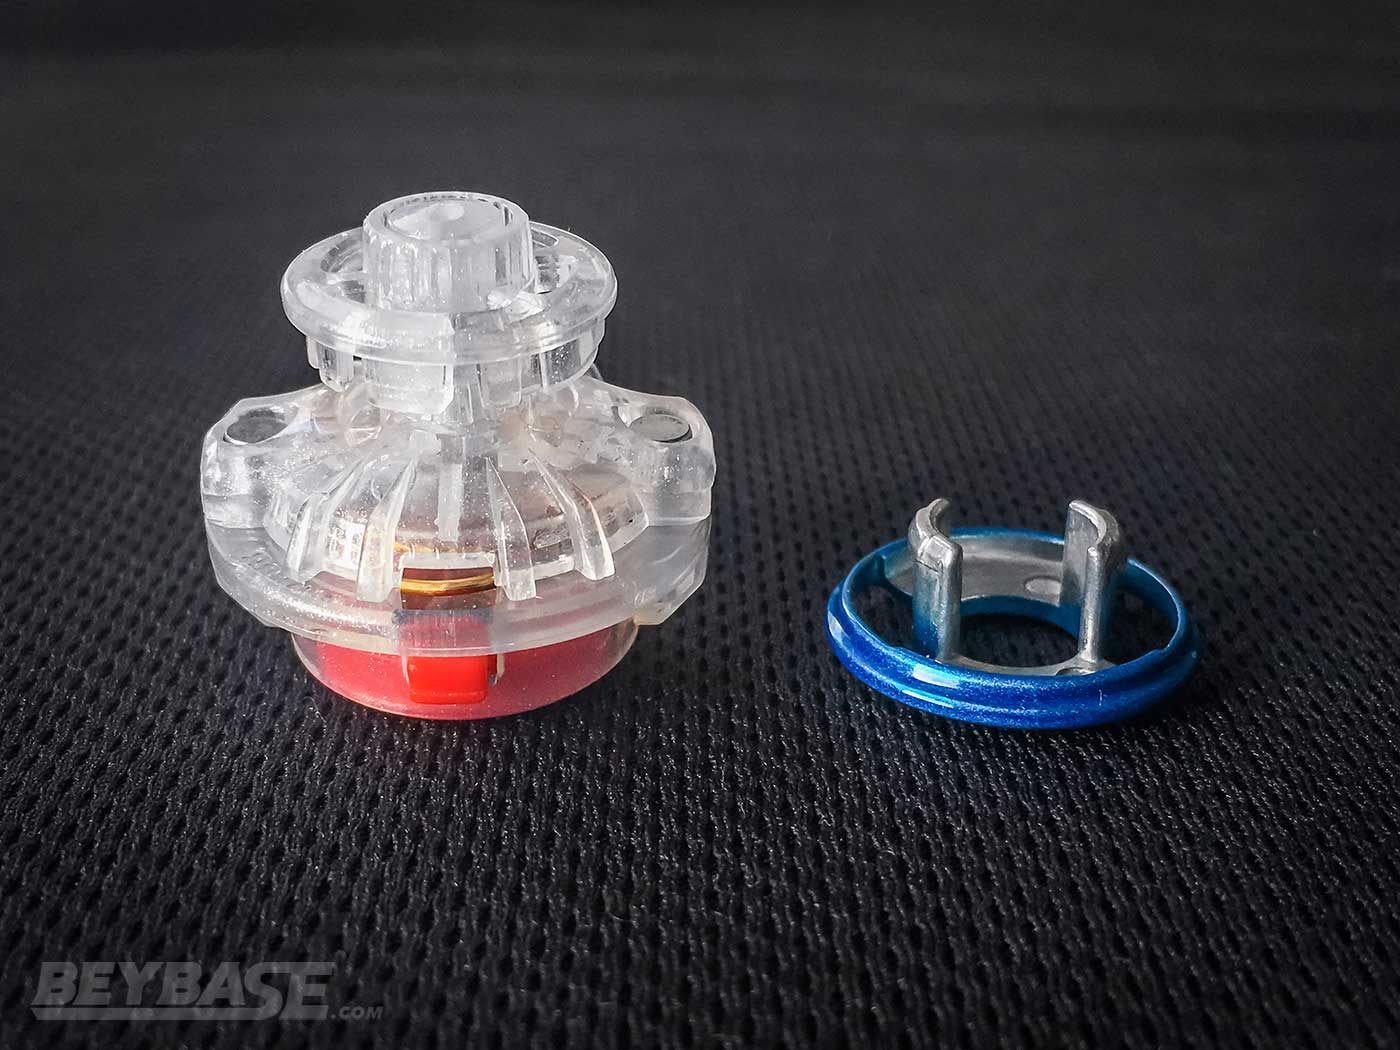
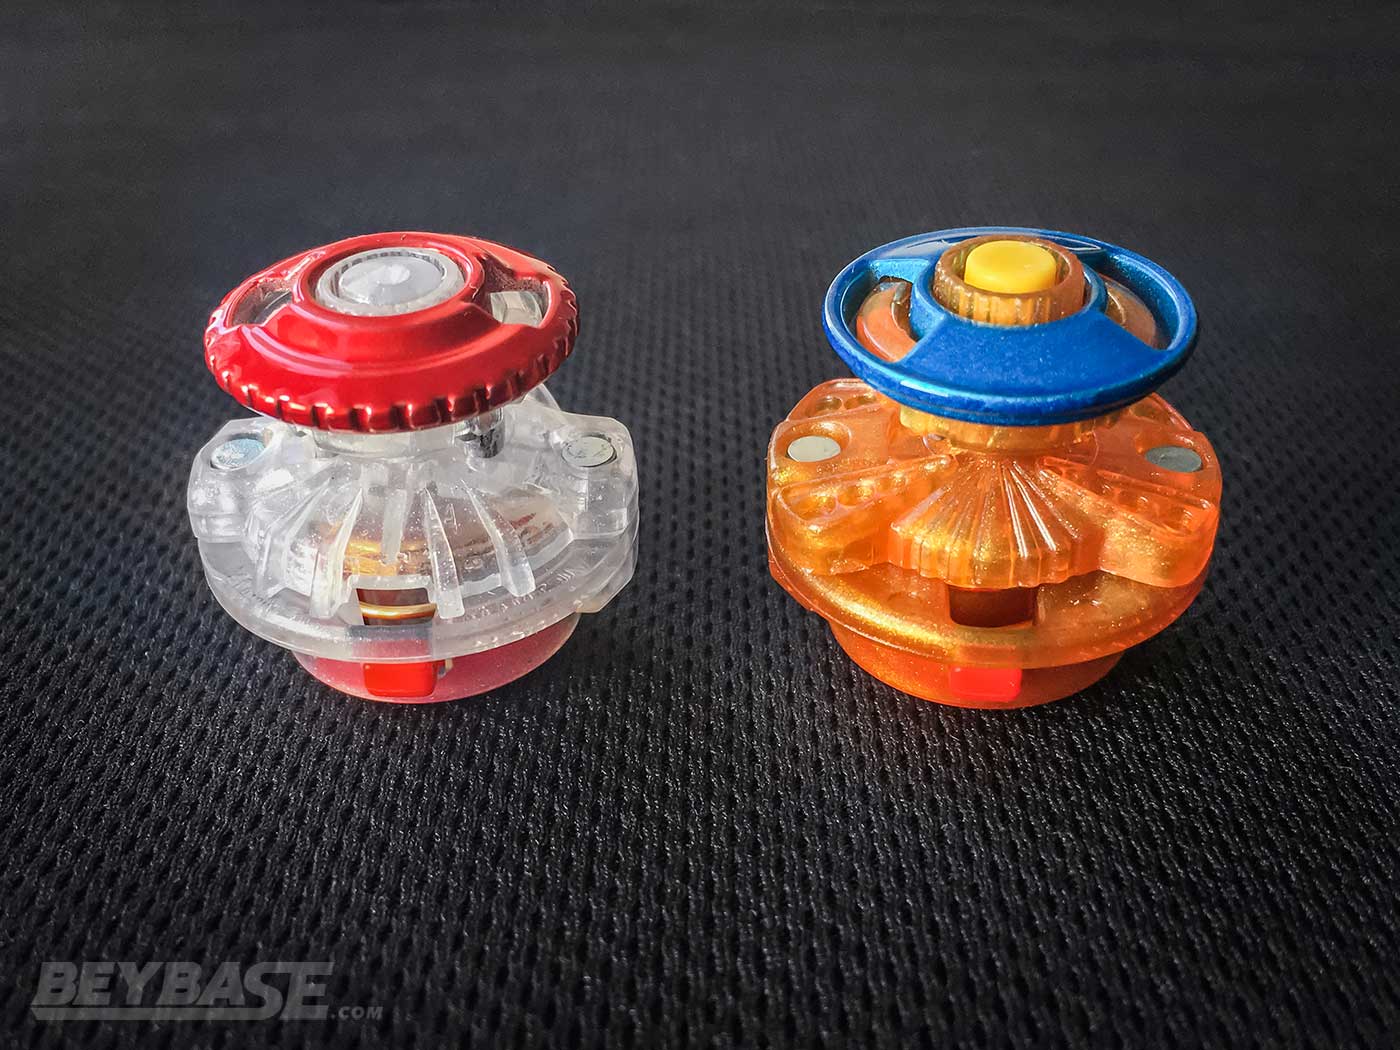
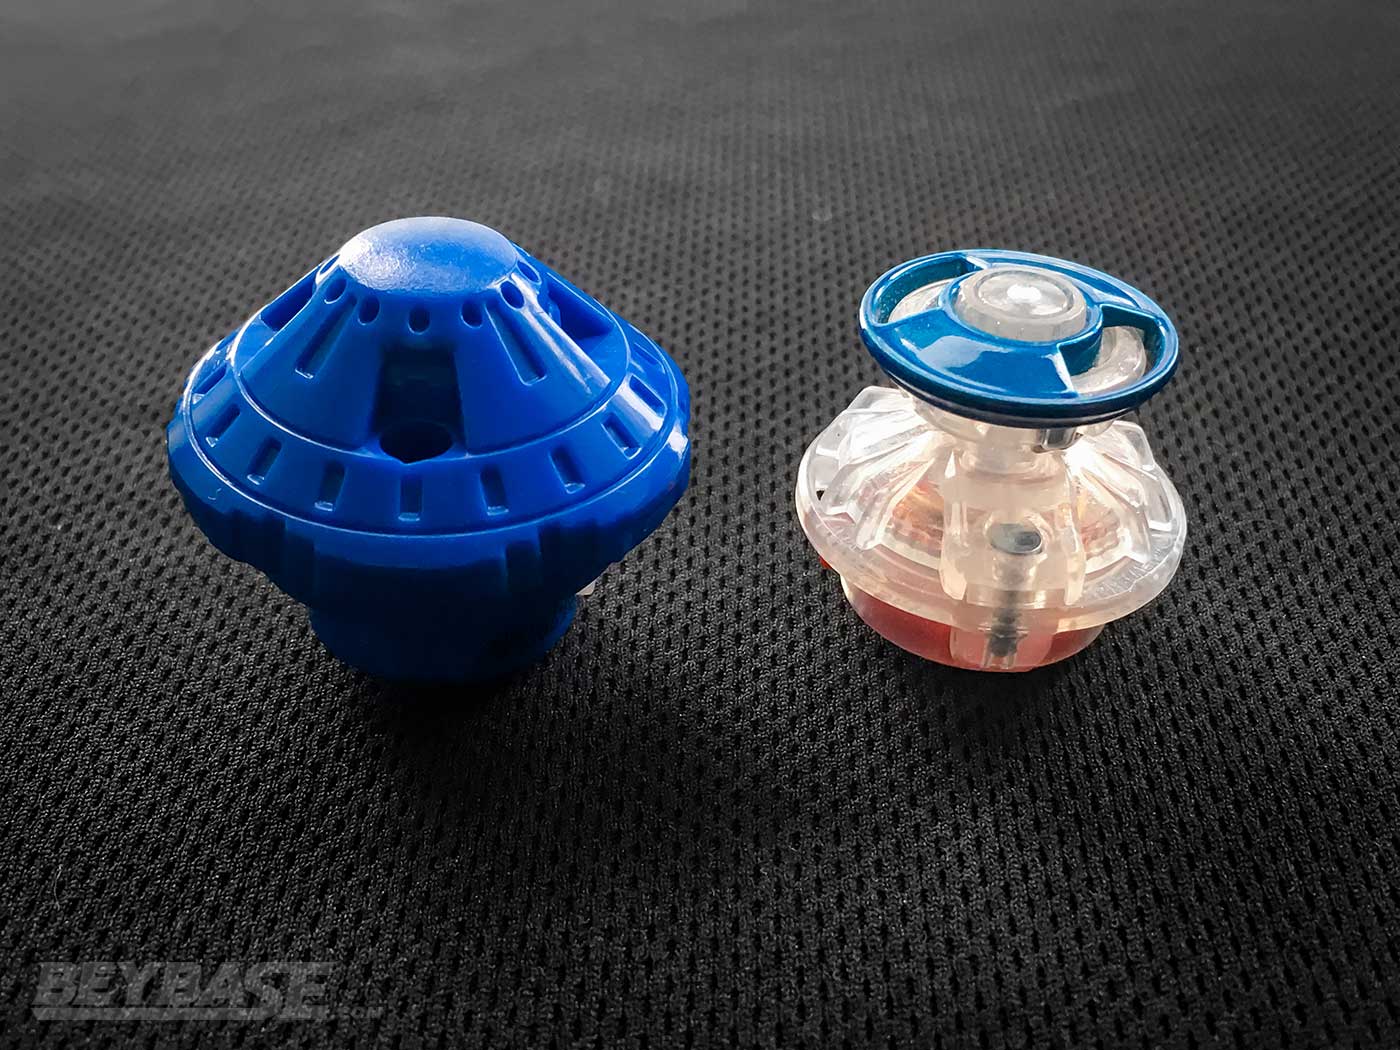
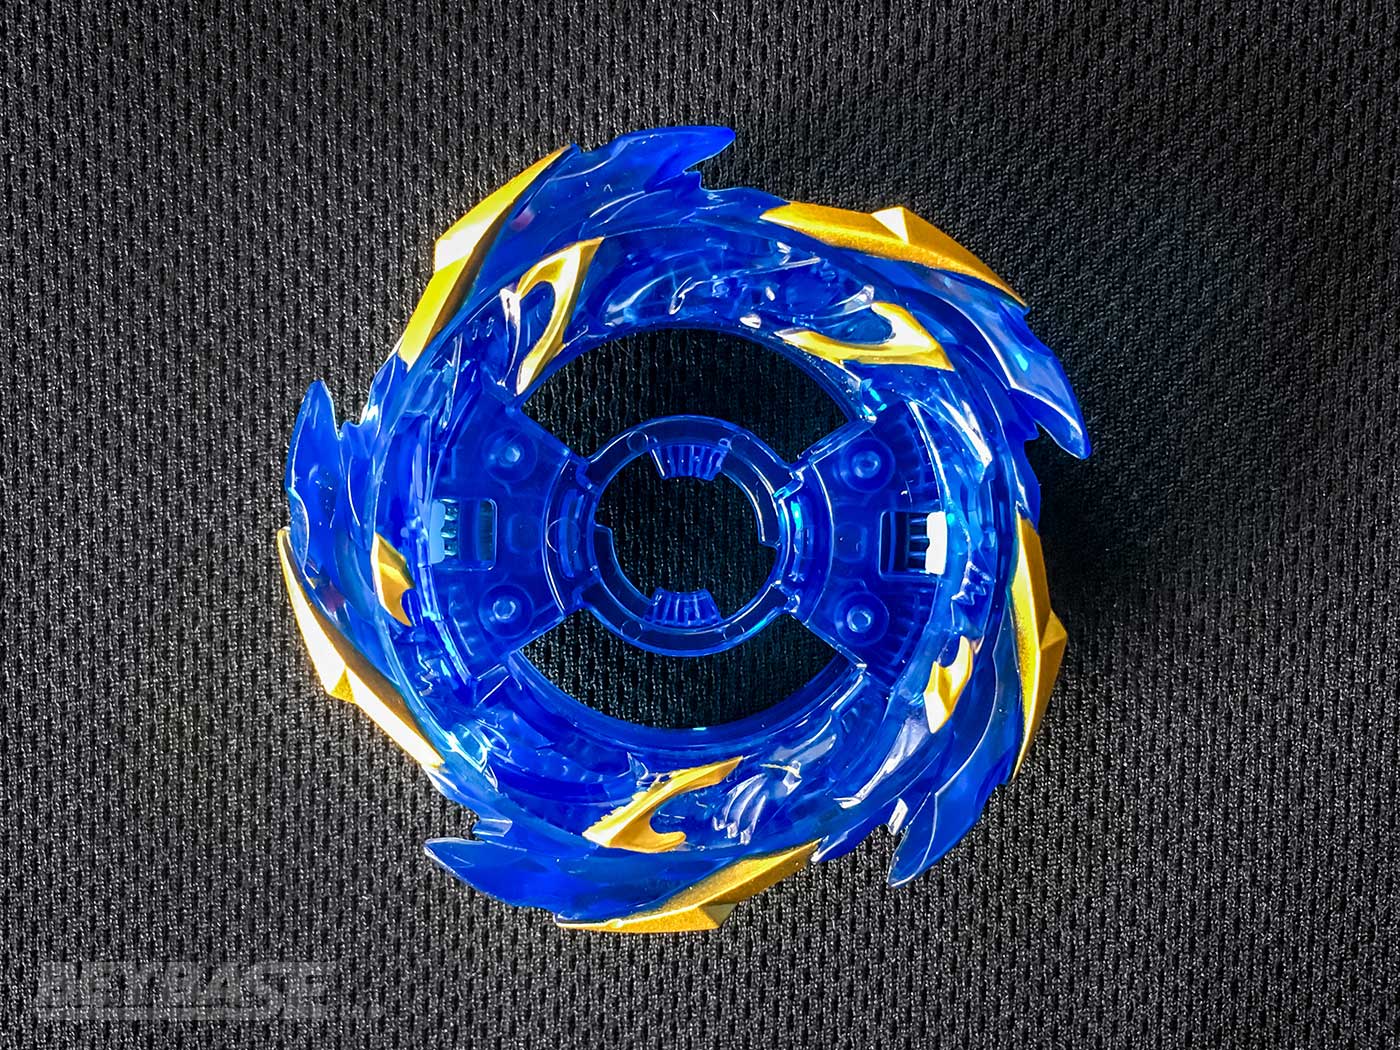
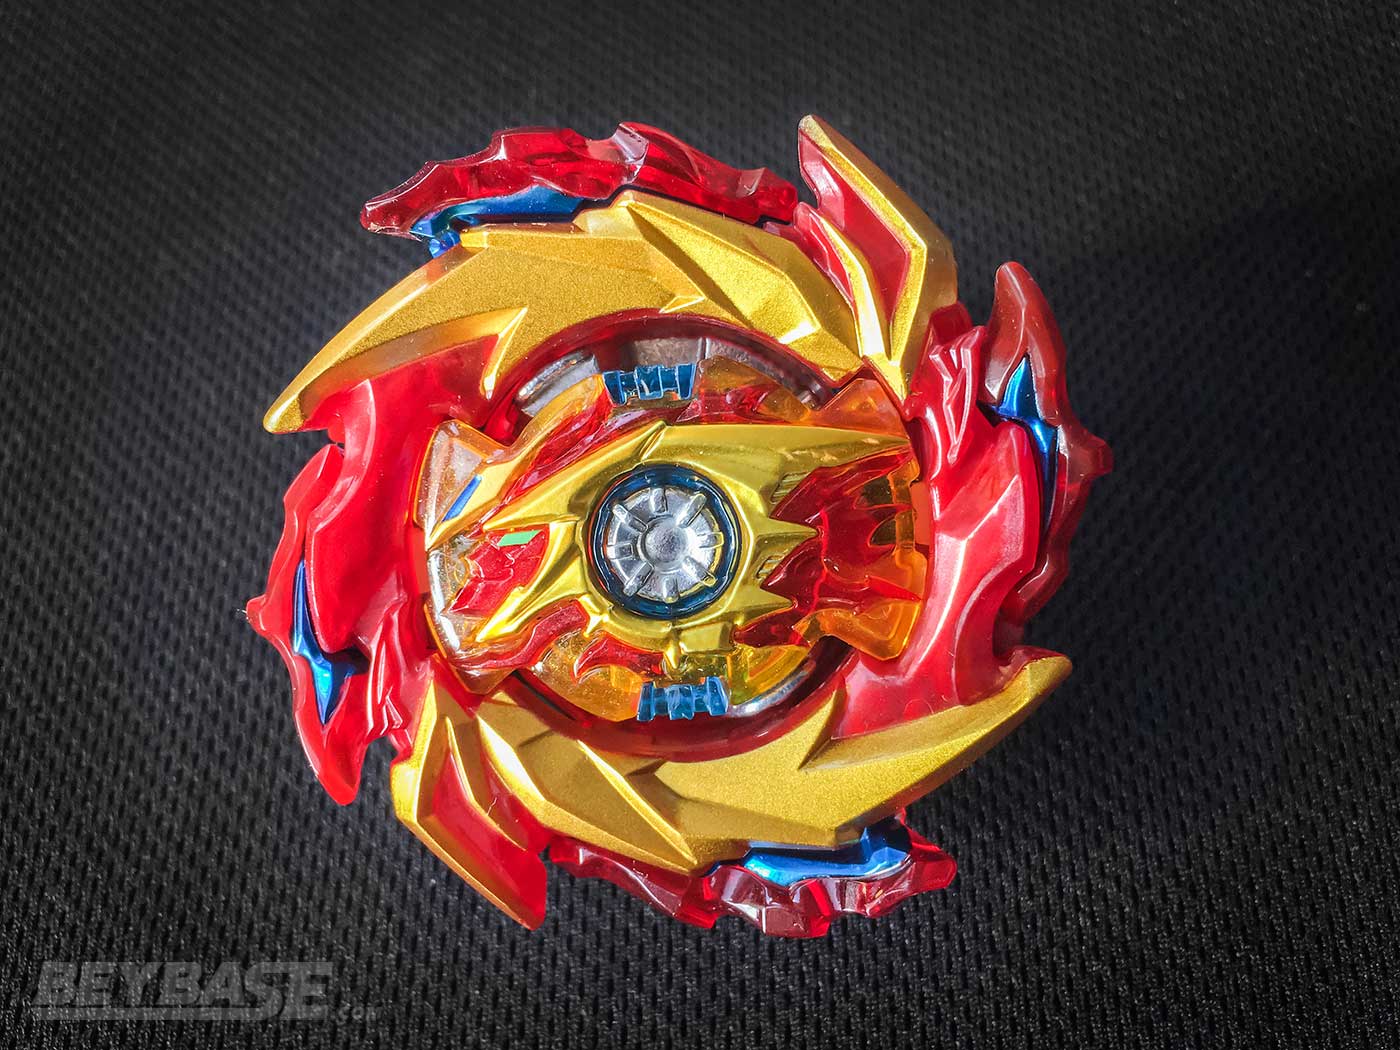
The Burn Ring is an Attack Type Glass Cannon
The Burn Ring’s Limit Break gimmick allows for its four wings to extend, making it the largest Layer in the entire Beyblade Burst series thus far.
However, this extended reach is actually an immense drawback because the burst resistance of the Burn Ring is relatively low. When the wings are extended, it is much more likely to burst.
This can be mitigated by using Disks like 王 (Ou) from Helios Volcano and 皇 (Kou) from Lucifer The End because their Limit Break activation tabs allow for the gimmick to be activated on the second or third click rather than the first. But even so, usage of Burn does carry risk.
Whether the wings are extended or not, Burn has terrible stamina, but makes up for it with some explosive smash attack power. When paired with Drivers like Xtreme’ it can deliver devastating blows, but often this can result in it self-bursting or KOing itself.
And in my testing, it also doesn’t match up too well against attack combos using the Rage Ring due to its recoil, which is arguably the strongest Attack Layer in the game right now.
But when it works … it works well. In this sense, Burn is a bit of a glass cannon. It has the power to KO and burst many opponents–particularly right-spin–but you never know what you’re going to get because of its low burst resistance and recoil.
For me, the self-bursting risk is what kills Burn on a competitive level.
I want to love it, and I do when it works. But it’s not quite consistent enough against enough opponents and the fact that bursting has become so rare combined with the reality that in many rulesets burst finishes are worth two points, you risk putting yourself at a massive disadvantage by using it in most situations.
Finally, I conducted a few sets of tests to demonstrate how Burn performs below:
Hyperion 2 Burn Ou Xtreme’ vs. Tempest Diabolos Wheel Xtend+ 1S
- Hy2B.Ou.X’: 7 wins (7 KO)
- TDb.Wh.Xt+ 1S: 3 wins (2 OS, 1 BF)
- Burn Win Percentage: 70%
This was the first set of formal testing that I conducted. In the informal rounds preceding this I did notice Burn’s self-bursting tendency on Cho and switched to Ou.
Lucifer 2 Burn Ou Xtreme’ vs. Tempest Diabolos Wheel Xtend+ 1S
- Lc2B.Ou.X’: 9 wins (5 KO, 4 BF)
- TDb.Wh.Xt+ 1S: 10 wins (6 OS, 3 KO, 1 BF)
- 1 draw (1 DBF)
- Burn Win Percentage: 47%
This second round of tests began to demonstrate to me how wildly Burn’s performance can vary. The reality is that shooting technioque and some luck will determine the outcome here, so the actual win percentage Burn should have in this situation probably sits somewhere between the 47% of this set and 70% of the first set.
It’s worth noting that in many of the rounds where Tempest won here, it had lost three clicks and nearly bursted.
Nevertheless, it’s still commendable that it is able to stand up against a combo that for the latter half of 2020 was so dominant in tournaments, including in here where I live in Toronto.
Lucifer 2 Burn Ou Xtreme’ vs. Hyperion 2 The End Cho Zone’
- Lc2B.Ou.X’: 5 wins (2 BF, 2 KO, 1 OS)
- THy2.Cho.Zn’: 5 wins (2 BF, 3 OS)
- Burn Win Percentage: 50%
Lucifer 2 Burn Ou Xtreme’ vs. Infinite (Shield) Hyperion 2 Xtend+ 2B
- Lc2B.Ou.X’: 3 wins (2 KO, 1 OS)
- Hy2I.Xt+ 2B (Shield): 7 wins (1 KO, 4 BF, 2 OS)
- 1 draw (1 DBF)
- Burn Win Percentage: 30%
This test against Infinite in particular was interesting. My first impression of Burn was formed largely by how well it was performing against Tempest, but Infinite seems to be its kryptonite to some degree. This is where my opinion that Burn is a “glass cannon” really formed.
Best Beyblade Burst Sparking Burn Combo: Lucifer 2 Burn Ou Xtreme’
While the Burn Ring may be a glass cannon, if you are looking to optimize its potential particularly against right-spin opponents, give Lucifer 2 Burn Ou Xtreme’ a try.
Lucifer 2‘s rubber burst stopper helps to reduce the self-bursting tendency of the Burn Ring.
The Ou Disk delays the activation of the Limit Break to the second click without sacrificing much weight in comparison to Cho. I had hoped Kou would work well for this combo given that it would activate Burn’s Limit Break on the third click, but it weighs less than Ou and I did not enjoy how it was moving when I tried Kou.
And of course, the Xtreme’ Driver helps to give some much needed burst resistance, speed to optimize attack power, and the rubber tip provides friction to help at least minimize the recoil Burn can suffer.
If you’re sure you’ll be going up agaisnt a right-spin stamina type, this combo can help get the job done … but be careful of things like Infinite!
Want to build Lc2B.王.X’? You’ll need:
-
Burn & 王 (Ou)
-
Lucifer 2:
-
Xtreme’ (1 of the following):
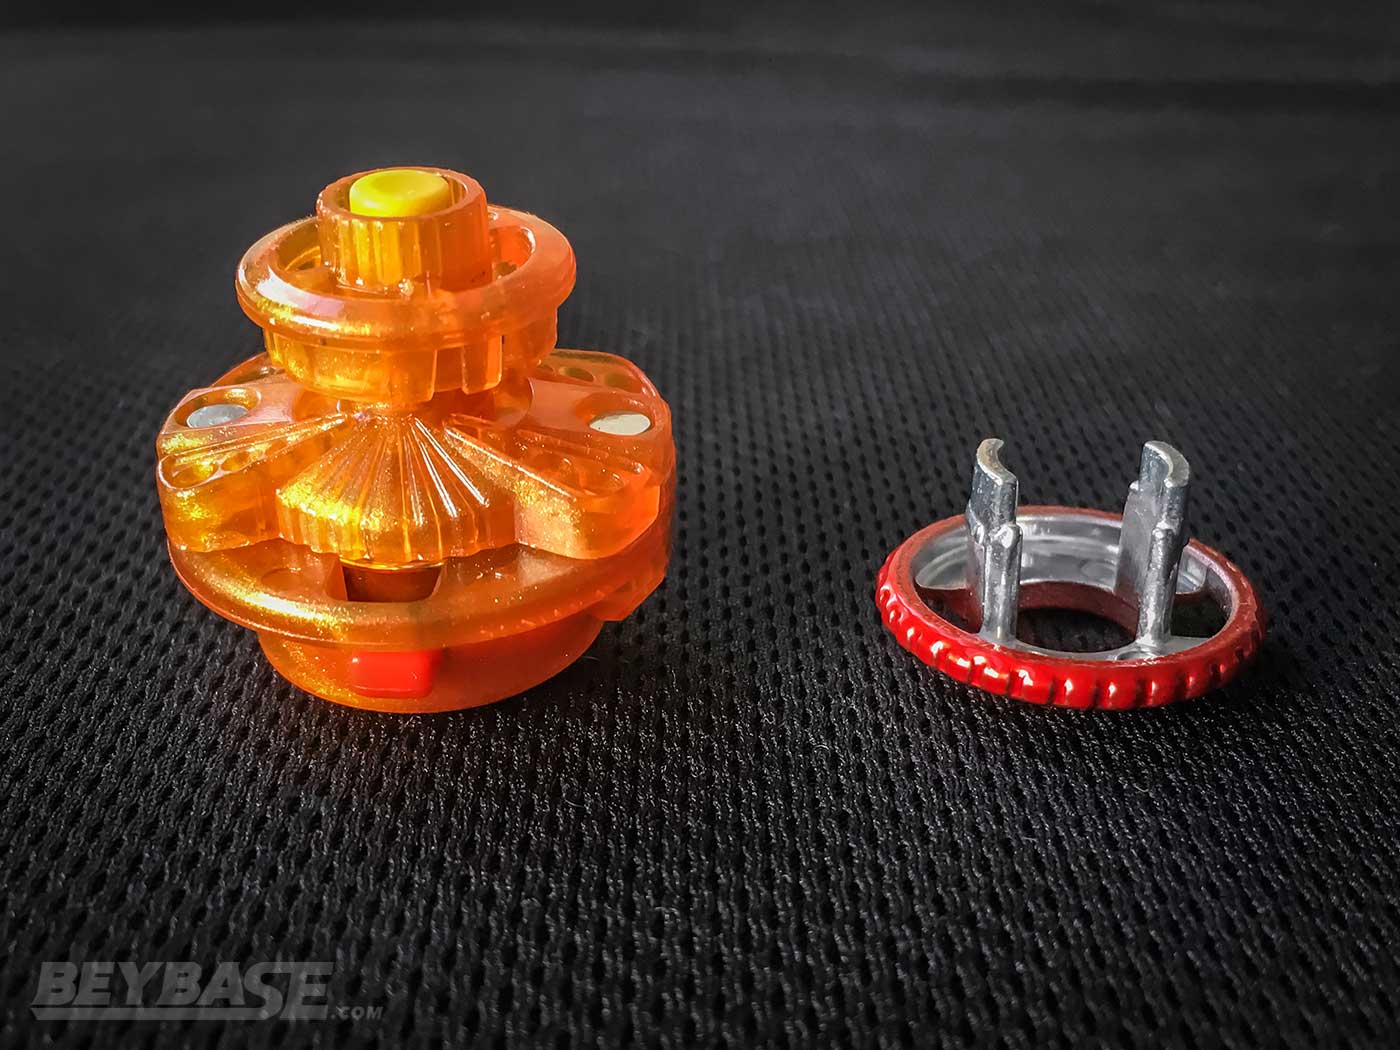
Volcano Has Poor Defense & Same Spin Stamina
Despite being advertised as a balance type Ring, Volcano does a very poor job of presenting a balanced representation of attack, defense, and stamina qualities.
It has little to no attack power to speak of, loses stamina quickly in same-spin battles versus other stamina type Rings and Layers like World and even Master, and has poor defense against both left- and right-spin top tier attack type Rings like Rage and Brave.
The following quick five round test demonstrates the poor same-spin stamina of Volcano (although, it is important to note that the Ou Disk may contribute to this):
Helios Volcano Ou Revolve vs. World Diabolos Wheel Revolve 1S
- Hl2V.Ou.R: 0 wins
- WDb.Wh.R 1S: 5 wins
- Volcano Win Percentage: 0%
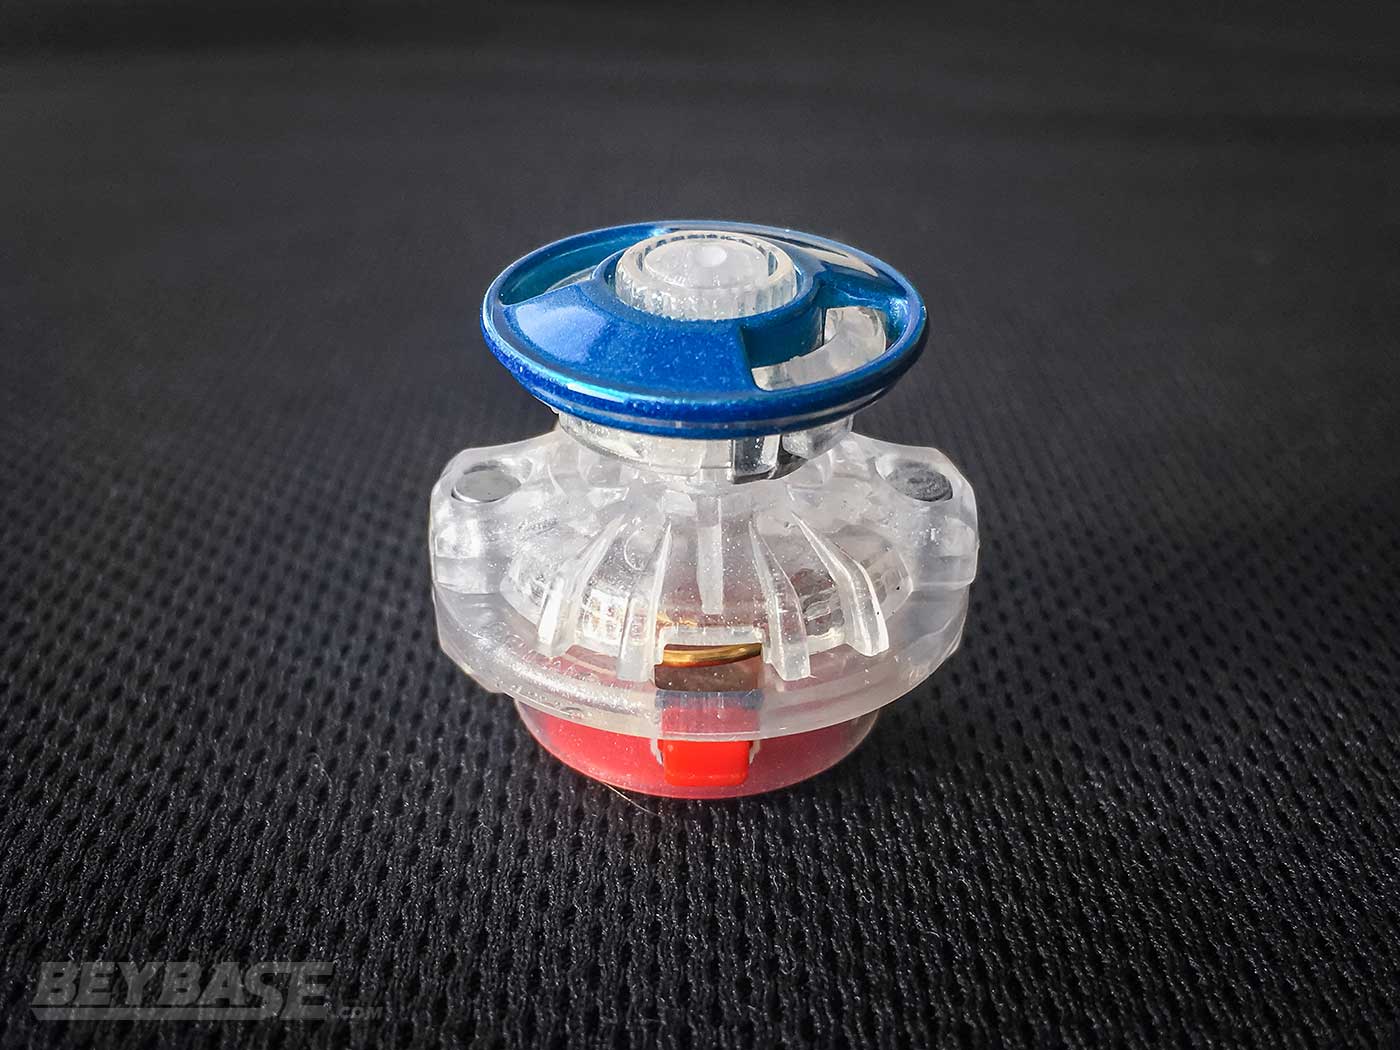
The five-bladed design of Volcano is reminiscent of the Hell Salamander Layer in attack mode, and it’s spring-loaded gimmick changes the Ring into a ten-bladed design. This is also similar to Hell Salamander’s mode change, but in this case, it activates mid-battle when the single switch on the bottom of the Ring is pushed in by the Disk.
Also unlike Hell Salamander, because each set of five blades are stacked on top of each other, the resulting ten-blade mode is not as smooth as Hell Salamander’s.
Volcano’s ten-bladed mode may reduce recoil slightly, but if so it is negligible and does not change the fact that it performs poorly in all same-spin scenarios and attack type scenarios.
However, it does have one saving grace: opposite spin performance.
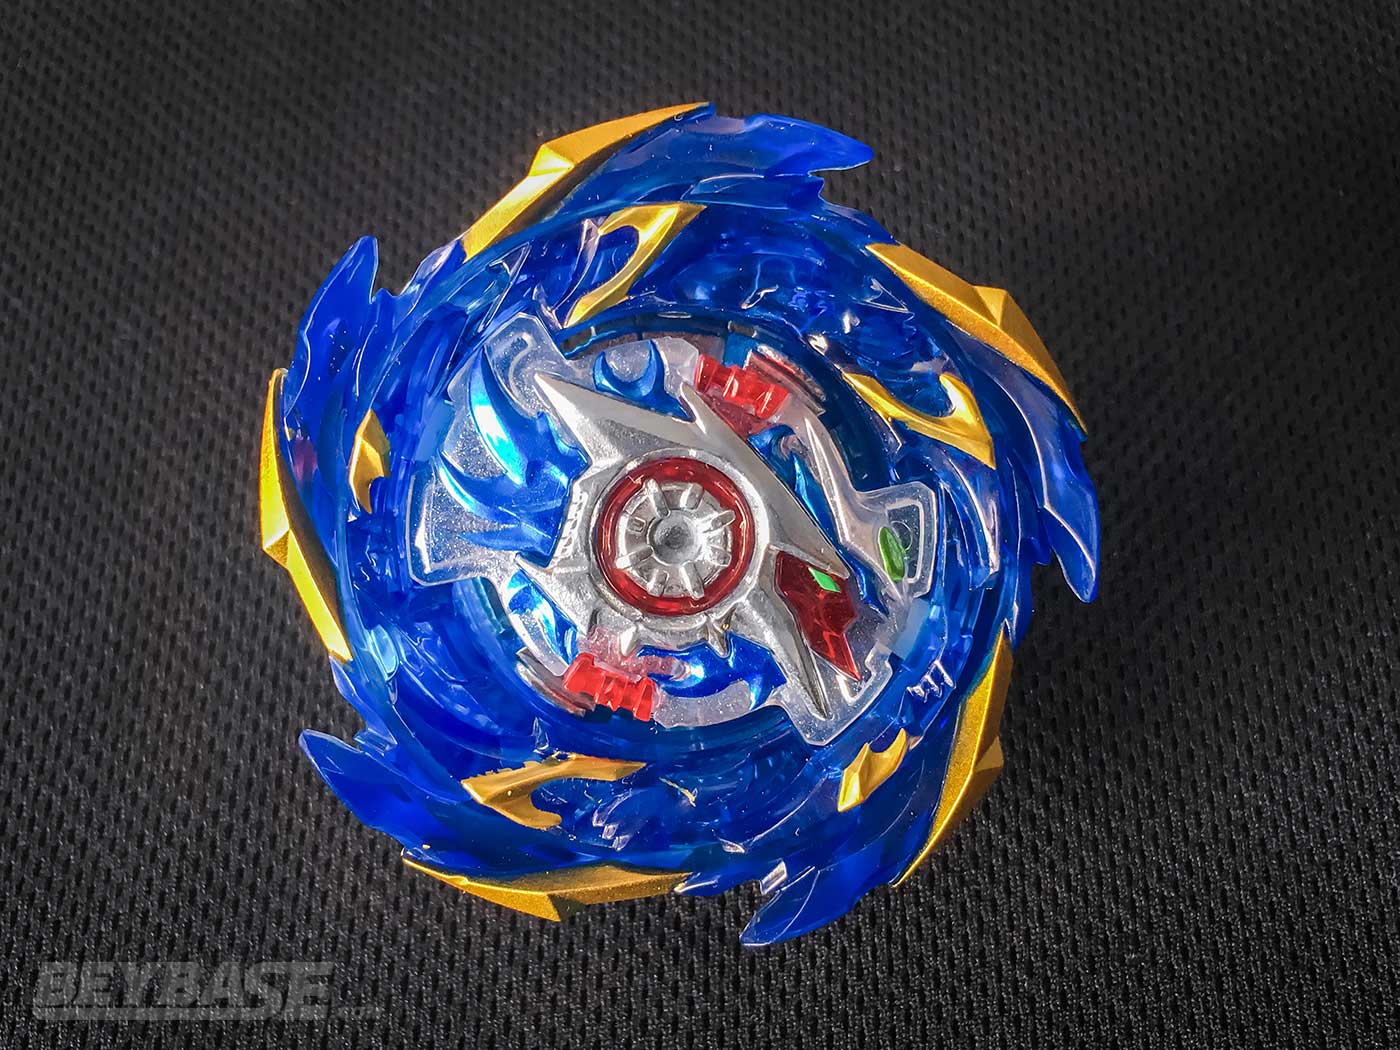
Stock Helios Volcano Ou Zone’+Z Is a Top Tier Opposite Spin Stamina Combo
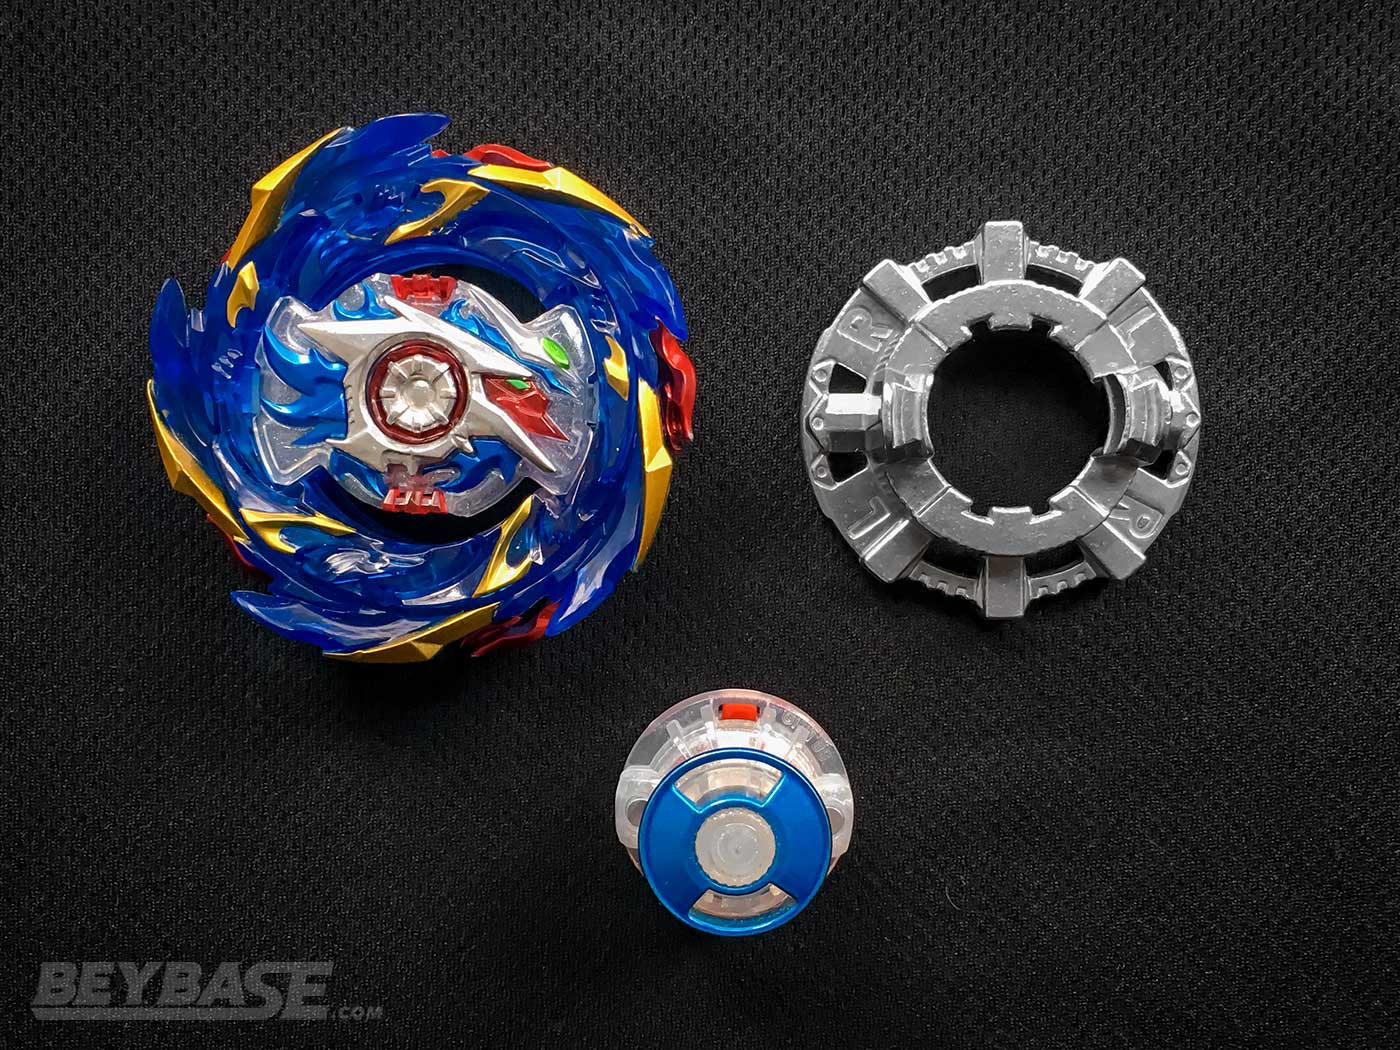
While it may not be entirely optimized as far as opposite spin stamina combos are concerned, Volcano’s stock combo included with the Limit Break DX Set–Helios Volcano Ou Zone’+Z–is top tier against opposite spin opponents.
This is due in large part to the Zone’+Z Driver and not Volcano, but nevertheless, the fact that such a high performing combination is included pre-built as part of a set like this is notable.
It might be the best stock opposite spin Beyblade combo ever released, perhaps better than even Variant Lucifer Mobius 2D.
These tests demonstrate why Helios Volcano Ou Zone’+Z is a top tier opposite spin Beyblade stamina combo:
Helios Volcano Ou Zone’+Z vs. Tempest Diabolos Wheel Xtend+ 1S
- Hl2V.Ou.Zn’+Z: 7 wins
- TDb.Wh.Xt+ 1S: 1 win
- 2 draws
- Zone’+Z Win Percentage: 88%
Helios Volcano Ou Zone’+Z vs. World Spriggan Paradox Rise (Worn) 1S (Right-Spin)
- Hl2V.Ou.Zn’+Z: 4 wins
- WSp.Pd.Rs 1S: 6 wins
- 6 draws
- Zone’+Z Win Percentage: 40%
Helios Volcano Ou Zone’+Z vs. World Spriggan Wheel Mobius (Worn) 1S (Right-Spin)
- Hl2V.Ou.Zn’+Z: 6 wins
- WSp.Wh.Mb 1S: 3 wins
- 1 draw
- Zone’+Z Win Percentage: 67%
Your results may vary. In some of these matchups the level of wear on parts like Rise and Mobius can drastically affect them.
But nevertheless, the point here is to illustrate that stock Helios Volcano Ou Zone’+Z can compete with the best of the best in opposite spin battles.
If you’re just getting into Beyblade Burst, there is no better place to start with a single purchase than the B-174 Limit Break DX Set for this reason alone.
Sponsored: Order the newest Beyblades at malloftoys.com!
Heads up: If you buy something through Mall of Toys, you won’t pay any extra, but I’ll get a small commission. This helps me keep things running. Thanks for your support!
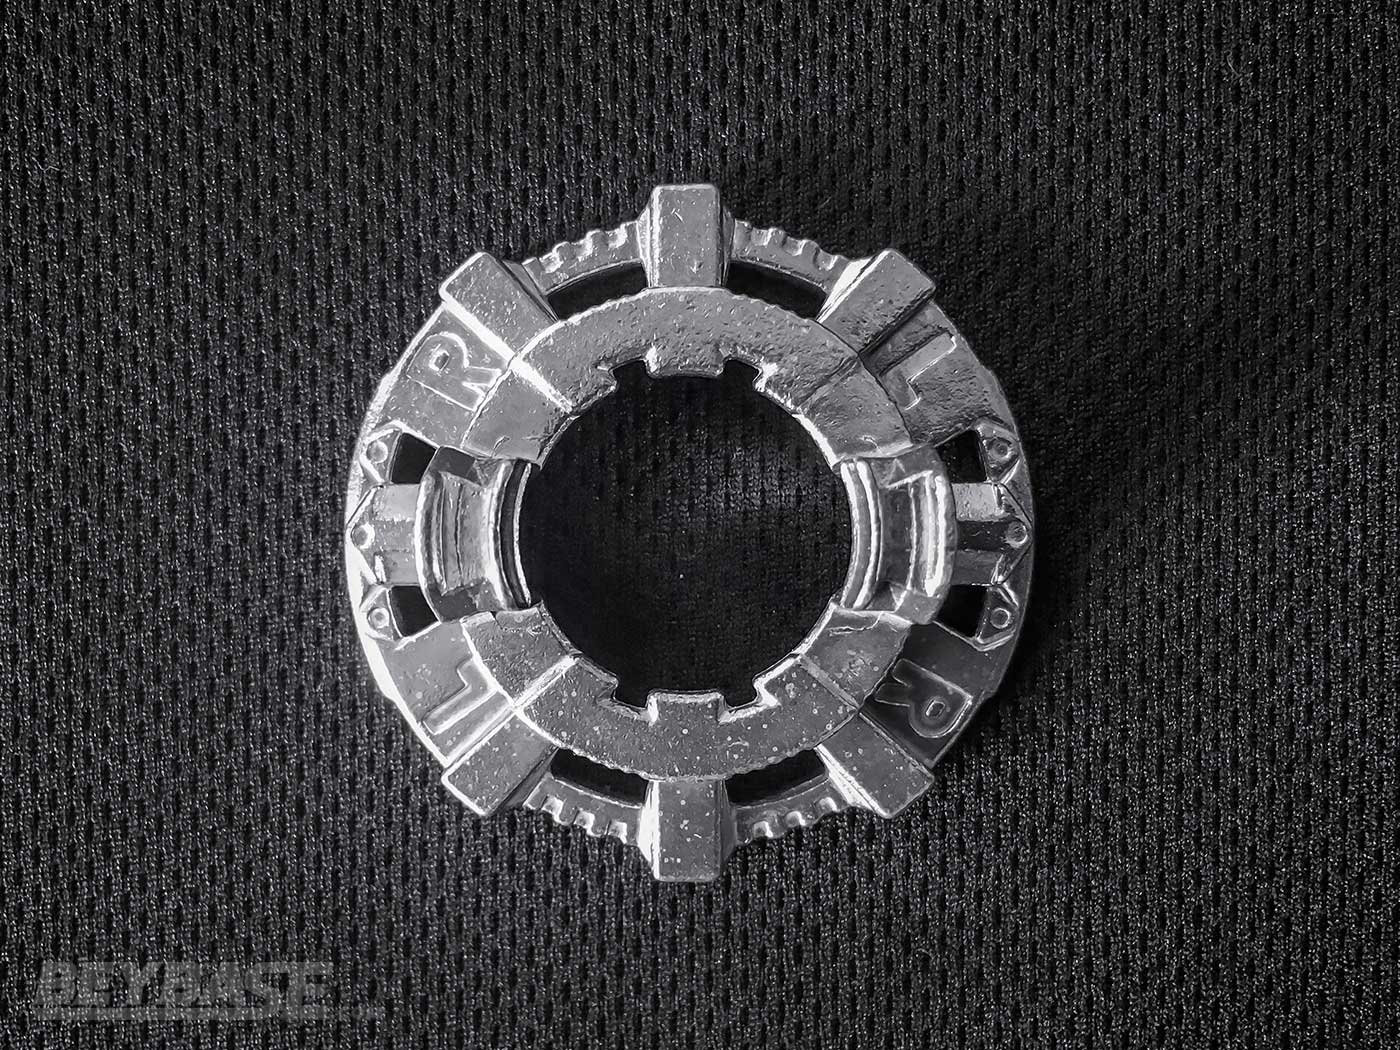
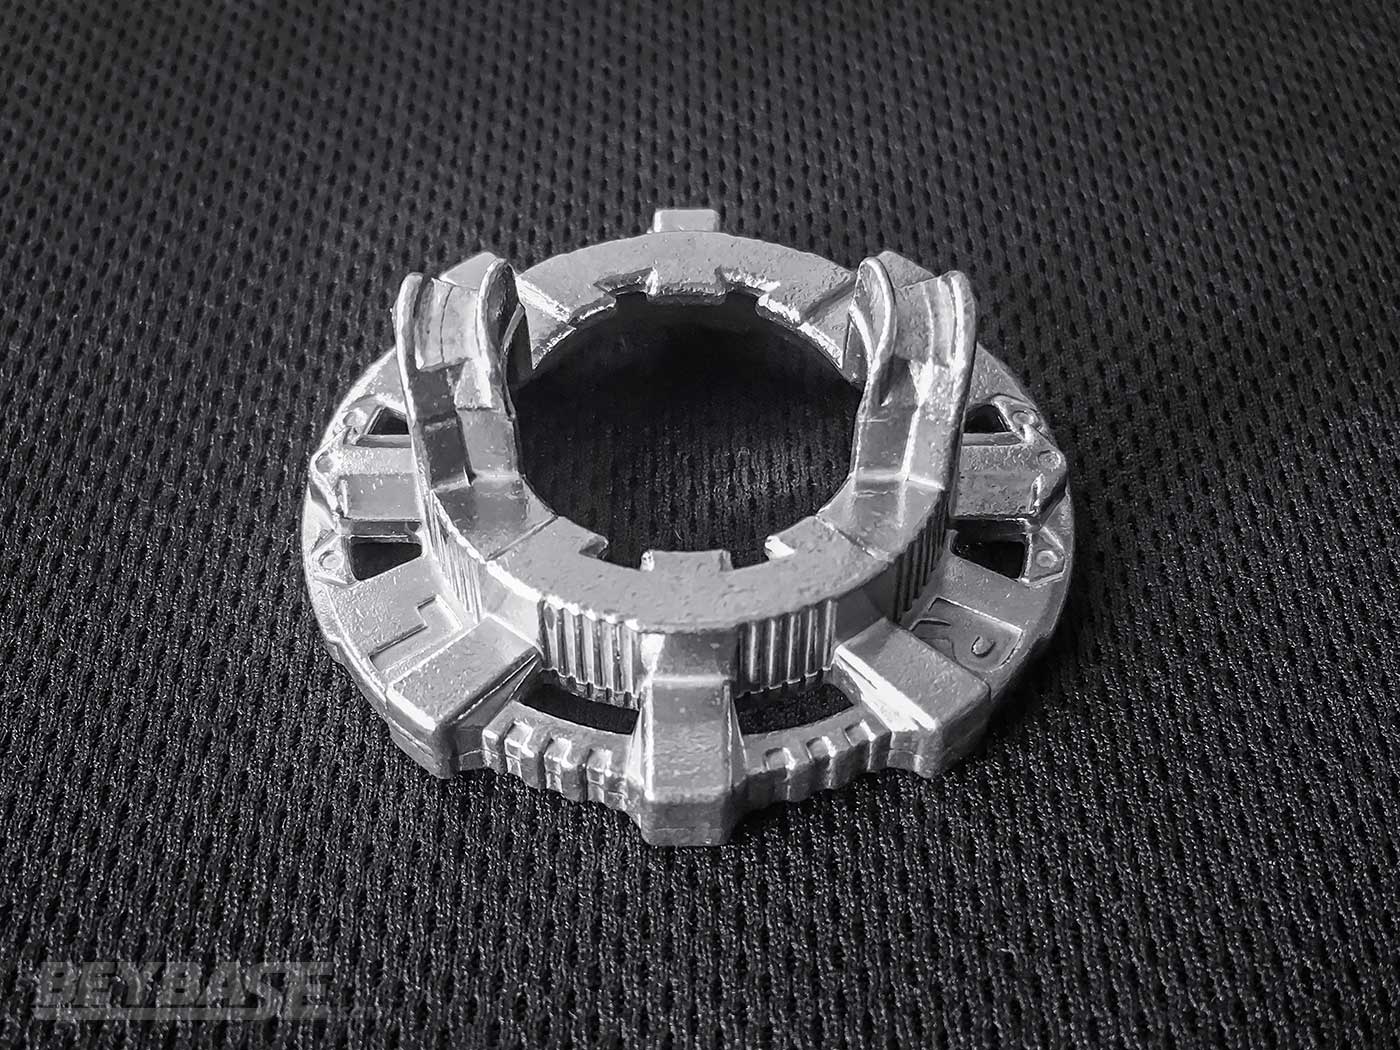
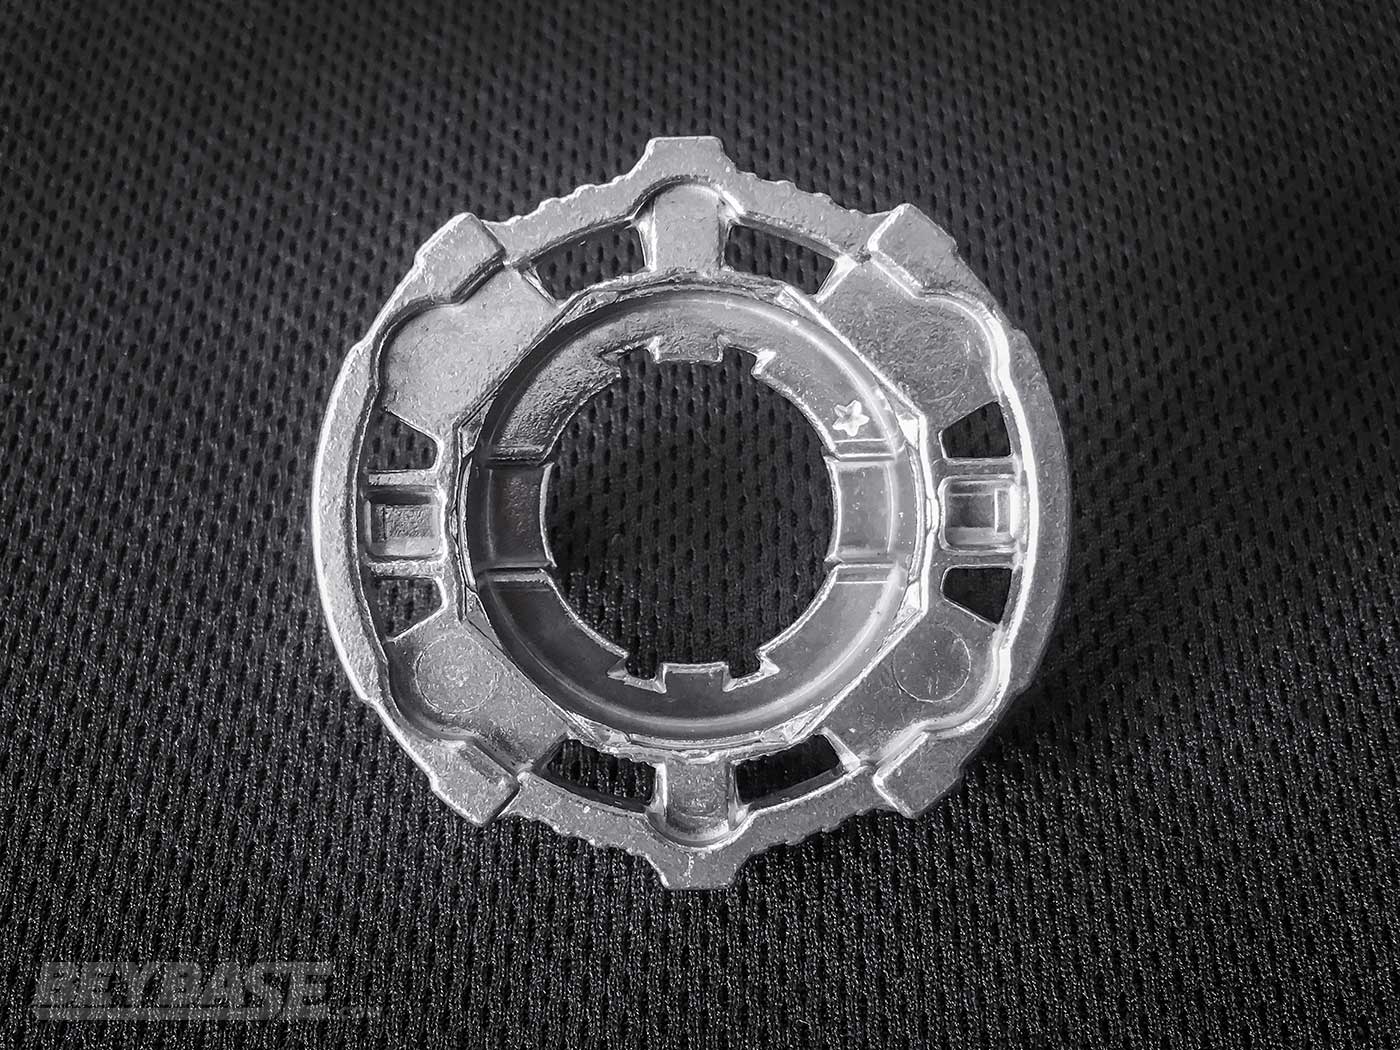
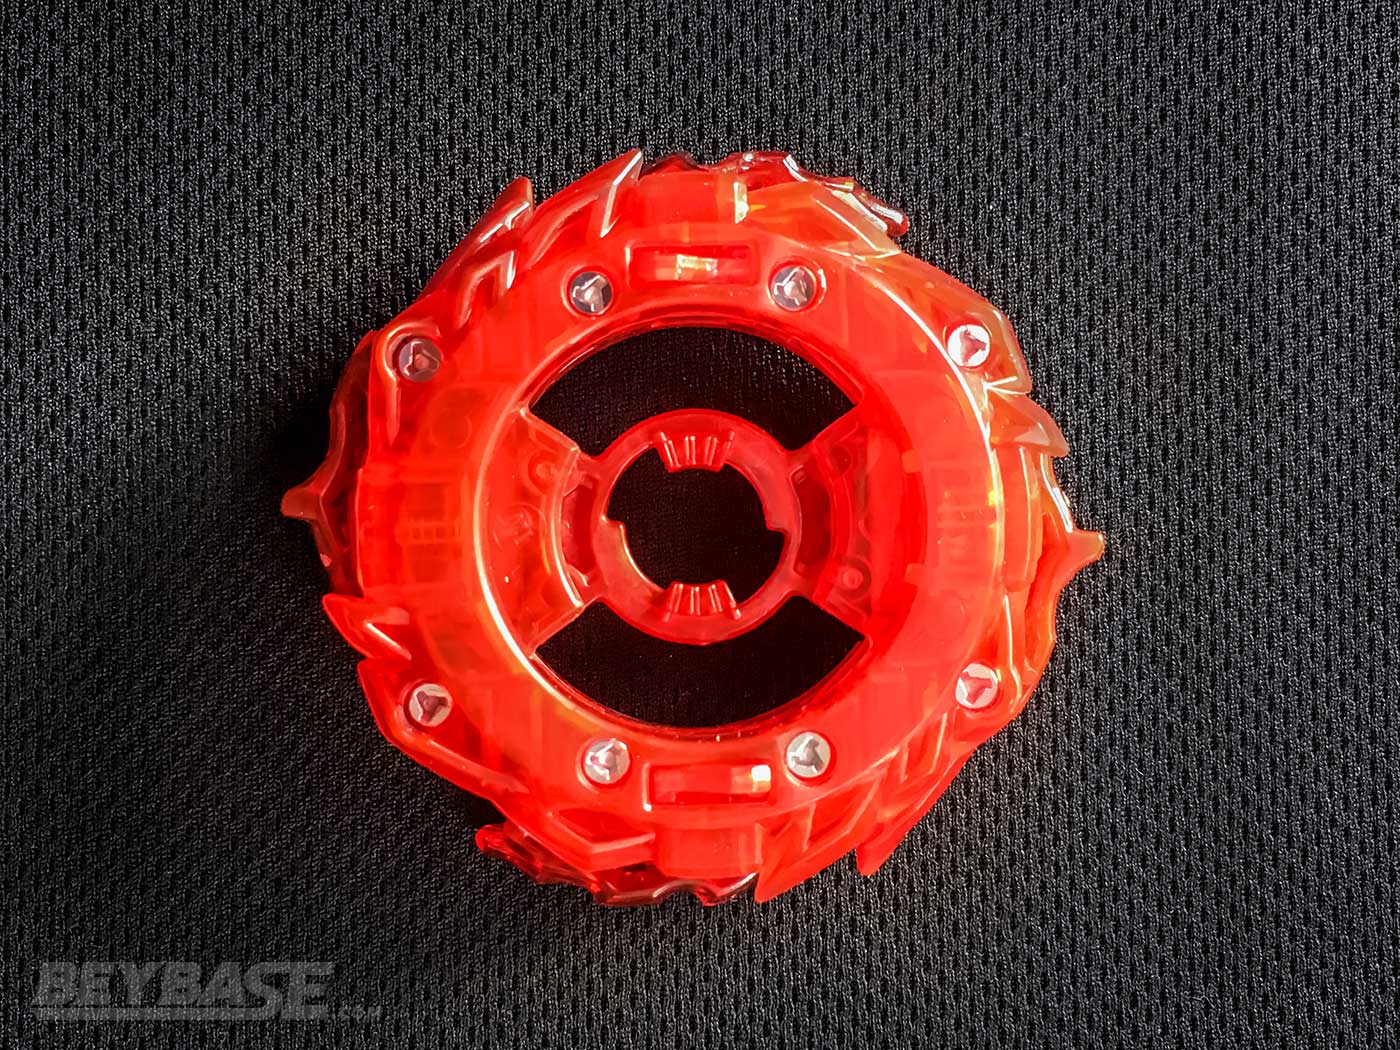
2. The Cho and Ou Disks Break Compatibility With Existing Beyblade Burst Parts
Normal Disks Are Not Compatible With Limit Break Rings
In order to make the Limit Break gimmicks technically possible on the Burn and Volcano Rings, they were made much thicker than a regular Ring/Layer.
As a result of this, all existing regular Disks released prior to the B-174 Limit Break DX Set have been rendered incompatible with these new Limit Break Rings due to their shorter tabs.
The distance a Disk needs to travel to reach the top of a Ring/Layer now has been increased, so the new Limit Break Disk tabs were made taller in order to achieve this.
This means that these new Disks are not compatible with older Layers/Rings as well.
Limit Break Disks May Increase Burst Finishes
If this continues into the future, one advantage of making Rings/Layers thicker is that we may see the ‘return’ of Burst Finishes as a realistic possibility in competitive same-spin matches eventually.
What activates the bursting mechanic in this series is the impact of a collision between two Beyblades causing the other to skip the teeth on its Layer.
But the removal of Disks from combos using Double Chassis like 3A, 2A, 2D, or 2B means that much more weight is physically attached to the “Layer” of your Beyblade.
This makes it harder for you to burst because instead of having a good portion of your combo’s weight attached to the Disk, you’re placing almost everything into the Layer, which makes it harder to shift even with huge impacts.
This, in combination with burst stopping gimmicks and the prevalence of Dash Drivers with stronger springs are the reason why we’ve seen a decrease in Burst Finishes over the past few years.
And it’s why sometimes you see that when a Burst Finish does occur, the spring of the Driver can barely even pop the Ring/Chassis off because of how heavy they are when combined.
I don’t see Double Chassis going anywhere just yet when it comes to competitive play, but if Takara-Tomy continues this trend of Limit Break Rings and Disks in the new season coming in 2021, we may eventually see the Burst Finish make a comeback.
Whether this is a positive or not is up for debate, however.
When it comes to attack types, I’ve always been of the opinion that if a risk of self-bursting exists, the incentive to use them drops dramatically. This is my greatest concern, especially seeing that exact scenario play out with Burn at times.
Other factors which affect burst resistance such as the teeth of the Ring, Sparking Chip Hook length/thickness, and the idea of a rubber burst stopper that we’ve first seen in the Lucifer 2 Sparking Chip exist as well, so it will be interesting to see where Takara-Tomy takes Beyblade Burst from here when it comes to properly balancing the series core gimmick: Burst Finishes.
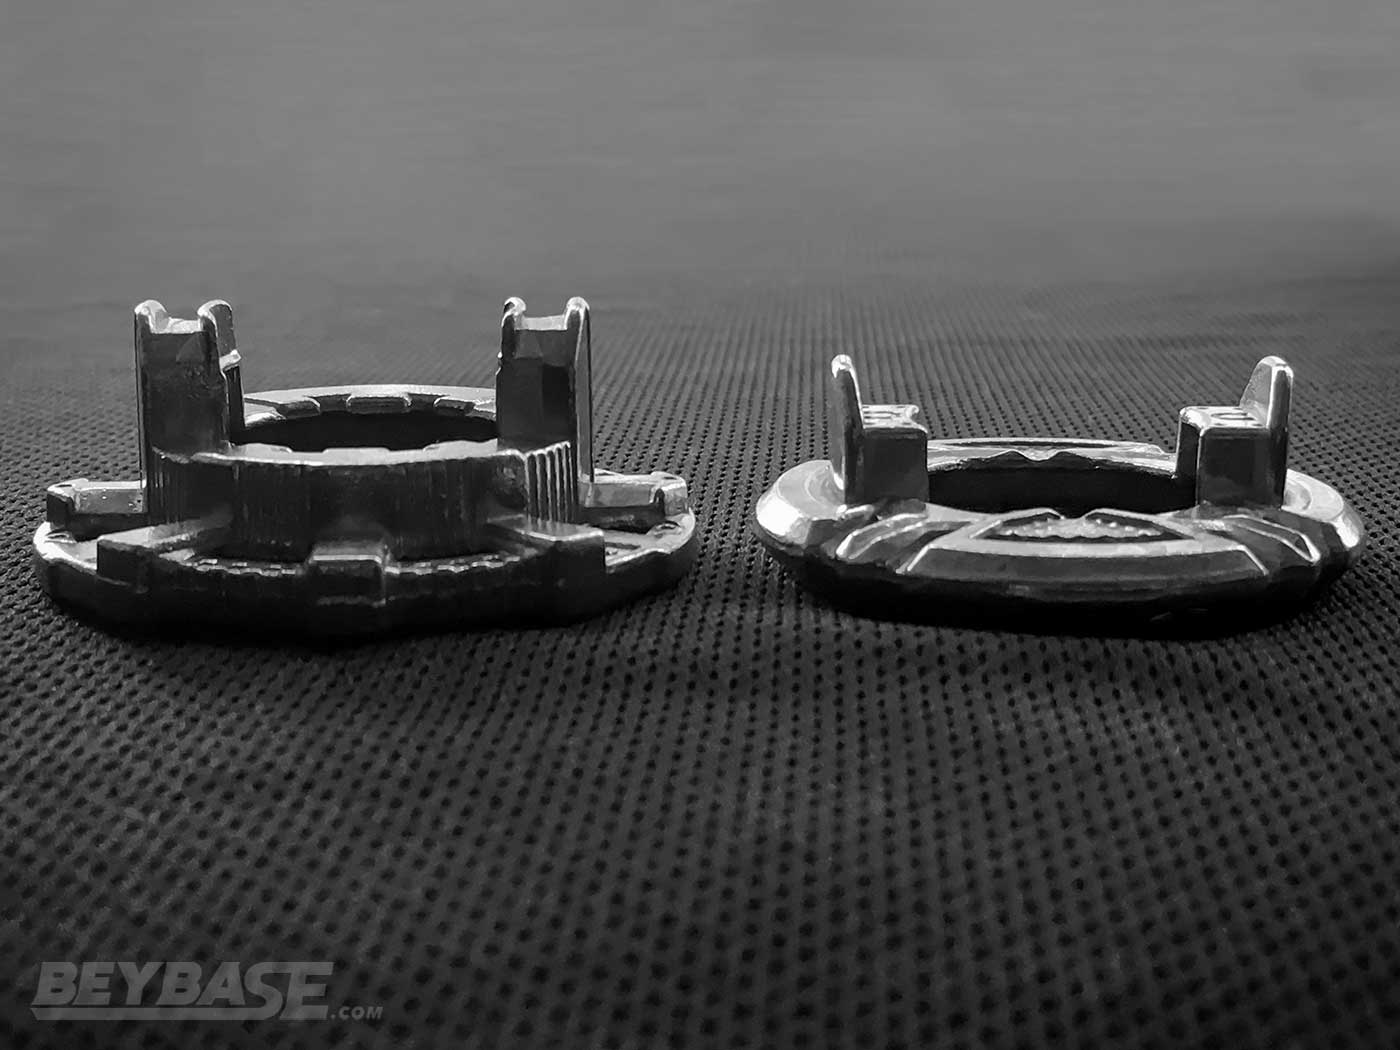
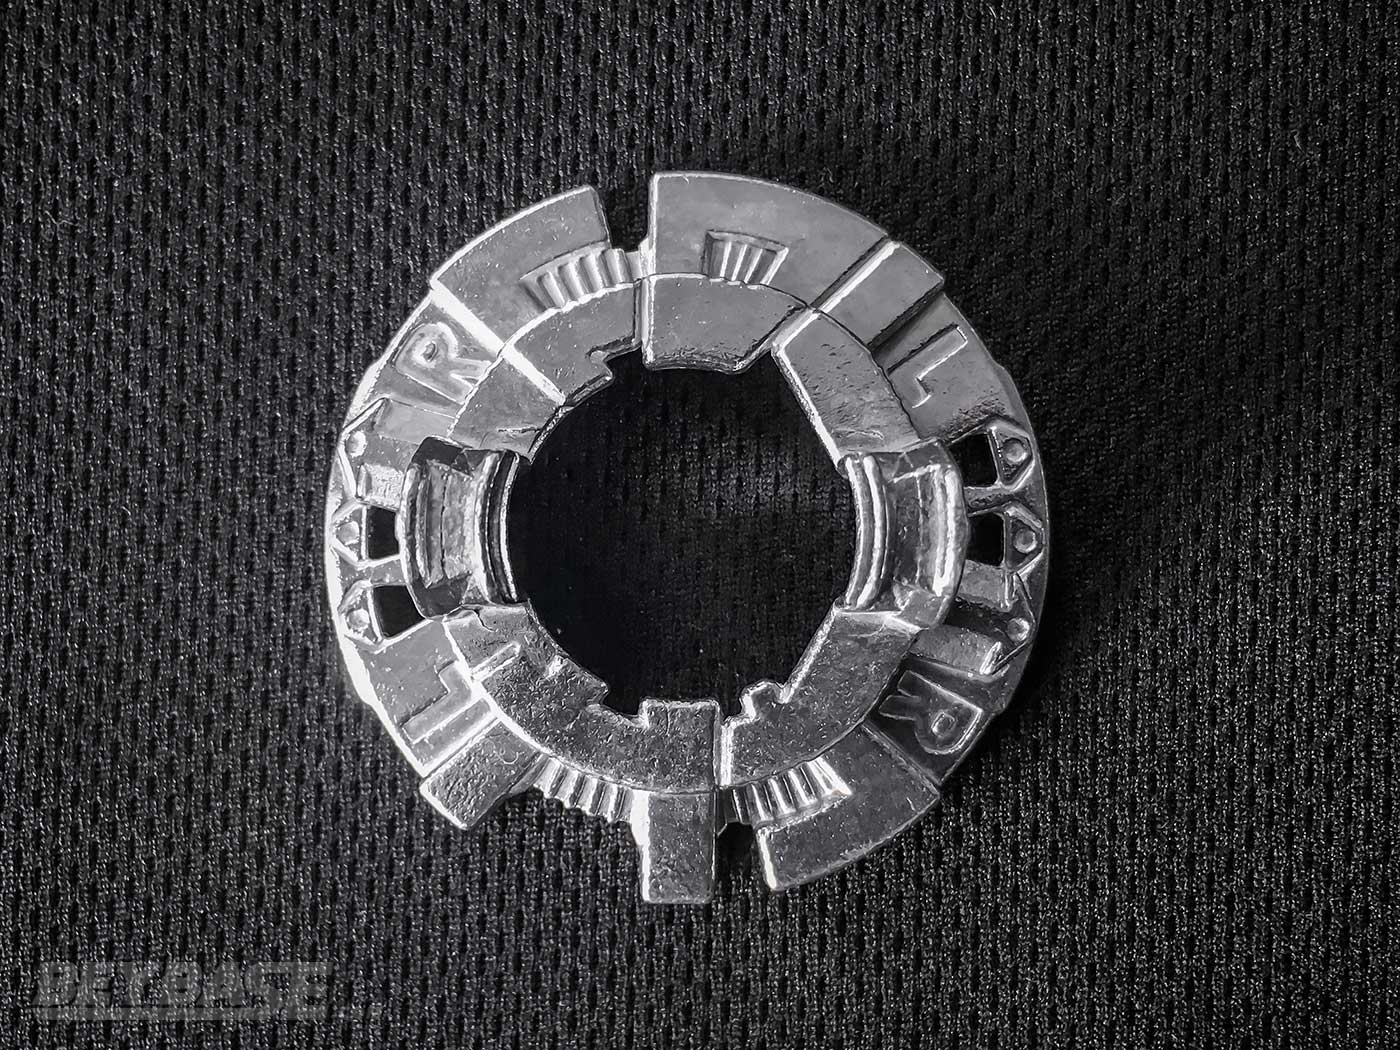
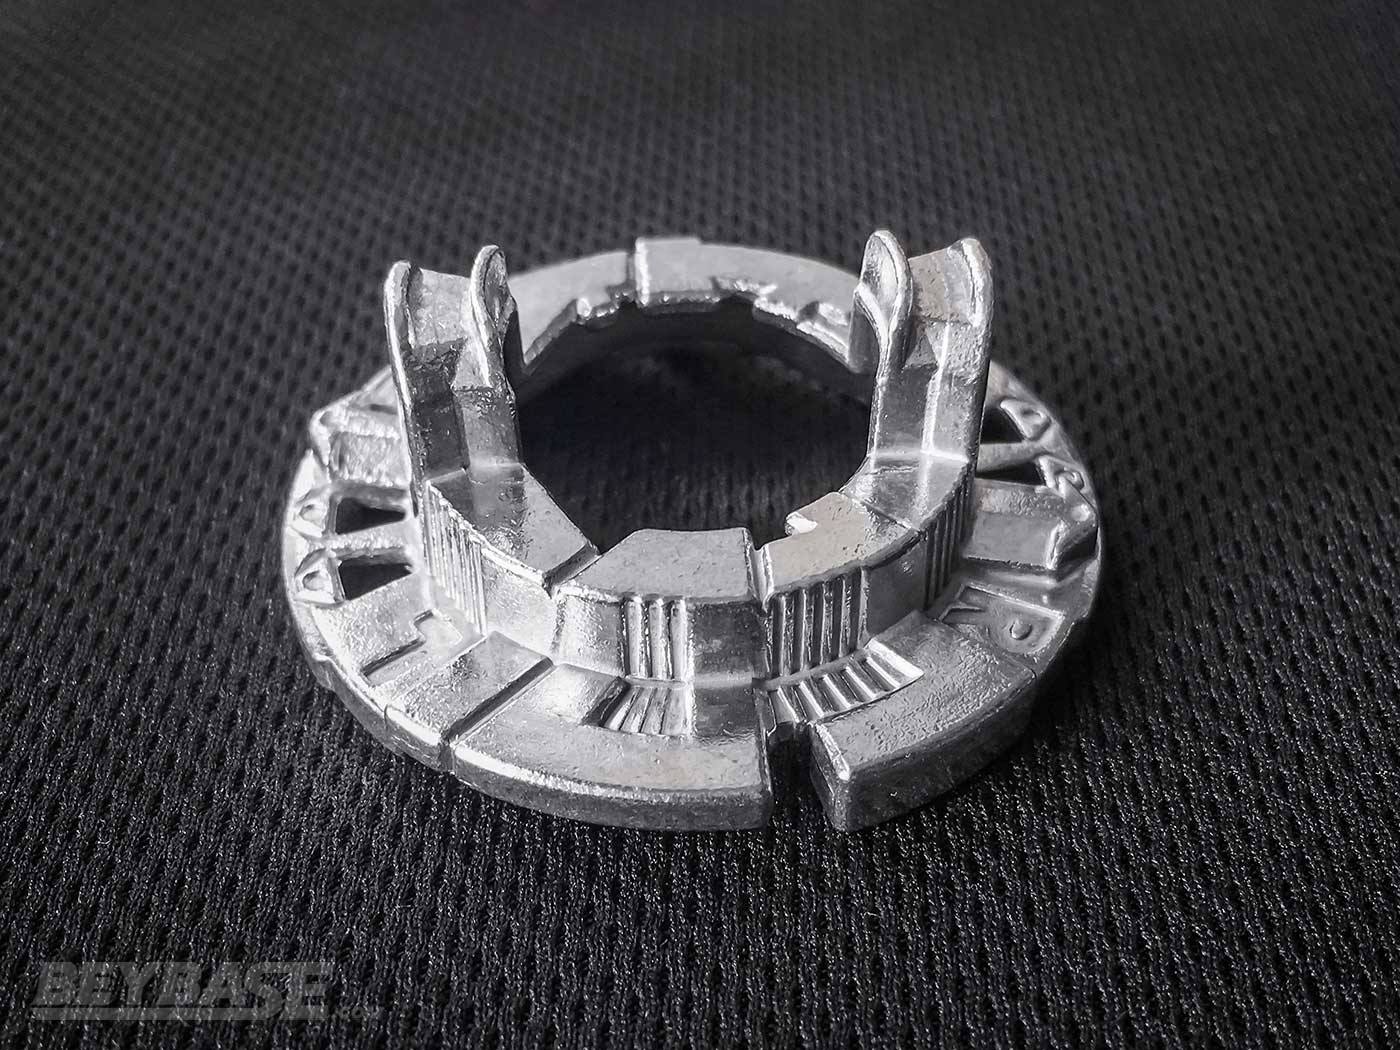
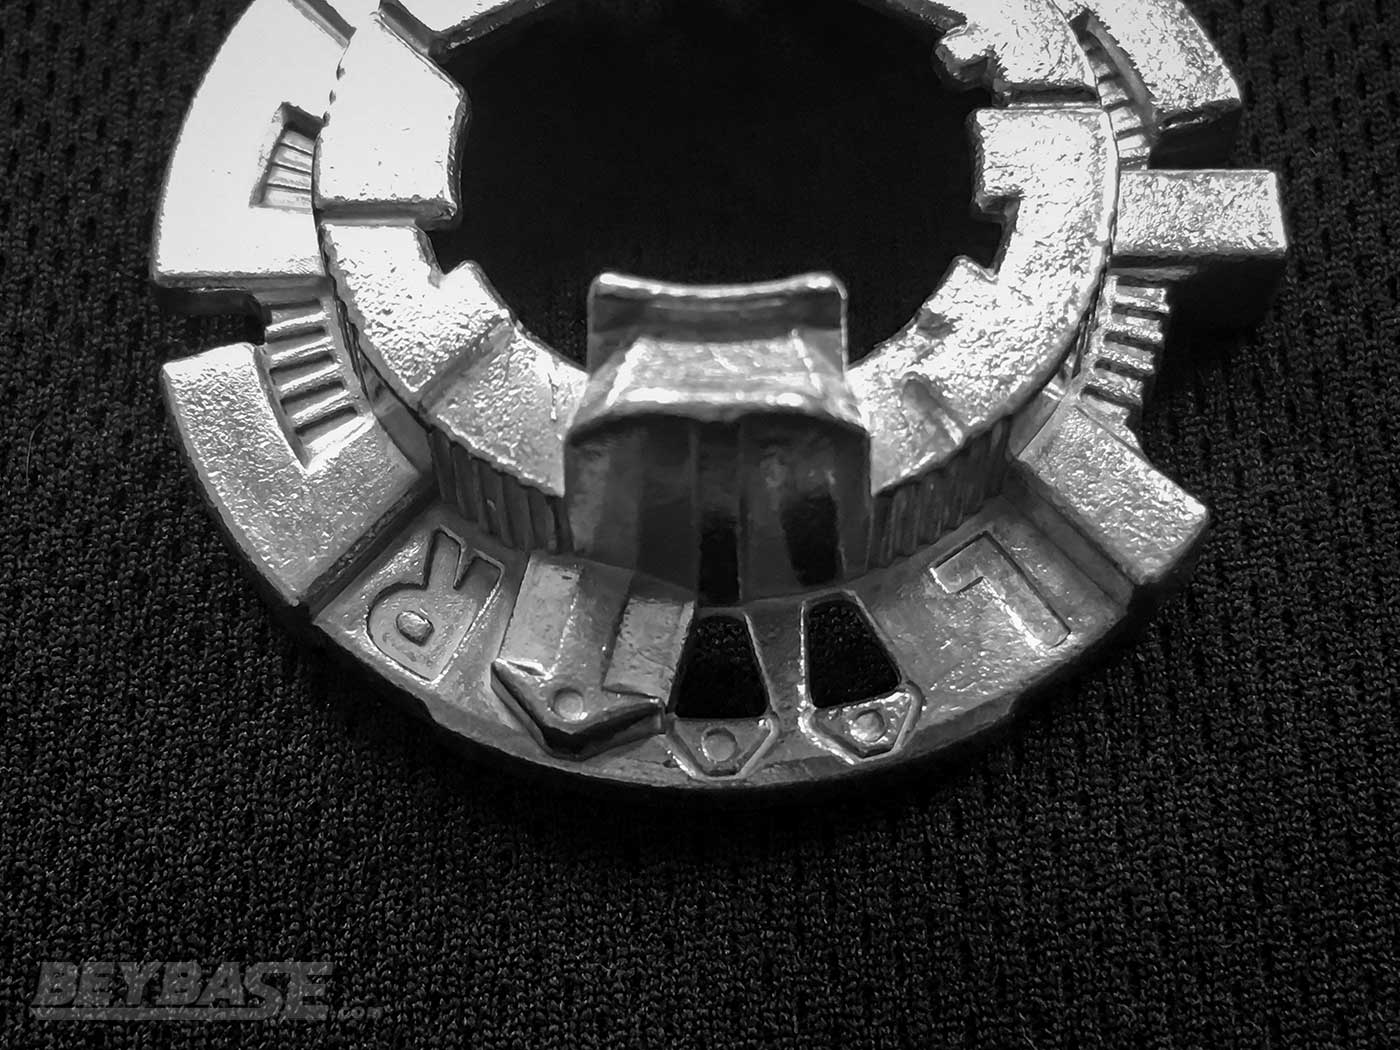
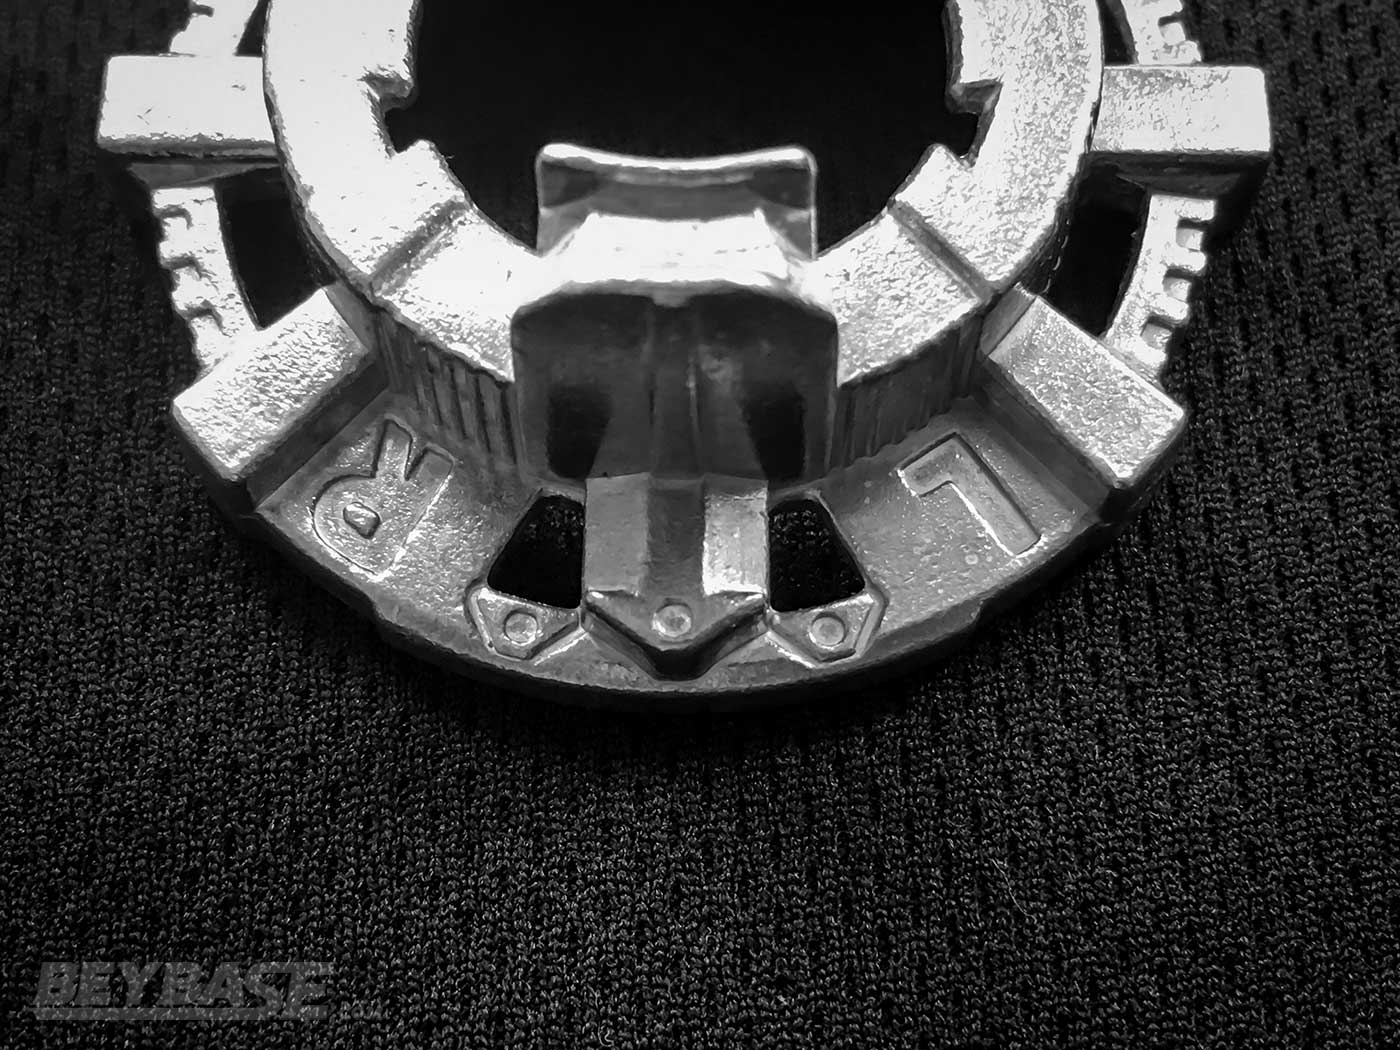
How The Weight Of The Cho And Ou Disks Compare To Normal Disks
The Cho (超) and Ou (王) Disks are within the new standard Disk weight range set by Wheel.
My Cho came in at 31.36g and Ou at 30.26g.
In comparison, taking the average weight of three Wheel Disks I own (30.39g, 29.91g, 30.29g)–30.20g–we can see that Cho comes in 1g heavier than Wheel and Ou is about on par with it.
While the Cho Disk is heavier than Ou, the Ou Disk has a more even weight distribution. This gives it more same-spin stamina.
The comparison to Wheel–the current gold standard for same- and opposite-spin stamina–however is a bit difficult.
There are a few reasons for this. First is that Wheel has far more weight placed around its perimeter, which increases its stamina greatly.
Limit Break Disks like Cho and Ou have a raised centre portion, which decreases stamina, but increases maximum RPM potential.
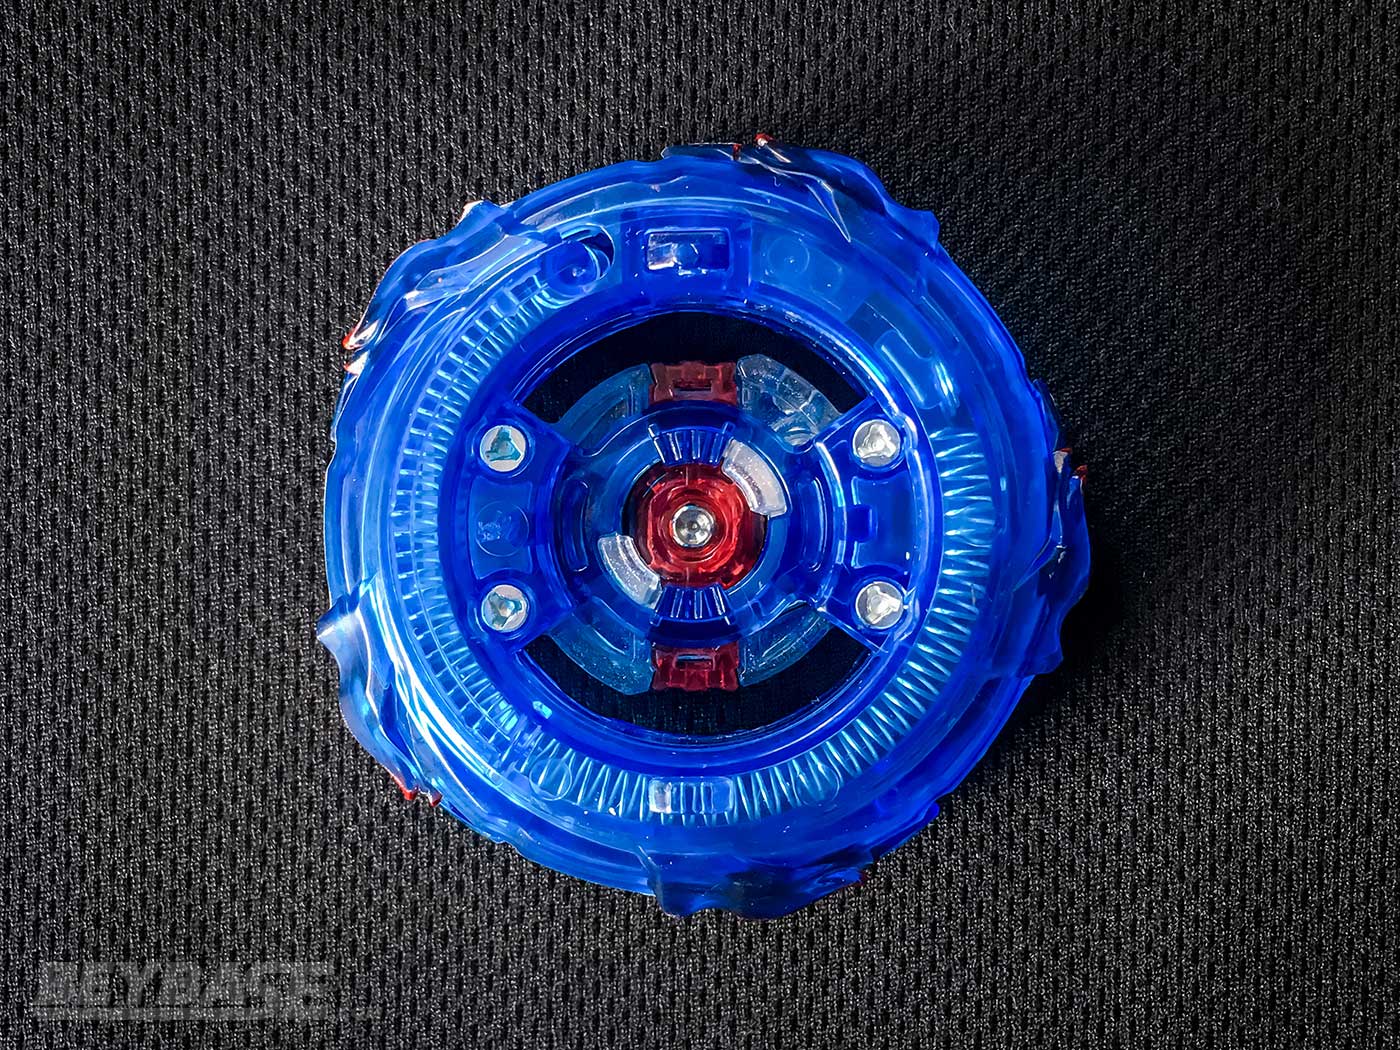
Cho & Ou Sit Lower Than Normal Disks
The second reason why the comparison to Wheel is difficult for Cho and Ou is because Limit Break Disks are designed to sit lower than regular Disks.
This means that they will scrape sooner on the stadium floor than a Disk like Wheel, which drains their stamina quicker at the end of a battle.
It’s possible that in the future we will get even heavier Disks with greater outward weight distribution that could overcome the lowered position and centralized weight inherent to the design of Limit Break Disks.
Takara-Tomy has also demonstrated more than ever recently that they are aiming to implement taller Drivers (like Wave, Mobius, High Blow’, High Jaggy’, High Survive, High Defense, etc) into the game. So there may come a time when the lower positioning of Limit Break Disks does not negatively affect them as much.
Finally, it’s worth considering that on some high Life After Death Drivers like the included Zone’+Z (Drivers which do not fall over easily and can spin for longer than their opponent at the end of a battle when tilted), the lower positioning does not always become a factor because the Disk even at the lower position may not touch the stadium floor.
But based on the game as it exists in this moment, I would say that Wheel outclasses them both.
Limit Break Activation Tabs
Part of what makes these Disks interesting though is that on each side they feature raised tabs which are used to trigger the Limit Break gimmick on Limit Break Rings like Burn and Volcano.
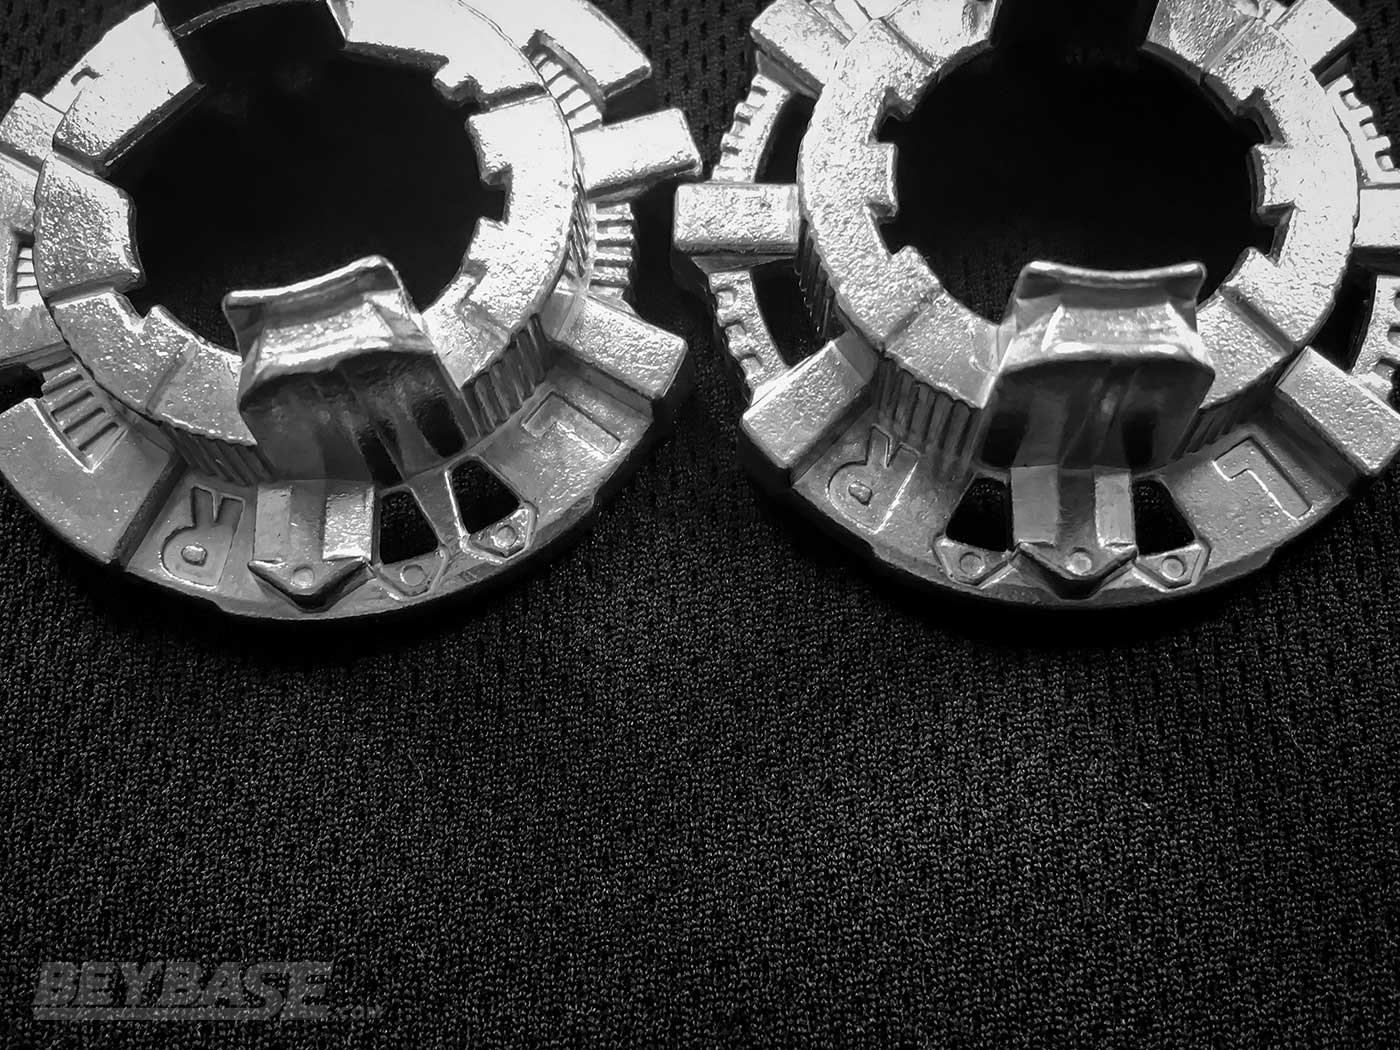
These tabs are placed in one of three positions. The positioning of these tabs determines when the Limit Break gimmick of your Ring will activate.
The Cho Disk has its tab placed on the first position of the “R” (Right-Spin) side of the Disk.
The Ou Disk has its tab placed on the middle position of the Disk.
What this means is that for example, if you use the Cho Disk with the Burn Ring, the Limit Break gimmick will activate when your combo has lost one click during battle due to the impact of a hit.
Conversely, if you use Cho with the Volcano Ring, the Limit Break gimmick will activate when it has lost its third click since in that scenario it would be considered to exist on the third slot of the “L” (Left-Spin) side.
Considering this, new strategic considerations emerge. For me, the most obvious one was using Ou instead of Cho with Burn when I first got this set because I wanted to delay the activation of its Limit Break due to the increased chances of bursting once it had activated.
3. The Xceed Dash + X and Zone Dash + Z Drivers Set New Standards for Attack & Stamina Types
Zone’ Is Effectively The First “Dash” Stamina Driver (Strong Spring)
Since the release of the first Dash Driver–Xtreme’ with Shadow Amaterios in 2018–Beyblade Burst players have asked if and when we’ll see a Dash Driver (Driver’s with stronger springs/burst resistance) for a stamina type.
I never thought we’d get there as it would risk breaking gameplay balance.
But here we are with Zone’. It’s technically classified as a “Balance” Driver … but it’s effectively a stamina Driver when you look at how it performs.
Before this, we had things like Trans’ and Zeta’ which contained “stamina” tips due to their mode switching abilities.
But these tips didn’t have enough stamina to really rival the heavy hitters in the metagame like Revolve and Xtend Plus. Zone’ does.
Many people are focusing–rightfully so–on the +Z and +X Driver Chips included with this set, but I wanted to first take a look purely at Zone’ to see where it stands in terms of pure same-spin stamina potential to other popular Drivers.
If it got anywhere close to them, it would instantly become intriguing because of the perk of high burst resistance afforded to it.
So, here’s some tests I conducted to try and find out:
Archer Hercules Wheel Zone’ vs. Archer Hercules Wheel Revolve
- aH.Wh.Zn’: 5 wins
- aH.Wh.R: 5 win
- Zone’ Win Percentage: 50%
In this test, whoever was launched first won.
Archer Hercules Wheel Zone’ vs. Archer Hercules Wheel Atomic
- aH.Wh.Zn’: 1 wins (1 KO)
- aH.Wh.At: 4 win
- 0 draws
- Zone’ Win Percentage: 20%
Zone’ had no chance here unless the Atomic Beyblade self-KOed.
Archer Hercules Wheel Zone’ vs. Archer Hercules Wheel Xtend+
- aH.Wh.Zn’: 4 wins (2 OS, 2 KO)
- aH.Wh.Xt+: 6 wins
- 0 draws
- Zone’ Win Percentage: 40%
This test was also not really in the favour of Zone’ … it is possible to OS Xtend Plus, but the chances of winning are relatively low. Especially if your opponent launches well and doesn’t cause their Xt+ to act aggressively nad self-KO.
The biggest problem for Zone’ in terms of its same-spin stamina is that it really loses a lot of it towards the end of the battle when it starts to lean over onto the free-spinning disk.
What these tests demonstrate is that the same-spin stamina of Zone’ is simply … not bad.
What they don’t demonstrate however is the potential benefit of the added burst resistance as well as the ability of Zone’ to aggressively circle the tornado ridge when launched near it.
I can see this movement pattern being used to counter attack types or switch up your movement pattern unexpectedly against an attack type user who doesn’t know Zone’ can do that.
The competitive applications of Zone’ may admittedly be limited, but if you are in a situation where you are stronger than your opponent, prioritize having a higher defensive potential in combination with good same-spin stamina, Zone’ may be a Driver worth considering.
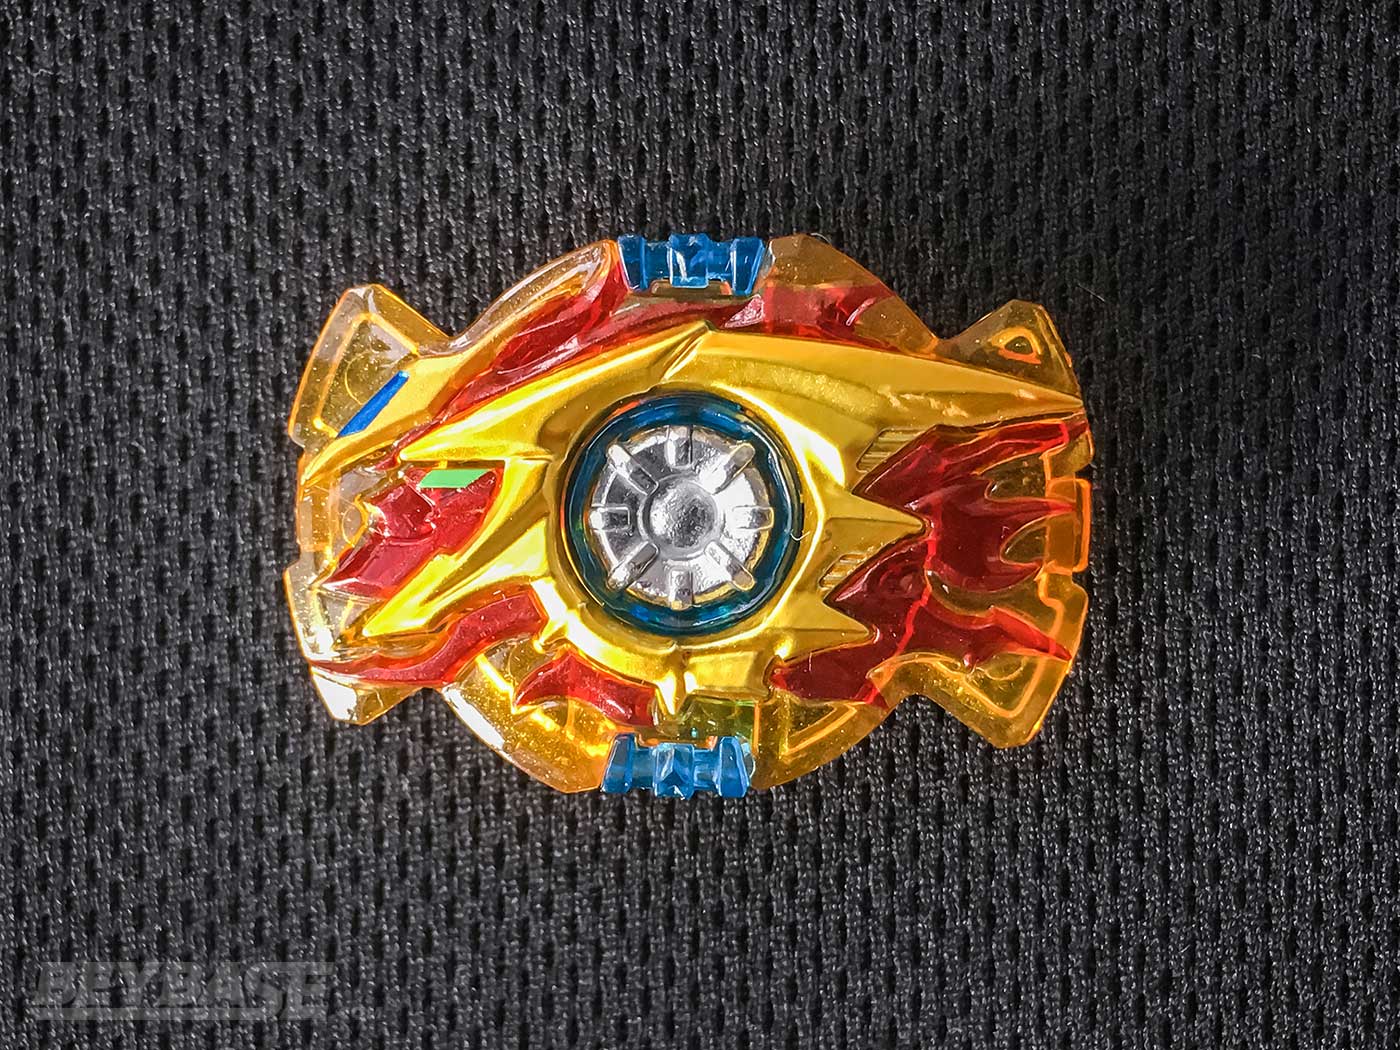
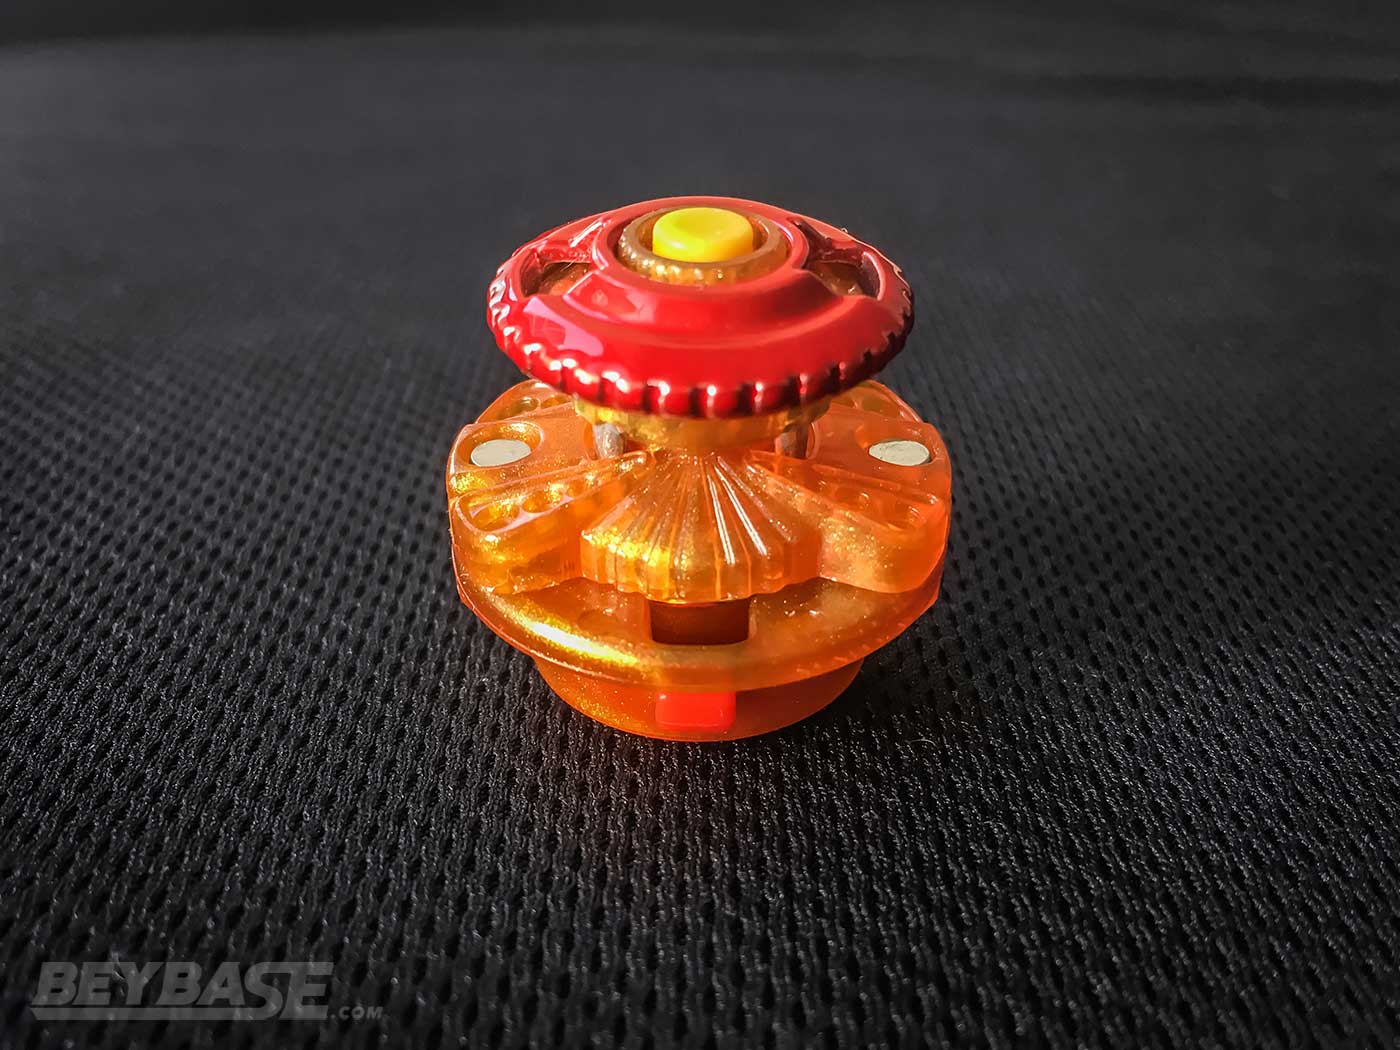
Compared to Xceed, Xceed’ Has Both Better Burst Resistance & Better Controllability
Xceed’ is a straight upgrade in every way to the original Xceed Driver included with B-159 Super Hyperion Xceed 1A. It features a rubber tip at its center surrounded by a free-spinning wider casing.
Being a Dash Driver, It is not only harder to burst than the original Xceed, but for some reason based on my testing it seems to be slightly more controllable as well when banked. It doesn’t maintain a flower pattern when banked as well as the Xtreme’ Driver, but it feels a bit more controllable than the Xceed Driver was.
This, combined with the existing qualities brought over from the original Xceed Driver which allow it to stall around of the ridge of the stadium at high speeds and outlast other top tier attack Drivers in opposite spin like Xtreme’ make Xceed’ a solid option to consider when constructing your attack combos.
Driver Chips Add A Meaningful New Customization Option
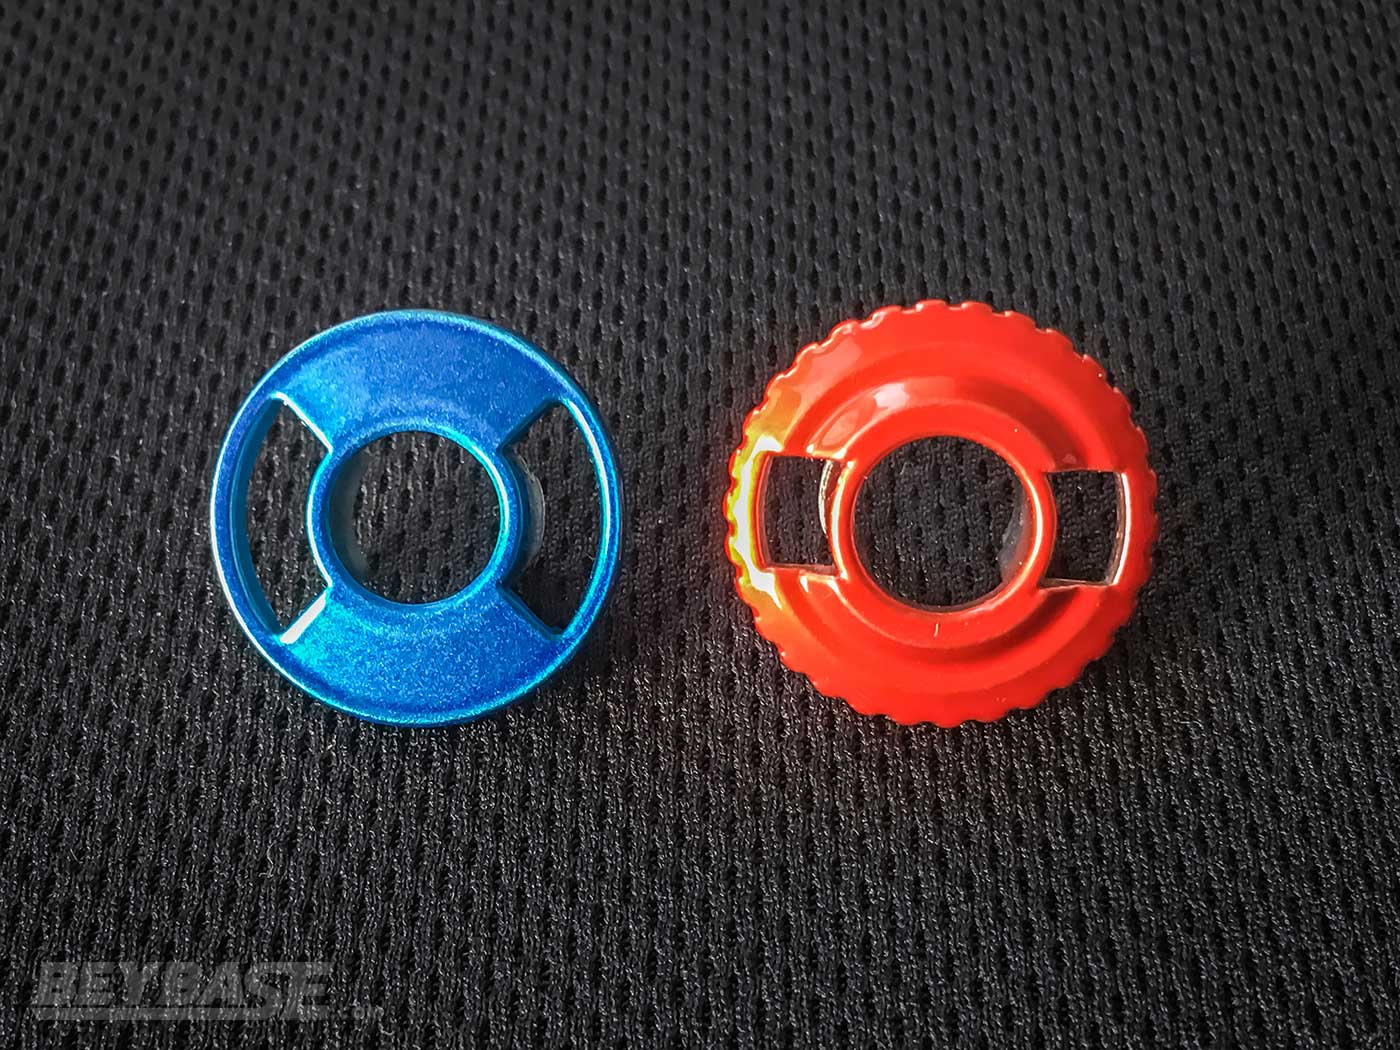
Included with the Limit Break DX Set are a set of brand new parts designed specifically as attachments to the Zone’ and Xceed’ Drivers: the +Z and +X Chips.
These all-metal circular chips can be interchangeably attached to the bottom of Zone’ and Xceed’ Drivers. They both allow the tip of Zone’ and Xceed’ to peek through the opening at their centre.
The +X Chip has a ridged perimeter and raised secondary level around the centre where the Driver tip comes through. When attached to a Driver, it disables the free-spinning casing surrounding the tips on Zone’ and Xceed’.
The +Z Chip has a smooth perimeter and is cone shaped as it leads up to the centre where the Driver tip comes through. It is slightly shorter than the +X Chip, which allows more of the Driver’s tip to be exposed. When attached to a Driver, the casing surrounding the tips of Zone’ and Xceed’ is allowed to continue spinning freely.
Xc’+X, Xc’+Z, Zn’+Z, and Zn’+X therefore all perform differently.
I’m hoping that Takara-Tomy will continue this line of Drivers and Chips into the future with new variants! There are many possibilities such as the introduction of rubber Driver Chips or something like Xceed’ but with a metal flat tip.
The +Z and +X Chips Provide An Opposite Spin Performance Boost
Personally, I prefer the +Z Chip on both Zone’ and Xceed’ due to the considerable boost to opposite spin performance it provides. The +X Chip is not necessarily bad in this department, but +Z is better, as these tests demonstrate:
Archer Hercules Wheel Xtend+ vs. Hell Salamander Wheel Zone’+X
- aH.Wh.Xt+: 4 wins
- hS.Wh.Zn’+X: 1 win
- 3 draws
- Zone’+X Win Percentage: 20%
Archer Hercules Wheel Xtend+ vs. Hell Salamander Wheel Zone’+Z
- aH.Wh.Xt+: 4 wins
- hS.Wh.Zn’+Z: 6 wins
- 4 draws
- Zone’+Z Win Percentage: 60%
With performance like the above, Zone’+Z in particular fits in alongside the top Drivers for “Life After Death”/opposite spin stamina in the game like Xtend Plus, Rise, Bearing, and Mobius.
In fact, I did a few more sets of tests to further illustrate this:
Tempest Diabolos Wheel Zone’+Z 1S vs. World Spriggan Paradox Rise (Worn) 1S (Left-Spin)
- TDb.Wh.Zn’+Z 1S: 4 wins
- WSP.Pd.Rs 1S: 6 wins
- 2 draws
- Zone’+Z Win Percentage: 40%
Tempest Diabolos Wheel Zone’+Z 1S vs. World Helios 2 Bearing 2D
- TDb.Wh.Zn’+Z 1S: 5 wins
- WHl2.Br 2D: 0 wins
- 2 draws
- Zone’+Z Win Percentage: 100%
Interestingly however, Zone’+Z runs into some problems against the new Drift Driver from Lucifer The End:
Archer Hercules Wheel Drift vs. Hell Salamander Wheel Zone’+Z
- aH.Wh.Dr: 5 wins
- hS.Wh.Zn’+Z: 0 win
- 8 draws
- Zone’+Z Win Percentage: 0%
Despite the shocking 0% win percentage, note the incredible eight draws between the two.
This matchup illustrated the new Beyblade metagame better than anything else I’ve seen so far … these Beyblades just don’t fall over. In a sense, there’s no “Death” anymore if we want to refer to these Drivers having strong “Life After Death”, which is amusing.
Despite Zone’+Z falling to Drift, it does still have a stronger spring going for it, so it does still carry that as a utility that could place it above Drift if you were forced to pick one or the other.
Being entirely metal, both the +Z and +X Chips assist in keeping them upright towards the end of a battle. This combined with their extreme width–and in the case of +Z, keeping the tips of Zone’ and Xceed’ free-spinning–is what helps them perform so well against opposite spin opponents.
The Downfall of +Z And +X: Same Spin Matches
However, as has been an ongoing theme with several of the parts in this set, Drivers using +X and +Z don’t perform nearly as well in same spin matches.
If you launch Xc’+X, Xc’+Z, Zn’+Z, and Zn’+X hard you risk self-KOing in the Burst BeyStadium Standard Type. Even more so if your combo is not balanced properly.
To make matters worse, even if you don’t self-KO, the same-spin stamina potential of these Drivers is quite abysmal. This is to be expected from Drivers with very wide tips due to increased friction with the stadium floor.
Zn’+Z is the best of the bunch due to the sharper tip of Zone’, but when knocked off balance it loses stamina quite quickly.
Best Beyblade Burst Sparking Xceed’ Combo: Rage Diabolos Xceed’+Z 3A
Rage Diabolos Xceed’+Z is the best combo for the Xceed’ Driver, and it also makes a strong case for being the best attack type combo in the game too.
I’ll explain more below, but here’s what you need to build it:
Want to build RDb.Xc’+Z 3A’? You’ll need:
-
Rage & 3A:
- B-168 Rage Longinus Destroy’ 3A
-
Diabolos (1 of the following):
-
Xceed’+Z:
One of the biggest weaknesses of attack types has always been that in general they tend to perform worse against opponents in the opposite spin direction.
And given that most attack types do not have anywhere near top tier opposite spin stamina potential/Life After Death, this can make such matchups extremely dicey. You need a perfect shot to have a chance to win within the first few seconds of the battle.
In some ways, this is really how it should be. Giving an attack type high LAD has the potential to be game-breaking because it eliminates a huge weakness that attack types typically have.
Drivers like Destroy’ have in the past allowed for some higher same-spin stamina and LAD than traditional attack type Drivers like Xtreme’, but the trade off was controllability, plus the fact that at no point has Destroy’ ever been close to the very top tier for opposite spin performance in Drivers.
Xceed’+Z on the other hand–while still a step below Drivers such as Zn’+Z or Xt+ for opposite spin stamina–does approach this top tier. The controllability trade off is still there to a degree, but the rubber tip of Xceed’ ensures that it isn’t completely unmanageable.
In combination with Rage Diabolos 3A, this combo is able to inflict vicious knock-outs and outspin both low LAD combos and even high LAD combos at times. I’d highly recommend experimenting with it!
The Trend Towards High “Life After Death” Drivers
As is to be expected, Takara-Tomy has consistently pushed to release Drivers with higher and higher Life After Death potential since the beginning of Beyblade Burst in 2015.
If weight is one way of introducing power creep in Beyblade, Driver LAD is certainly the second factor they have been exploiting to make each subsequent release and series generally more powerful than the last.

The +X and +Z Chips demonstrate both of these things both through their physical width and materials used to create them.
As seen above: with Revolve we had regular plastic, Bearing used POM with lower friction for its tip, and now we have the +X and +Z Chips which are both metal and wide in order to improve LAD.
I’ve seen some players express discontent when it comes to recognizing how huge of a factor has been playing, especially as of late.
But for me, I actually see this as a positive. The reason is because to achieve higher LAD you generally need something which has a wider tip which can spin for longer without falling over … this is exactly what Takara-Tomy has been giving us through Drivers like Mobius, Drift, Xtend+ and of course the various combinations afforded by the +X and +Z Chips.
In making tips wider however, you sacrifice same spin performance and controllability.
What this means is that ironically, by introducing such Drivers which promote stronger and stronger opposite spin performance, you’re simultaneously promoting the usage of other Drivers which carry strong same spin stamina and controllability.
And in fact, in the midst of this, Takara-Tomy did in fact release a new Driver with the best same-spin stamina in the game not too long ago: Hybrid.
Yet for some reason, it–and same-spin stamina focused Beyblade combos–haven’t really seen as much focus among the competitive community in my experience.
Various factors can and have played into this result, but it’s important for players to remember how much same-spin stamina matters.
Even if you’re not willing to use something like Hybrid, or Atomic because of the opposite spin performance you’d be sacrificing; you should at least be familiar with the differing same-spin stamina levels among high LAD Drivers. You should know the answer to questions like: “Which Driver generally has better same-spin stamina: Zn’+Z or Xtend+?” (the answer is Xt+).
In a metagame where LAD is seemingly top of mind for many competitive players, it’s worth considering how you can catch someone off-guard and beat them in a same-spin stamina match. Especially in WBO Burst tournaments where spin direction switching is not permitted for Rings like World, this could be the difference between winning and losing.
If weight is one way of introducing power creep in Beyblade, Driver LAD is certainly the second factor they have been exploiting to make each subsequent release and series generally more powerful than the last.
Sponsored: Order the newest Beyblades at malloftoys.com!
Heads up: If you buy something through Mall of Toys, you won’t pay any extra, but I’ll get a small commission. This helps me keep things running. Thanks for your support!
4. The Long Sparking BeyLauncher L & R Are The Most Powerful Launchers Yet
The Long Sparking BeyLauncher L and Long Sparking BeyLauncher R included with the Limit Break DX Set are more powerful versions of the original B-165 Sparking BeyLauncher and B-166 Sparking BeyLauncher L due to their longer strings.
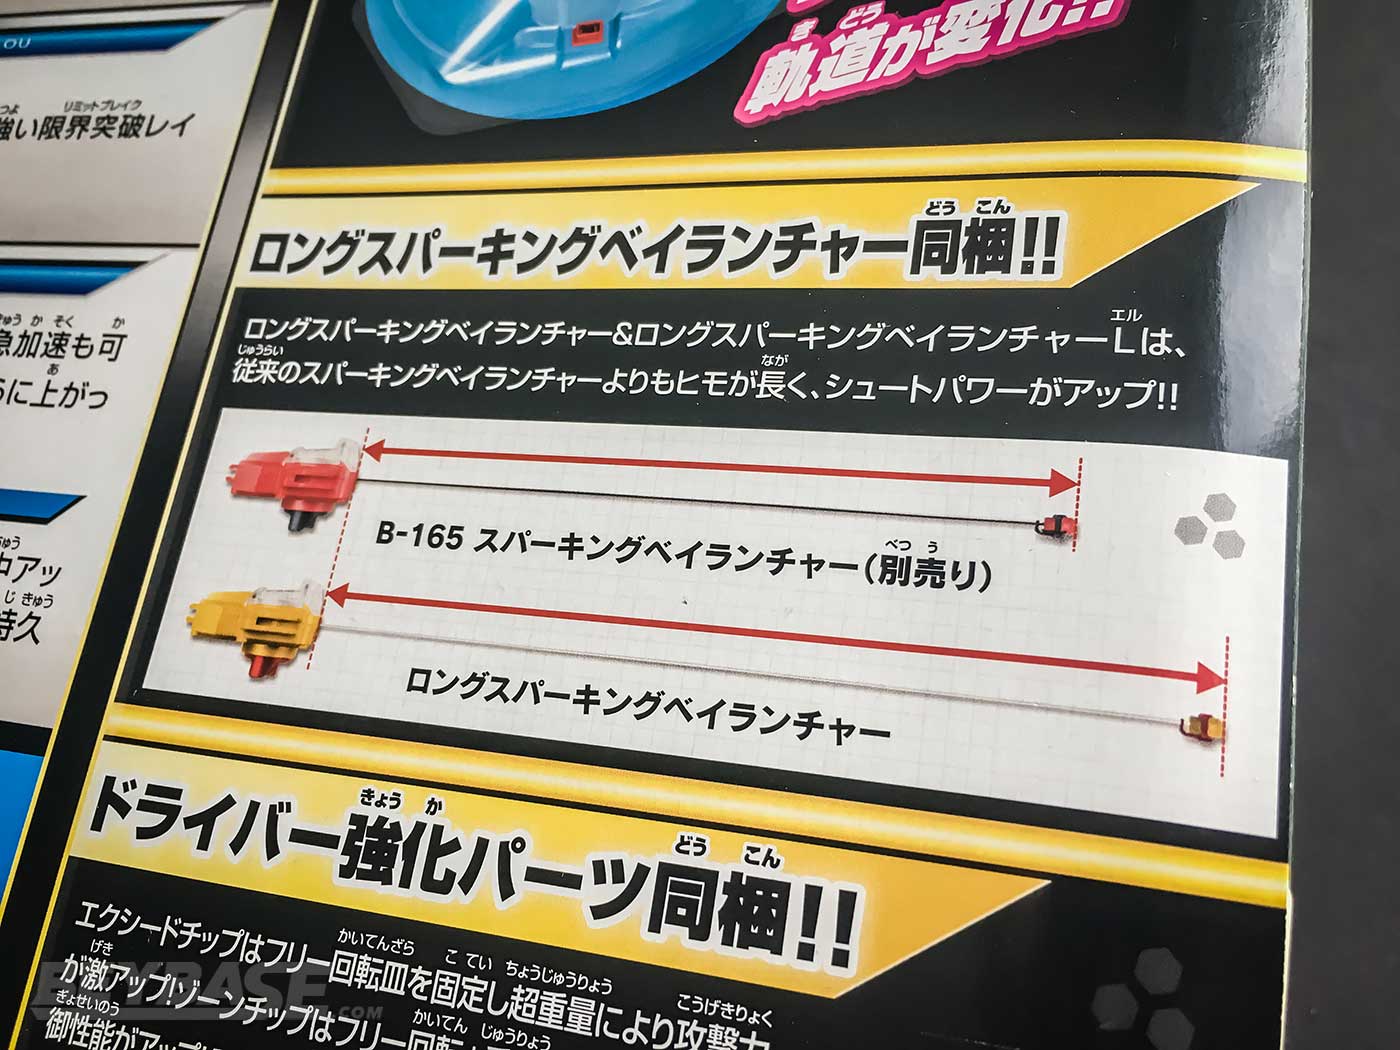
The original Sparking BeyLaunchers had some breakage issues. I almost broke one of mine and found that often your launcher would skip if you weren’t careful to pull the string slowly before a battle to ensure it was working. But so far I haven’t experienced any such issues with the Long Sparking BeyLaunchers.
As I talked about in my “What are the Best Beyblade Burst Parts?” article, the Long Sparking BeyLauncher L and Long Sparking BeyLauncher R are the launchers I would recommend the most right now.
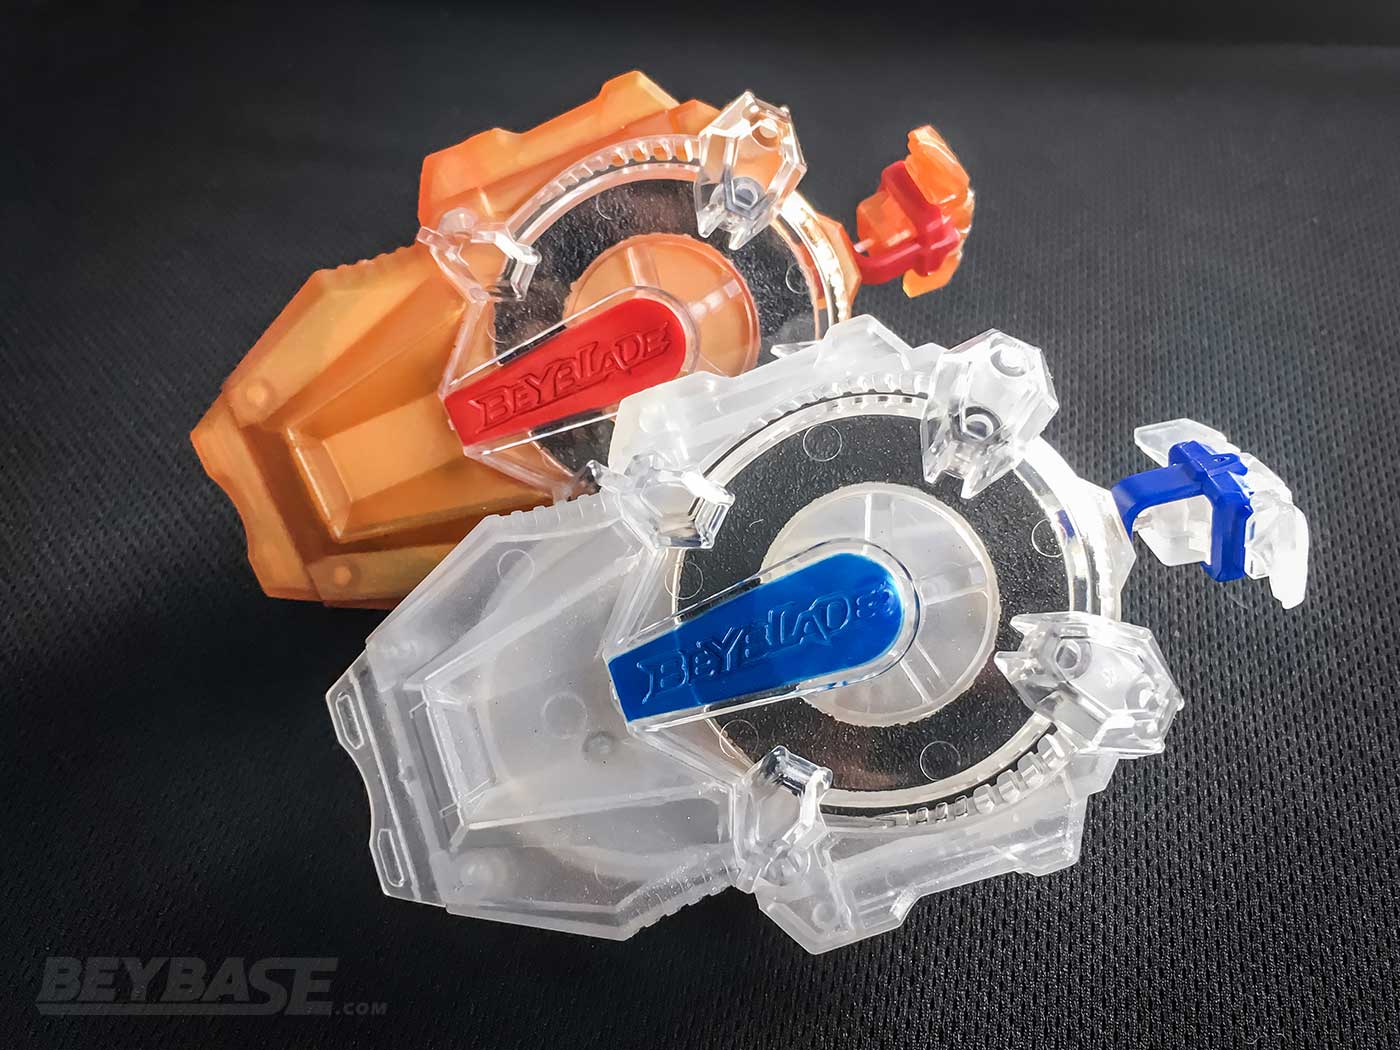
They offer extremely powerful launches and are well-suited to the heavier Beyblades found in Beyblade Burst Sparking, but I would caution players to be sure they practice with these launchers to understand how much power is appropriate based on the Beyblade they are using.
Launching full strength isn’t always the right answer! It might even be the case that a less powerful launcher could be a better choice for you.
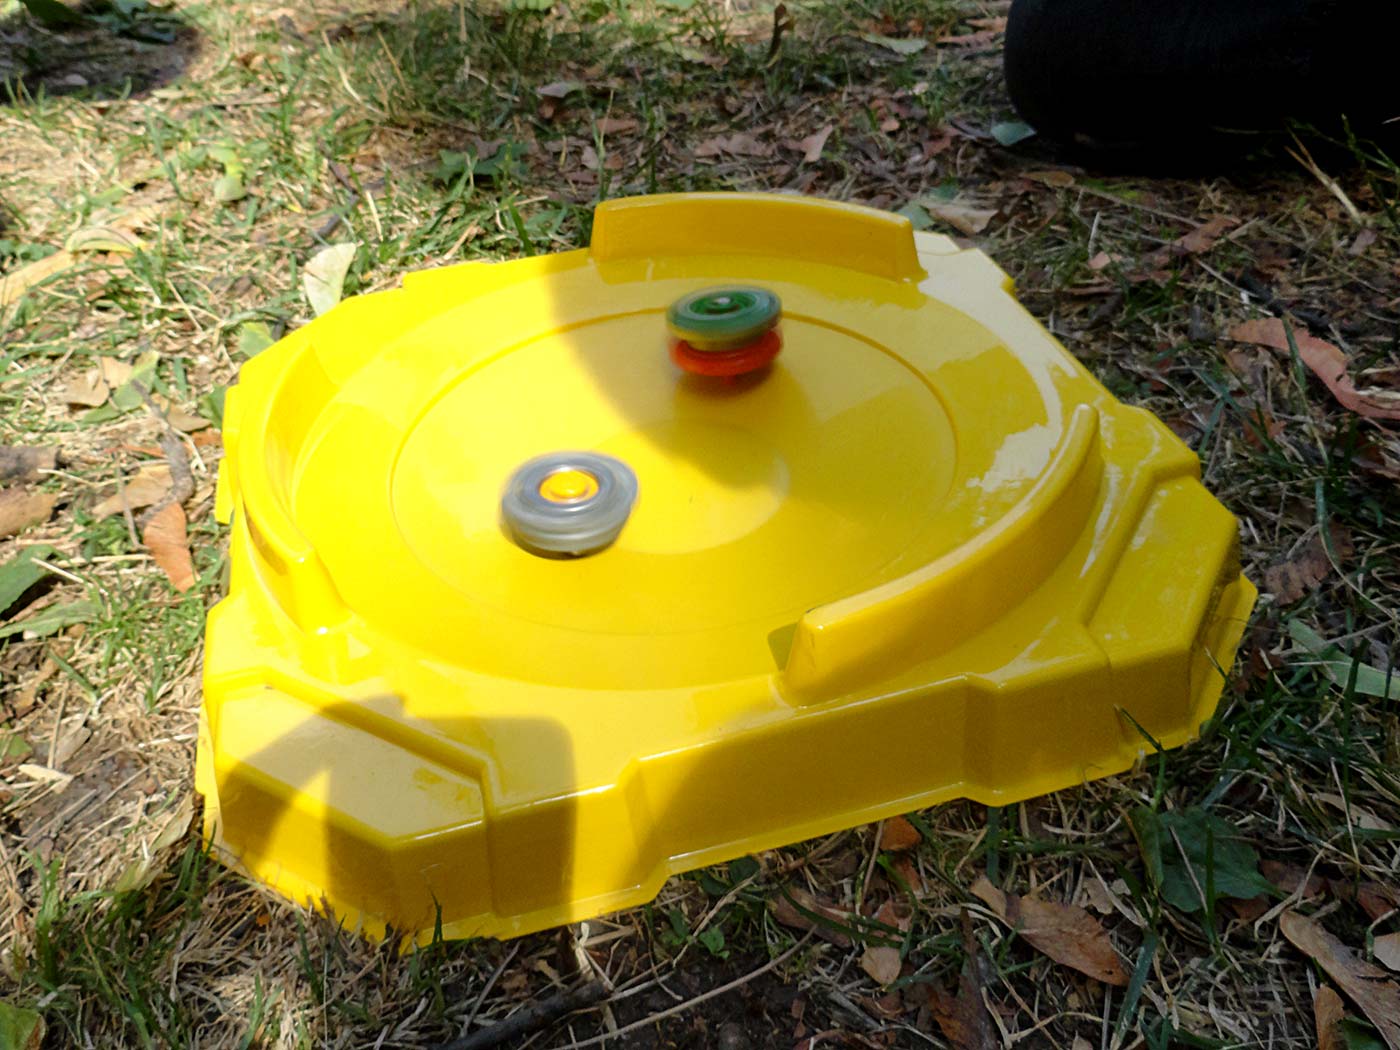
5. The Dash BeyStadium Is Fun But Doesn’t Eclipse the Burst BeyStadium Standard Type for Competitive Play
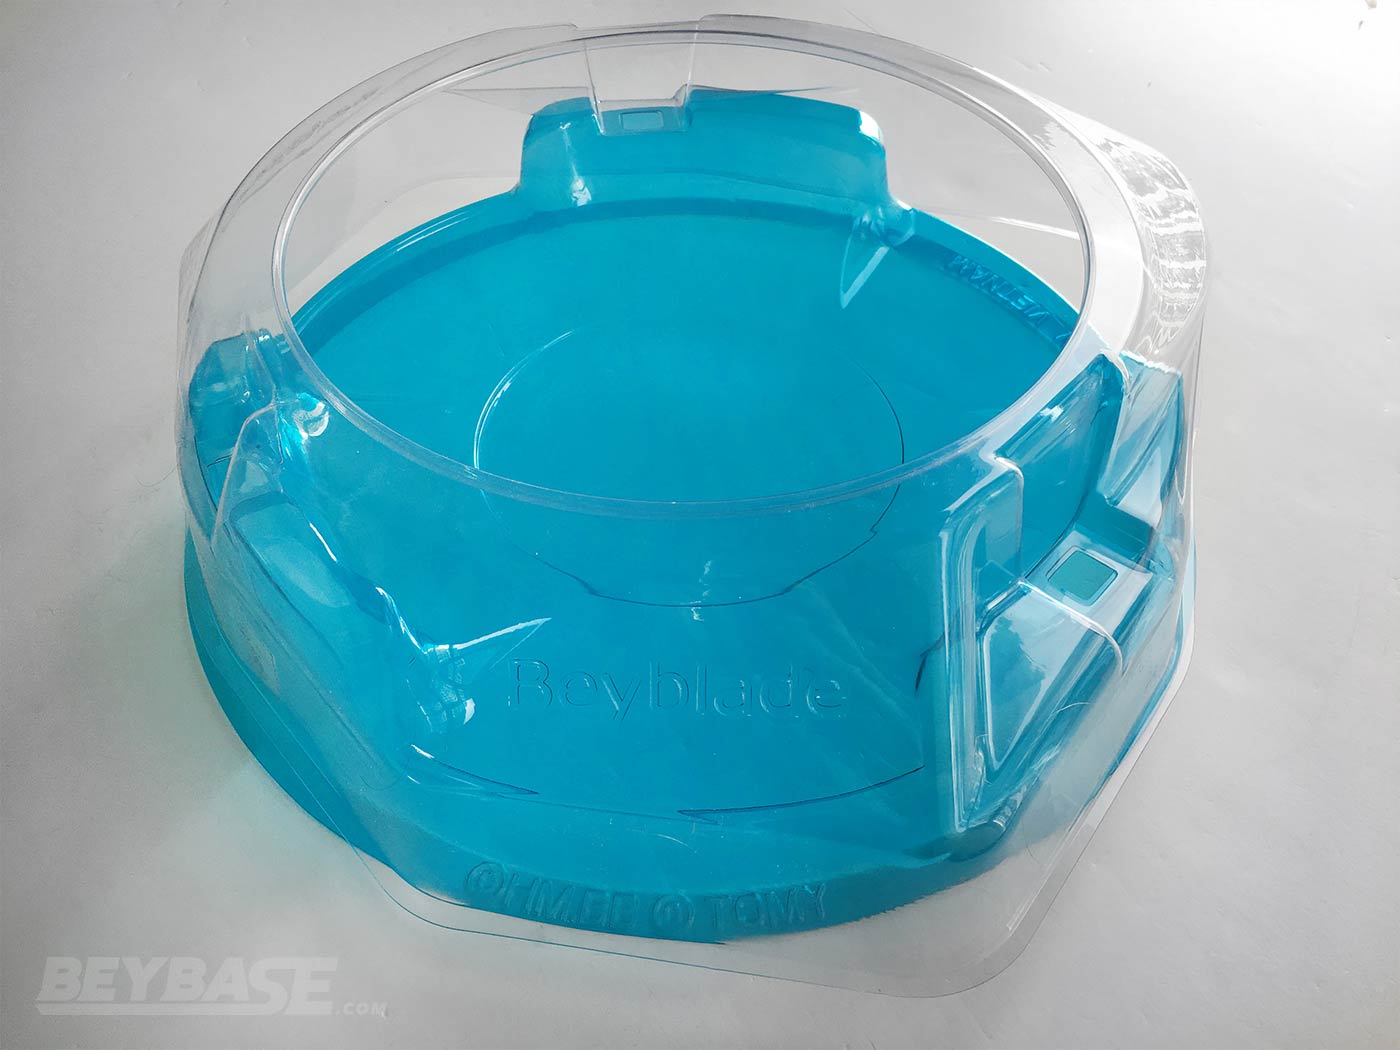
Describing The Dash BeyStadium Design
Throughout the history of Beyblade Burst we have seen a plethora of creative stadium designs from both Takara-Tomy and Hasbro.
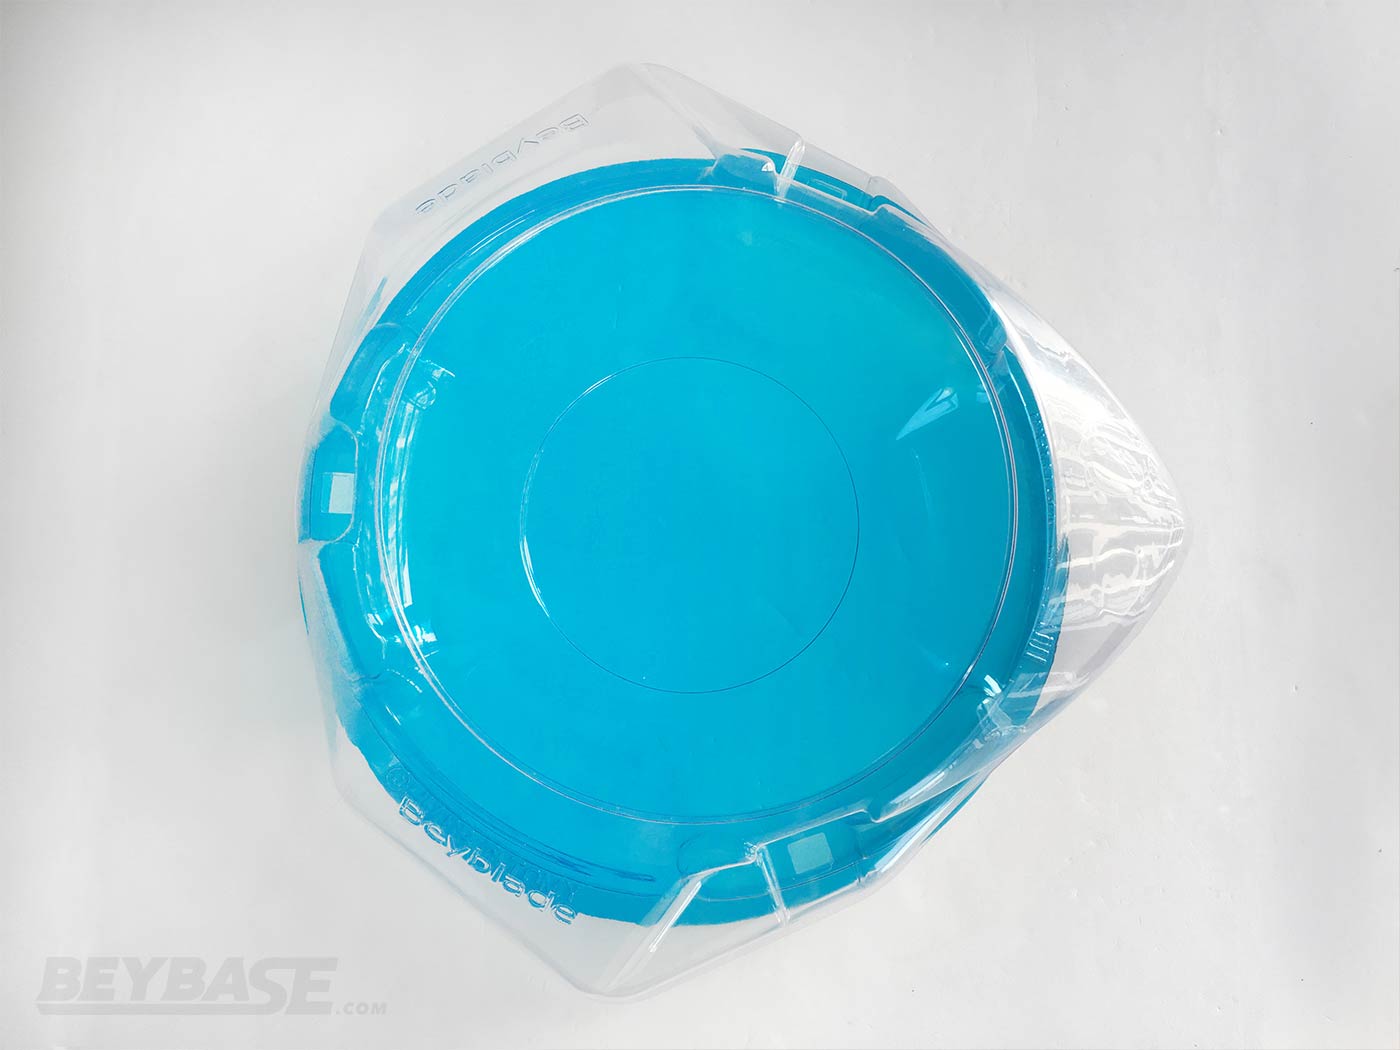
The new Dash BeyStadium included with the Limit Break DX Set is no exception.
It features a traditional circular design with three exits and has a stadium cover, similar to the Burst BeyStadium Standard Type, but this is just about where the similarities end.
Stadium Cover & Exits
The stadium cover is an almost triangular shape. The walls of this cover are very close to two of the exits, leaving only a small area where most Beyblades could fall through or become stuck within them. The third exit is covered by the point of the stadium cover’s semi-triangular shape and is therefore much larger and easier to KO Beyblades into.
The two smaller exits feature a tornado ridge which helps to further prevent Beyblades from being knocked out unless the power from the hit is just right.
The lip of the larger exit on the other hand, is completely flat. This allows Beyblades to freely slide outside the stadium.
Stadium Central Area
The central area of the stadium floor features a circular ridge which helps to keep Beyblades towards the centre of the stadium for greater chance of contact. Some tips may be able to circle around the perimeter of this small area if they can catch this ridge properly.
Stadium Outward Semi-Flat Areas (“Dash Area”)
Outside of this towards the exits are some nearly flat areas called “Dash Areas” just in front of each exit. These serve two purposes:
1. To prevent Beyblades from being KOed unless they have the momentum to surpass the relative flatness of these areas.
2. To allow Beyblades knocked back into these areas to swoop back into the central area for an attack with some level of momentum.
Designed For Drivers With Movement In Mind
Up until now, Drivers with wide tips like Mobius have been extremely risky, difficult, and not advisable to use in the Burst BeyStadium Standard Type for battles in the same spin direction as their opponent.
This is due to their poor stamina and how much of a KO risk they can be given the huge movement they produce even with a relatively weak launch.
Extreme Movement Is An Asset
The Dash BeyStadium however has obviously been designed to make such movement an asset rather than a hindrance due to the semi-flat areas near the exits helping to slow their momentum and then swoop back into the centre.
Drivers with narrower tips which do not move as much generally seem to perform worse in the Dash BeyStadium because they become easy targets for opposing Beyblades with larger and faster movement patterns.
If your Driver does have the ability to move significantly around the stadium, it tends to be a positive strategy to utilize that so you have the ability to counter opposing attack types.
Otherwise, attack type combinations utilizing Drivers like Xc’+Z have a good shot of either inflicting a KO or even outspinning you if you’re in the opposite spin direction.
Because of this, Drivers that produce significant movement and have decent LAD have the most potential in the Dash BeyStadium.
Drivers like the included Xc’ and Zn’ with +X or +Z, Mobius, Bearing, Universe, Atomic, Yard, and many more are all worth experimenting with.
However, the fact that movement is an asset in this stadium concerns me. It makes Drivers like these which were less controllable normally even easier to use without much thought because while banking can be utilized in this stadium, I feel as if positioning is a greater factor than the angle of your launch.
In the Burst BeyStadium Standard Type, positioning and angle can be key, especially for attack types. In the Dash BeyStadium, I’m not sure angle matters as much.
The Dash BeyStadium Encourages an Active & Offensive Battle Strategy
Looking at the name of the stadium–which includes “Dash”–it’s really no surprise that it rewards players who use an active and offensive battle strategy rather than a passive one.
With this in mind, the design decision to make only one of the exits large (and without a ridge) was a smart one.
In battles with attack types or battles between Beyblades with high recoil, KOs between the two smaller exits and the one larger exit are about even and there doesn’t seem to be too much self-KOing. It’s balanced.
Takara-Tomy & Hasbro’s Trend Towards Decentralized Stadium Gameplay Gimmicks
SlingShock & HyperSphere Stadiums Similarity to the Dash BeyStadium
Over the past couple years Hasbro has demonstrated gameplay concepts designed around the idea of decentralized stadium gameplay gimmicks.
What I am referring to by this are the Beyblade Burst SlingShock and Beyblade Burst HyperSphere systems.
SlingShock stadiums feature various elements (rails and the speed cradle, for instance) which encourage gameplay outside of the central or main area of the stadium.
HyperSphere stadiums feature the “brink” around the edge of their inner bowls, which Beyblades can climb and then swoop down into the bowl below.
Sound familiar?
Yeah, in a sense … it’s just like the Dash BeyStadium.
Do Beyblades need to touch for it to be considered a battle?
This trend has made me wonder: does a Beyblade battle truly require both Beyblades to touch each other for it to be considered a “battle”?
The design of these stadiums would seem to suggest the answer is closer to “no” than most people might naturally think.
In each of these stadiums, battles can be won and lost without ever touching the opponent or by spinning in an area away from the reach of your opponent for long enough to win.
What makes these stadiums work is that in most cases, the decentralized areas are not and will not become the primary play area. They are quite literally the “extended play area”, if I am to borrow the term proposed in some of my articles about how the “play area” should be defined in Beyblade.
Knowing this, it’s fine in my eyes for gameplay to exist and win conditions to be achieved in “extended play area” type spaces.
In the end, the stadium is the stadium. The point of the game is to:
- Have superior knowledge of Beyblade and preparation than your opponent
- Have a stronger physical composition of your selected top than your opponent’s
- Inflict a win condition on your opponent through simultaneously launching your spinning top within the space of that stadium.
You can accomplish this by studying and testing all Beyblades more, studying your opponent more before and during the match, studying the local metagame more, outspinning your opponent, knocking them out, or bursting them.
How you do it or what gives you the edge is immaterial as long as ultimately all pre-match rules are followed, your Beyblade is legal, launching rules are followed, and your Beyblade exists spinning within the space of the stadium (AKA the “play area”).
In that sense, a Beyblade match is actually a match between not just two Beyblades, but between two people using Beyblades as an interface.
And interestingly, back in an August 2011 Takara-Tomy press release, this is how they described Beyblade:
The hugely popular toy is a “communication toy” which is creating bonds of family fun and friendship not only within Japan, but on an international level. – Takara-Tomy August 2011 Press Release
The emphasis of this press release was the connection the game enables among people. They describe Beyblade as a “communication toy” and not a “battle toy”.
“communication” between people–both direct and indirect–is inherent to Beyblade and in my view this is where the game begins and ends.
When I go into a match, the first thing I think about aren’t the Beyblades that may or may not be used, but who my opponent is and what they are capable of mentally and physically in that moment. It’s a game between two players first and foremost, not two Beyblades.
This is why the rules of the game and the environment within which it exists should be designed to offer as much agency as possible to players.
By imposing a more restrictive view which demands that Beyblades must touch each other or must touch the stadium floor first for a match to be considered valid or that Beyblades cannot win inside of the “extended play area” attached to a stadium, the game moves a little bit closer to becoming homogenized. The significance of player will and some strategies are reduced.
There has been some huge misconceptions in the Beyblade community this year about these fundamentals, driven by the discussion about the WBO’s knock-out rules, the ongoing debate about the definition of the play area, and more recently, about how Gattyaki or “sniping” should or shouldn’t fit into the game.
I encourage everyone to play Beyblade however they would like in casual settings, but looking at what Hasbro has done with SlingShock and HyperSphere and now what Takara-Tomy has done with the Dash BeyStadium, it reinforces my personal belief that players should look at the game in a manner which expands the “play area” to become slightly less restrictive.
The Dash BeyStadium is 120% Bigger Than The Burst BeyStadium Standard Type

Takara-Tomy has slowly been increasing the size of Beyblade Burst tops for the past several years. The most significant example which originally signified this trend was the Maximum Garuda Layer, first released in 2017.
As time went on, issues began to arise such as Beyblades becoming stuck between the edge of an exit in the Burst BeyStadium Standard Type and the interior of the cover that extends just beyond that exit to allow Beyblades to be knocked-out.
It raised the question as to whether such Beyblades should actually be considered KOed or not. In the WBBA, they considered such situations as a spin finish. In the WBO, it was considered a KO.
Players began asking when Takara-Tomy would release a larger standard stadium better suited to the larger modern Beyblade Burst tops.
The Dash BeyStadium is seemingly their answer to that, being 120% bigger than the Burst BeyStadium Standard Type.
While the stadium is larger than before, it fails to fix one of the key problems with the Burst BeyStadium Standard type: larger Beyblades having the ability to become stuck in the exit, leaving them suspended somewhere between being KOed and being outspun.
The singular large pocket solves this, but I understand that the two smaller ones could not have been designed to do that for the sake of balancing and enabling the gameplay goal of the stadium.
However, this is not where the key issue I have with the Dash BeyStadium lies.
Sponsored: Order the newest Beyblades at malloftoys.com!
Heads up: If you buy something through Mall of Toys, you won’t pay any extra, but I’ll get a small commission. This helps me keep things running. Thanks for your support!
Does the Dash BeyStadium Break The Fundamental Components of Competitive Beyblade Stadium Design?
Although the size of the Dash BeyStadium is certainly welcome, all of the other design choices for it do not represent the answer players were looking for when it came to producing a new standard stadium for competitive play.
Most players would have been happy with an updated version of the Burst BeyStadium Standard Type with a larger play area and extended pocket sizes. This would have allowed larger Beyblades to move more freely, players to have more room to launch and maneuver, make KOs more obvious, and judging easier.
The Subjectivity of “Proper Performance”
The reason most tournaments use the Burst BeyStadium Standard Type is because it contains all of the fundamentals which allow all Beyblade types to have a fair and balanced opportunity to win and perform properly.
Admittedly, “perform properly” may be subjective. We can look at things like Hasbro’s HyperSphere Drivers and say that they don’t perform “properly” in non-HyperSphere stadiums.
But from my perspective, the game is at its best when a mixture of bottom types are viable. Whether that be cone shaped tips, flat tips, rubber tips, ball tips, and so forth.
Just like the HyperSphere Drivers with the bulky rounded tip designs required to make them perform correctly in HyperSphere stadiums, the Dash BeyStadium requires–to a lesser, but still significant degree–wide cone or wife flat tips for them to properly interact with the “Dash Areas” the stadium is designed for.
Interestingly, you can draw a parallel between Takara-Tomy and Hasbro when you take a look at Hasbro’s HyperSphere Drivers in comparison to Zone’+Z and Xceed’+X. They both feature very wide tips and are primarily designed for use in a specific stadium type.
The Importance of Banking/Sliding Shoot
One of the key things which traditional stadium designs like the Burst BeyStadium Standard Type allow for is the banking/sliding shoot launch technique. This technique is particularly critical for attack types as it is what allows them to create a flower pattern and swoop into the centre of the stadium in an effort to score a burst or KO.
It’s critical for that ability to be present not only to make attack type Beyblades more widely viable, but to enable players to feel they have some level of control over how their top performs.
That’s not to say that in the Dash BeyStadium for instance, you have no control. You do. Shooting technique, timing, and placement do play a factor. But not in the same way as the Burst BeyStadium Standard Type.
The Dash BeyStadium’s Design is Literally Unbalanced
And the Dash BeyStadium–like many other non-traditional Beyblade stadium designs–is unbalanced, literally. The Dash BeyStadium has one exit with a different design than the two others. Many of these non-traditional Beyblade stadiums employ non-circular shapes for their interior play area.
When I look at stadiums like this, the question I ask myself is usually not “Is this fun?” but “Is this balanced competitively?”. In many cases, these alternative stadiums are indeed fun to play in and have unique strategies or parts players can use to increase their chances of victory.
Looking back on the history of Beyblade stadium design, it’s actually quite remarkable how creative Takara-Tomy and Hasbro’s output has been with the series.
Hasbro Has Released More “Competitive” Stadiums Than Takara-Tomy in Beyblade Burst
Many fans hate on Hasbro in particular–sometimes for valid reasons–but the reality if you look back on Beyblade Burst in particular, is that Hasbro has have actually released more stadiums that are closer to the competitive Burst BeyStadium Standard Type than Takara-Tomy has!
Are they better than the Burst BeyStadium Standard Type? Probably not. But are the fundamentals present? Yes, they are when you look at things like the triangular Basic BeyStadium and the brand new Elite Champions Pro Beystadium from the Beyblade Burst Pro Series, which was very obviously inspired by Takara-Tomy’s Burst BeyStadium Standard Type.
As someone who has been playing this game for nearly two decades, it is puzzling to observe Takara-Tomy’s behaviour when it comes to stadium design over the past two generations of Beyblade (Metal Fight Beyblade and Beyblade Burst).
In both generations they release an excellent initial stadium for competitive play, but then really stumble from there to create something which can match it.
In the plastics and HMS generation we had stadiums like Tornado Balance, Tornado Balance Type S, and Tornado Attack which were all excellent. They tweaked the traditional gameplay balance by making certain types more powerful than others, but were viable competitively and did not change the game fundamentally.
But in MFB it was basically one and done with the Attack Stadium too. They released things like the Balance and Stamina Stadiums, but they did not allow for a balanced representation of all Beyblade types due to things like their lack of an outer ridge to keep attack types inside.
Takara-Tomy did a better job with the Zero-G Attack, Balance, and Defense Stadiums, but by then it was too late for Metal Fight Beyblade.
What is Beyblade’s Brand Strategy?
What this comes down to ultimately is the classic question:
“Is Beyblade a toy or a competitive game?”
The answer is and always has been “yes” to both, and it affects the type of products we see them produce, from the tops, to the launchers, stadiums, and more.
But really, it’s a matter of how well or not the companies handling the brand have balanced the representation of these two sides.
They’ve both always been present, to some degree. However, it seems like overall, the brand has never committed to one or the other. They use the “toy” angle and “competitive” angle as they see fit at any given moment.
When it comes to stadium design, on one hand, I can certainly understand the logic behind releasing a “basic” stadium which captures all of the essentials for traditional competitive Beyblade play first upon the release of a new series.
It’s what Takara-Tomy has done for MFB with the Attack Stadium, and Beyblade Burst with the Burst BeyStadium Standard Type. Hasbro also began Beyblade Burst with the aforementioned Basic BeyStadium, which while not perfect, was not bad.
By getting that done first and foremost, they enable the hardcore players who will be the first ones to buy in to a new series onboard. From there, it inevitably becomes about maintaining public interest and excitement with the brand.
Starting simple or with the fundamentals also gives them room to expand to more outlandish ideas so that they can one-up themselves and impress fans later on in the series. The same thing applies with the tops themselves, which typically become more intricate and high performance over time. So, it could be that the reasoning is ultimately more so financially driven than player driven.
The reality is that the hardcore player fanbase is probably far outnumbered by the general public buying Beyblades just for fun without any real idea of the depth and competitive side of the game.
I don’t have any hard data on this, but it is probably safe to say that as a brand Beyblade probably churns players at a relatively high rate given the typical cycle of kids growing up, getting interested in Beyblade, and then falling out of it as they enter into their teenage years.
I’ve seen it first hand if the thousands of kids who have participated in one or two worldbeyblade.org tournaments over the past ten plus years and then never returned are any indication.
So, taking the approach to try and reinvent the brand or inject some sort of new gimmick relatively frequently does make some sense on that level.
Hasbro has taken this approach more so than Takara-Tomy by pushing things like SlingShock and HyperSphere and completely dropping the main line of tops. Takara-Tomy on the other hand does produce new gimmicks, but does more to simultaneously support traditional competitive Beyblade play in Asia.
Part of me also wonders if there is a financial incentive for them to invest in producing new stadiums constantly.
I don’t have insight into toy production costs, but I have to imagine that the profit margin on stadiums or large sets that include stadiums is higher than that of single Beyblade starters or boosters. The stadiums can’t cost that much for them to produce, yet their price is always relatively high.
The reality is that the hardcore player fanbase is probably far outnumbered by the general public buying Beyblades just for fun without any real idea of the depth and competitive side of the game.
Beyblade Burst–now well into its fifth year–is already in uncharted territory when compared to previous generations of Beyblade. A new season for is confirmed for 2021, but based on Takara-Tomy’s 2020 Annual Report, we know that the series sales declined year on year (although, it did exceed their expectations).
At this point does it therefore make more sense for Takara-Tomy to cater for hardcore players and release a new “standard” stadium? I’m not sure.
And I’m not sure if the Dash BeyStadium will be used as the standard for new WBBA tournaments, but it seems to me like they’ve positioned it to be the new standard for finals at WBBA events. Part of what leads me to believe this is that they still picture the Burst BeyStadium Standard Type on the box of Lucifer The End.
This would be in line with how the WBBA has handled their new stadiums over the past decade. They typically remain reserved for the finals of big G3, G2, and G1 events, which in my opinion is done more so for marketing than anything else.
We do also know that there is a “new stadium” confirmed for the next season of Beyblade Burst confirmed to begin in April 2021. But at this point nothing is known about whether it will just be a re-release of the Dash BeyStadium or something completely new.
Beyblade As a “Sporting Tournament Brand”
Conversely, after several years Hasbro has finally indicated that they would like to cater to the competitive side of Beyblade again–to some degree–with the release of the Beyblade Burst Pro Series.
This strategy shift reminds me of a comment made by a Hasbro representative at the 2010 New York Toy Fair in this video by CollectionDX:
There will be lots of tournaments going on at the launch of the product in every country. That’s the key to the success of the brand. It’s really a sporting tournament brand. It’s giving kids the opportunities … – Hasbro Representative at NYTF 2010
When I first heard this ten years ago, I had hope that Hasbro would be changing their approach for the new generation of Beyblade at the time–Beyblade: Metal Fusion–to one with an increased focus on competitive play.
This never came to pass.
Tournaments existed, but as far as I know, no real organized play or competitive structure was ever implemented. As with the original plastics generation, they made the effort to build up to a world championship in 2012, but nothing beyond that. The same thing has happened with Beyblade Burst.
In each case, these tournaments always seemed built solely for the purpose of marketing and promotion of the brand rather than building a genuine competitive environment for players to compete with each other.
Marketing and promotion needs to be part of the equation because Hasbro is a business, but it continues to disappoint myself and other Beyblade fans to see the continual lack of effort to capitalize on the competitive side of the game in a meaningful way.
In an interview I did with The Pop Insider back in the summer of 2020, the director of global brand strategy and marketing at Hasbro had this to say about the brand:
Sonal Majmudar, who is the director of global brand strategy and marketing at Hasbro — which produces and sells Beyblade Burst toys in the U.S. — says the Hasbro team works closely with ADK Emotions NY to develop new products, always keeping fans first in mind.
“The passion the fans of the brand bring to the Beyblade community is unmatched,” Majmudar says. “Based on consumer insights from Beyblade fans who crave innovation and high performance, we’re proud to deliver an exhilarating new product lineup each year that encourages friendly competition and social play. – The Pop Insider, Issue No. 7
The words used here by Sonal Majmudar are revealing. The mention of “friendly competition and social play” as it relates to what they aim for the brand to achieve is extremely broad.
They’re trying to appeal to the widest audience possible, which is understandable. Before you become invested deeply into something, you start as a more casual fan. They need to keep doing this.
The piece that’s missing however is an investment in retaining, building, and rewarding hardcore fans of Beyblade who enjoy playing competitively. That’s where it actually becomes the “sporting tournament brand” they once said that it is.
Shawn Wada, president and CEO of ADK Emotions NY said in that same interview with The Pop Insider that:
“Beyblade is a phenomenon that spreads on the playgrounds and playrooms across the globe,” Wada says. “This is a game that new fans encounter by watching friends play, so there is an amazing peer-to-peer connection” – Shawn Wada, president and CEO of ADK Emotions NY
As I talked about in the article, this is exactly how I became exposed to Beyblade as a child. It’s how many of us did.
The Lack of Organized Official Beyblade Competition Outside Asia
I attended a tournament in the summer of 2003 at the Canadian National Exhibition, and began to crave further competition. But there was none.
I wasn’t able to connect with anyone else who liked Beyblade for years.
I’m sure there were others like myself in the same position. And I know the same thing has continued to this day with each new generation of kids.
That’s where the online fan-run Beyblade community at worldbeyblade.org eventually came in. It’s taken the initiative of Beyblade fans around the world to create an organized play structure to satisfy this desire.
To date, the WBO community has hosted over 1000 tournaments worldwide.
To varying degrees, both Hasbro and Takara-Tomy have taken steps towards a balanced representation of Beyblade’s two fundamental qualities: play and competition.
But they are not aligned; the most egregious example of this is the disparity in compatibility between Takara-Tomy and Hasbro Beyblade Burst tops that was intentionally invoked at the beginning of Beyblade Burst’s release outside of Asia. This has had a massive impact on fans of Beyblade.
And it meant that the 2018 Beyblade World Championship was forced into using a pre-selected group of Hasbro Beyblades provided to the competitors by the companies.
Neither have taken steps which are large enough to maximize the potential of this game to connect people on a global scale through structured and consistent competition.
They’ve done a great job encouraging people to connect purely through play.
But it is through structured competition that the full potential of a game can be unlocked.
It’s where such connections stand a better chance to sustain themselves and grow deeper over time while also keeping the game itself relevant over that time period. It’s not just something you play for fun and then forget next year when the next hottest toy is released.
But it is through structured competition that the full potential of a game can be unlocked.
I am one of the best examples of this, having grown from a child who first saw Beyblades being played with at recess during school in a lunch box to having hosted, participated in, and won hundreds of Beyblade tournaments around the world, making innumerable meaningful connections with others along the way.
The Dash BeyStadium included with the Limit Break DX Set represents Takara-Tomy maintaining the status quo.
It’s a well-designed, fun new stadium to play with that introduces a new type of gameplay to the series. I look forward to playing with it in some tournaments in the future and imagine that some competitive depth will emerge.
It satisfies the appetite for “innovation” that Hasbro says they see in their “consumer insights” from Beyblade fans. I’m sure Takara-Tomy makes use of similar insights.
But it ultimately does not surpass the simplicity and greatness of the traditional stadium design seen in the Burst BeyStadium Standard Type, the Attack Stadium from Metal Fight Beyblade, or the Tornado Attack stadium from the Plastics/HMS era.
I still have hope that Takara-Tomy will address the issues with the Burst BeyStadium Standard Type at some point if the series continues even longer, especially after seeing what Hasbro has done with the Elite Champions Pro Beystadium from the Beyblade Burst Pro Series, but for this we will have to simply wait and see.
I have less hope at the end of the day however that Beyblade will be treated any differently from a competitive perspective than it has been up until now.
The brand has been so successful that there must be some reason that Takara-Tomy and Hasbro in particular have not stepped up to build a stronger framework for organized, competitive play.
Should you buy the B-174 Beyblade Limit Break DX Set?
Yes. Absolutely, you should. Here’s why:
With the Limit Break DX Set, Takara-Tomy has hit another home run when it comes to product design. While the Dash Beystadium might not be the next standard for competitive play, it gives players a new, fun, innovative way to play the game; especially with the included Xc’+Z and Zn’+Z Drivers.
Almost everything else in this set has value as well. Whether it be for the competitive player or for someone just looking to play for fun with their friends or family.
The Long Sparking BeyLauncher L and Long Sparking BeyLauncher R are the strongest launchers yet in the Beyblade Burst series and arguably a must-have for competitive players moving forward.
Hyperion Burn Cho Xceed’+X and Helios Volcano Ou Zone’+Z both contain parts which can be used in top tier attack type and stamina combinations. They also both come with the previously incredibly difficult to obtain tournament-exclusive Metal Chip Core. The “Limit Break” gimmicks don’t provide much in-battle benefit, but they are quite cool to play with.
Every player and Beyblade fan should pick up this set if they can.
Final Score: 8.5/10
Where to Buy B-174 Beyblade Limit Break DX Set
Heads up: If you buy something through some of the links on this post, you won’t pay any extra, but I’ll get a small commission. This helps me keep things running. Thanks for your support!
What do you think of B-174 Beyblade Limit Break DX Set? Comment below!
If you’re thinking of picking up B-174 Beyblade Limit Break DX Set and have any questions, feel free to ask below and I’ll do my best to answer.
And if you’ve already picked it up, I’d love to hear about your thoughts and testing experiences with it. What combinations do you like to use with Hyperion Burn Cho Xceed’+X and Helios Volcano Ou Zone’+Z? Do you think the Dash BeyStadium is better than the Burst BeyStadium Standard Type?
Photo Gallery


10 thoughts on “Top 5 Things You Need to Know About B-174 Beyblade Limit Break DX Set (Beyblade Burst Sparking Review)”
Comments are closed.
Related Posts
Beyblade X Custom Line (CX) Buyer’s Guide: Expert Players Review the Best Products for All Skill Levels and Budgets
Discover the Best Beyblade X Infinity Stadium Combos & the Strategies You Need to Win (Competitive Player’s Guide)
Hey Kei!
Thanks fo such a detailed breakdown, it really helps a new blader like me grow my knowledge. Keep up the great work!
You’re welcome, Anthony! Thanks for reading.
I loved the Tournament reference. Detailed info.
Thank you!
Hi Blader Kei! Hope you can discuss building a 5G deck with the Superking meta in mind for your next article 🙂
Hi Jay, I will keep that in mind! I played 5G a little bit in Japan last year, but I honestly don’t have a ton of experience with it. But I do want to try it more here in Toronto once we are able to have tournaments again. Maybe after we’ve done that and I have more experience I’ll write an article about it.
Hey Kei,
I was wondering if you can do a review on Lucifer The End Kou Drift. I’m planning on getting one, and I would like to know more about it.
Hey there, I’m actually not planning on doing a review for Lucifer The End. Sorry about that! But I do plan to do reviews for other new Beyblades in the future, so please stay tuned for that.
That being said, I will say that you should definitely get Lucfer The End at least for the Drift Driver! It’s top tier for opposite spin battles.
who won the give away?
I can’t share his information, but one of the BeyBase newsletter subscribers won and successfully claimed the prize when I notified them. Good luck next time!