Affiliate Disclosure: If you buy something through some of the links on this post, you won’t pay any extra, but we’ll get a small commission. This helps us keep things running. Thanks for your support!
Toronto’s First Beyblade Burst Tournament Since the Release of Savior Valkyrie & Astral Spriggan
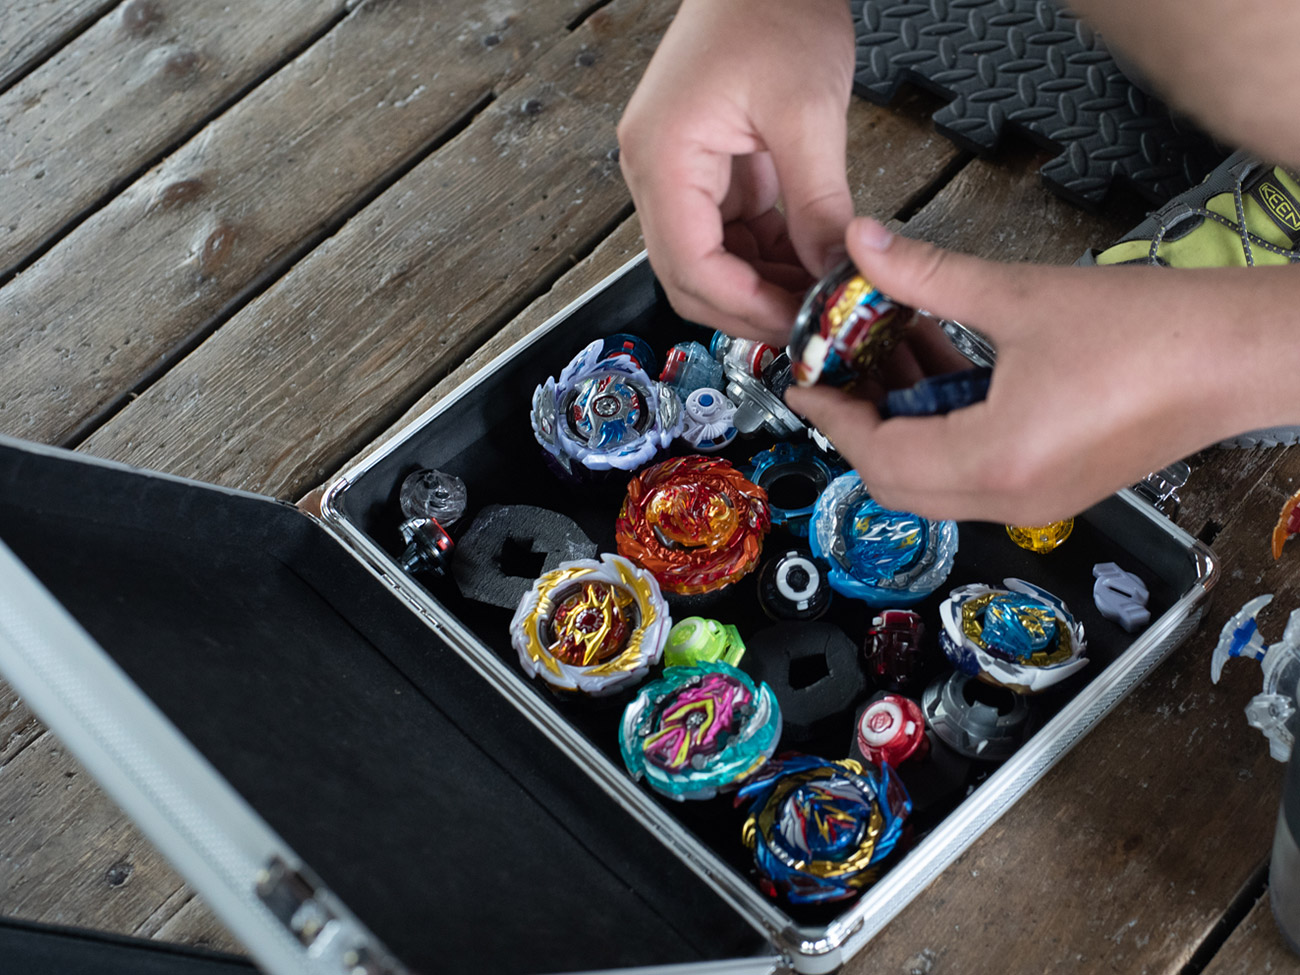
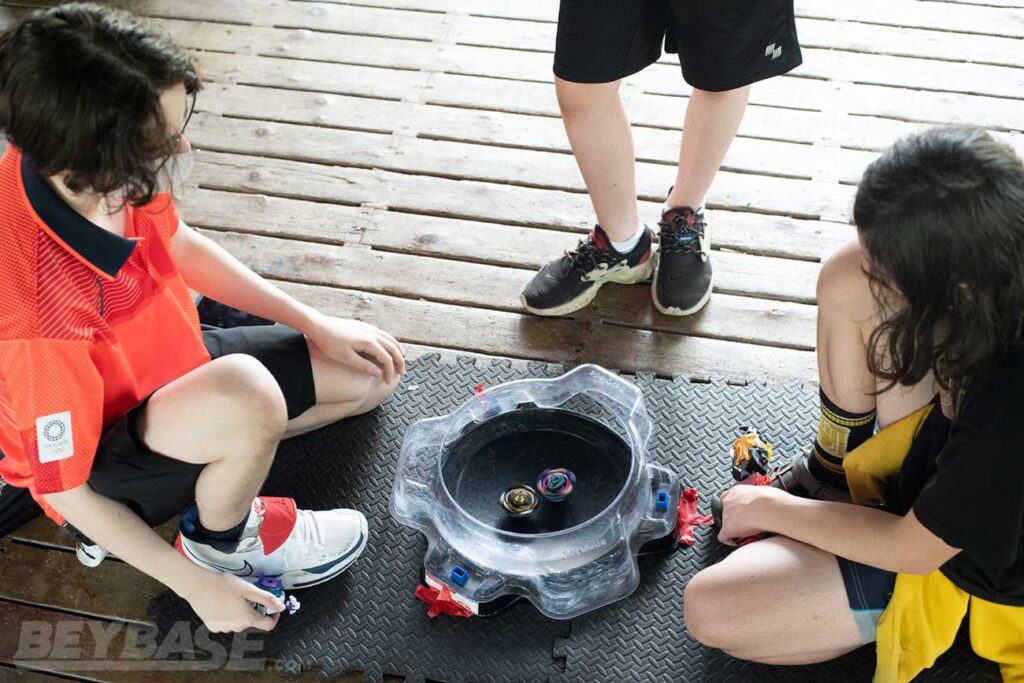
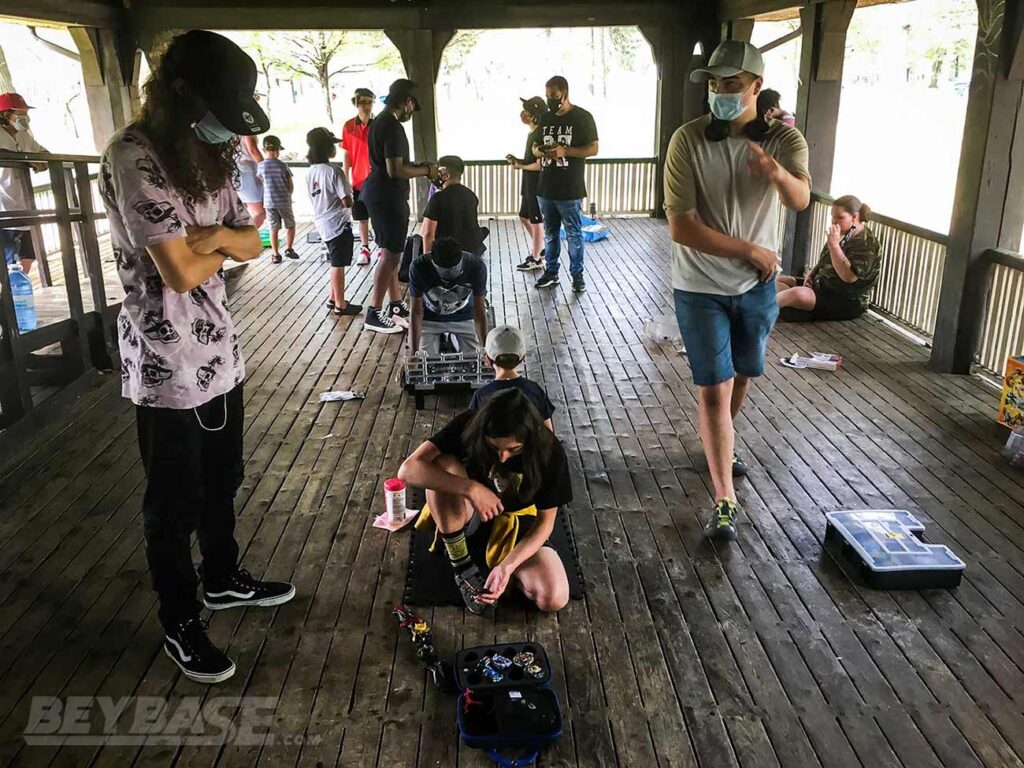
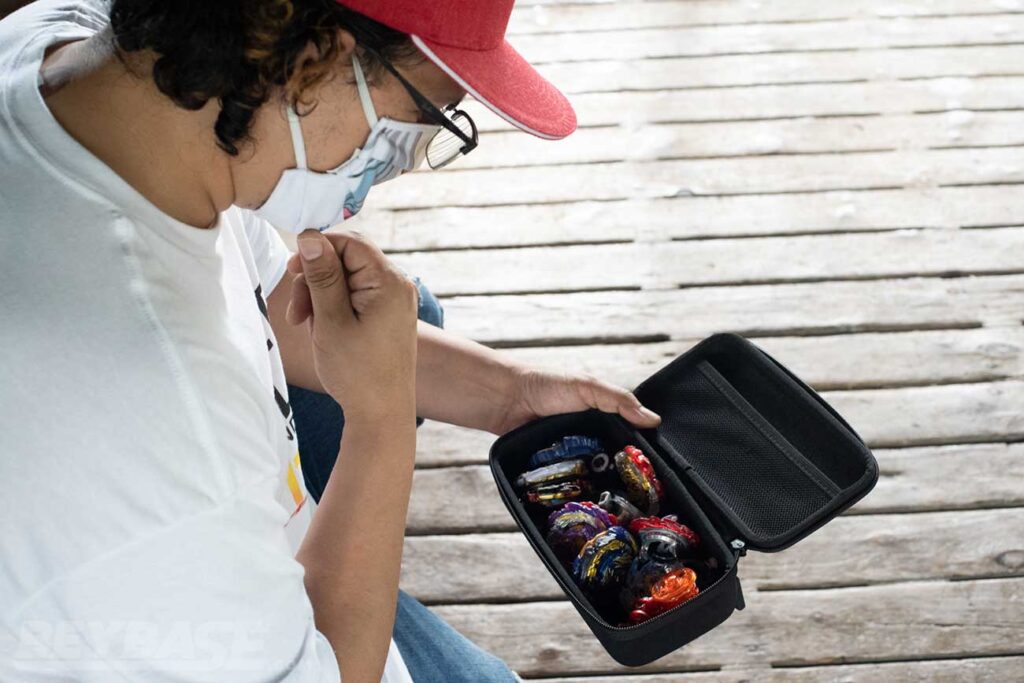
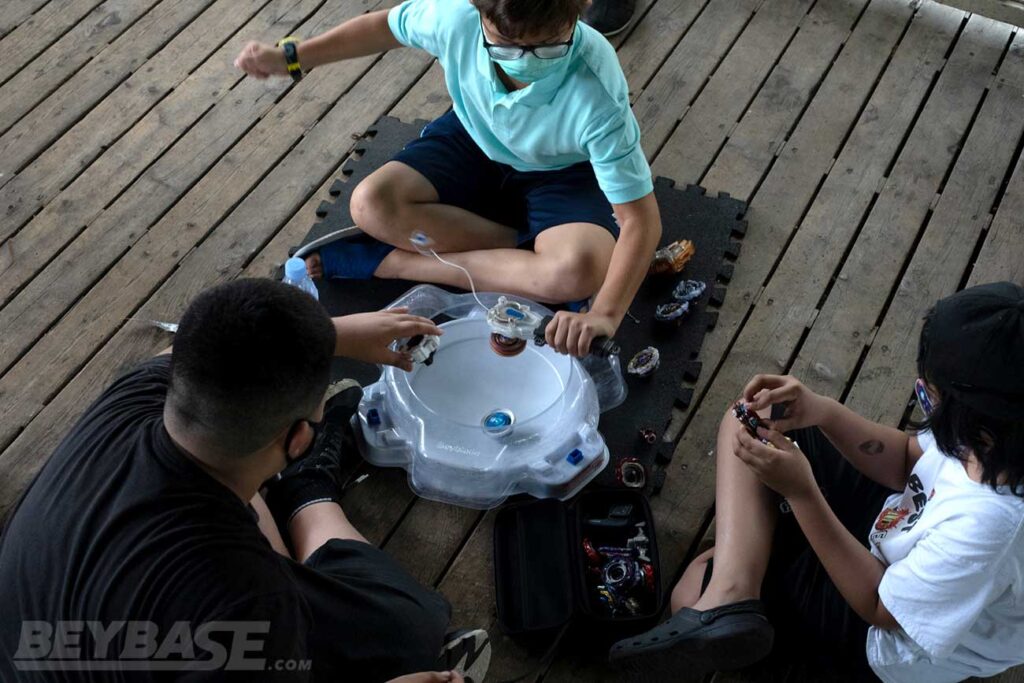
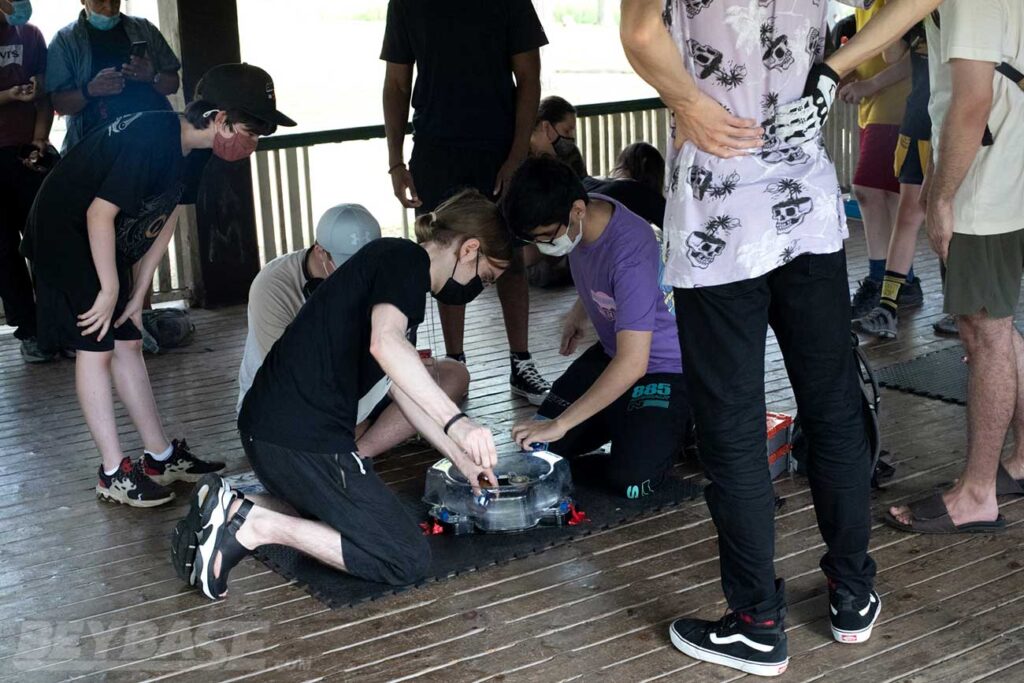
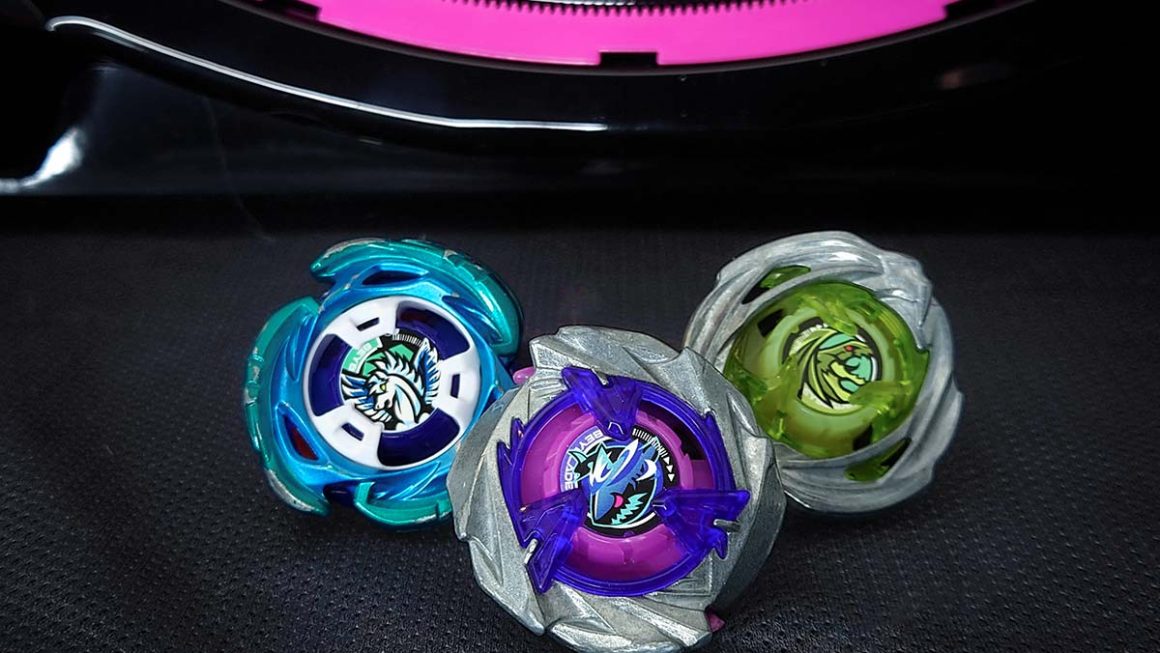
On August 21, 2021 the Toronto community gathered for Bey Fray Qt at High Park, our first ranked tournament of the year and first with brand new parts such as the Savior Blade and Astral Blade available!
In the first part of this tournament report, I outlined my 3 Step Guide To Preparing For a Competitive Beyblade Tournament based on the latest developments in my personal preparation process that came as a result of getting ready for this tournament.
What You’ll Learn in This Report
In this second part we’ll now be jumping into the tournament itself. We’ll be covering:
- What were the rules for this Beyblade tournament?
- What were the strongest Beyblade Burst parts in this tournament?
- The top 3 new Beyblade Burst DB parts for tournaments
- First Stage Report – Battle Format Analysis & Matches Outline
Tournament Details
- Date: August 21, 2021
- Location: High Park – Toronto, ON, Canada
- Format: WBO Burst Format (Rulebook)
- WBO Event Page
- Challonge Bracket – First Stage | Final Stage
Heads up: If you buy something through some of the links on this post, you won’t pay any extra, but I’ll get a small commission. This helps me keep things running. Thanks for your support!
Bey Fray Qt Tournament Article Series
Champions aren’t born overnight. In my latest article, I break down how my pursuit of knowledge, adaptability, and reproducibility compounded into victory at a 256-player G2 tournament.
Sponsored: Order the newest Beyblades at malloftoys.com!
Heads up: If you buy something through Mall of Toys, you won’t pay any extra, but I’ll get a small commission. This helps me keep things running. Thanks for your support!
What were the rules for this Beyblade tournament?
This tournament was played primarily with the WBO Burst Format ruleset, however we also implemented a few experimental rules.
During our last event HIGH PARK THROWDOWN 12 we played with some experimental rules: a modified version of the WBBA 3on3 Format and an updated ruling for “Knocked-Out” and the “Play Area”.

In this tournament, I wanted to keep pushing forward and trying more new things which could affect and improve WBO Organized Play moving forward.
It was thus decided to try out the following based on a few other areas that had been in discussion recently among WBO Staff:
Battle Limit & Consecutive Draws
All first stage matches have a battle limit of ten battles. If a tenth battle is reached or a judge calls a third consecutive draw by outspin and:
- One player has more points than the other: The player with more points wins the match.
- The score is tied: the match score remains as is and each player selects a Beyblade with all different parts from any previous incomplete match. Then, the match continues with the new Beyblades and:
- The first player to score a point wins.
- Or if the judge calls three consecutive draws by outspin, repeat step number two above.
Why did we test this rule?
The idea for this ruling came from recent issues in the community surrounding seemingly ‘endless’ draws between two opposite spin combinations with high Life After Death.
This is thanks to the increasing prevalence of Drivers that can produce such results: the Drift Driver, Zone’+Z Driver, Bearing Driver, Rise Driver, and so on.
There have been reports of some matches lasting 30 minutes or longer because of this, which can bring a tournament to a screeching halt as everyone waits for the match to finish.
A lot of this could be due to the way in which the WBO’s definition of “Spinning” is worded.
While discussing this internally among WBO Staff we got the feeling that it is more precise or strict than the definition used by the WBBA.
In the WBBA they seem to lean more towards whichever Beyblasde has the final movement or wobble than it does actual rotation around the axis of a Beyblade when it comes to defining which Beyblade stopped ‘spinning’ first in a match
Changing our definition of “spinning” might be one way to solve the issue, but it would require a larger discussion to properly evaluate.
The alternative was to implement a procedure for consecutive draws and add a battle limit in order to effectively place a soft cap on how long battles are allowed to take place before they enter a figurative sudden death “overtime”.
Our goal with this definition was to enable players to use whatever combinations they want and give them a reasonable chance to settle the battle without any change to their original intentions. This meant setting the battle limit to 10 and allowing for three consecutive draws before alternative measures came into place.
The alternative measures force the battle to conclude as quickly as possible.
We are also looking at trying to make sure this rule can be adapted in some fashion across all battle formats (WBBA 3v3, P3C1, etc), which made it a tricky discussion and is still ongoing.
And this issue may not be as prevalent in other formats like the Plastics Format or Burst Classic Format for instance, but nevertheless it will be beneficial to have a procedure in place to avoid any possibility of a never-ending match.
Did the rule work well in the tournament?
In Bey Fray Qt, this rule almost happened several times, but only actually came into effect once. In a battle between Lrexman and originalzankye.
The initial beys each player selected were Dynamite (F Gear) Belial Giga Drift vs. Vanish Bahamut Over Bearing-10 and it went to three straight ties from the beginning.
Second beys were Vanish Bahamut Tapered Zone’+Z and Dynamite (F Gear) Belial Giga Never.
Zankye used D(F)BL.Gg.Nv and won the battle 1-0.
Even though it only came into effect once during this tournament, my impression was that I liked it as did everyone else who seemed to agree it’s better than the alternative: draw ‘forever’.
It seemed to do the job. Even if the second combos had resulted in three consecutive draws again and we had to go to a third selection, it only begins to increase the chances that at least one player will score the one point needed to win the match.
The feeling I got was that as the tournament progressed people realized that they are making the choice to put themselves in this type of position if they choose to run a combo prone to drawing against opposite spin opponents.
So, if that means they end up in this particular situation where they can lose having lost only one point, it’s fair. Everyone knows this going into the match.
For the sake of the tournament, it allows things to keep moving, creates a bit of a disincentive from using high LAD stuff (although not enough to stop people from using it entirely!), and can create some interesting situations where players need to decide what’s going to give them the best chance to win a single round.
In the situations where we reached two consecutive draws, it actually made the match more exciting to watch because we knew there was a chance this ruling would come into effect.
I also like that this happened only once during the tournament.
The 10 battle limit seems good because it feels like the point where the battle is becoming too long.
Three consecutive draws being the alternative trigger seems fair as well. It’s when you get to three consecutive draws that you can tell it’s going to be very hard to determine a winner.
One thing I will say though is that while we got a bit more used to it as the tournament progressed, it did seem like a bit of an extra burden to have to worry about the total number of battles during each match. Not a huge deal, but I still am a little concerned about that being miscounted by some judges.
First & Final Stage Win Condition Point Value Changes
All existing point values for each win condition in first and final stage matches will remain the same as is listed in the rulebook except for:
- First Stage: Burst Finish will be worth 1 point.
- Final Stage: Knock-Outs will be worth 2 points.
Why did we test this rule?
This particular change, if implemented across WBO Organized Play, would bring all of the win condition point values for Burst Format into alignment.
With the introduction of WBO Burst Classic Format and WBO Burst Limited Format over the past few years, the decision was made to alter the points awarded for the Burst Finish and Knock-Out win conditions based on the differing metagames that exist within each format.
And even in the standard Burst Format the point values have shifted over time based on what was being released, what was strong, and what might need some help.
However, the problem that this creates is that it becomes increasingly difficult for Organizers and judges to keep track of the exact differences between each format. This might not matter to everyone, but if you have a community that enjoys playing multiple formats, it quickly becomes confusing.
When we are crafting the rules and guidelines for WBO Organized Play we have to walk a tight line between advancing the competitive depth of the game and protecting organizational feasibility and ease of understanding for players.
The result of this is that wherever we can, it makes sense to try and standardize and simplify our rules across formats. This is why we are continuing to work on things like this and:
- Defining a universal definition for “Knocked-Out” and “Play Area”
- Implementing a procedure to avoid excessively long battles (the Battle Limit & Consecutive Draws described above)
There will always be other ways in which the game can be played based on personal preferences, but focusing on standardization of things like this is part of what will help create a baseline for our global competitive Beyblade framework that is easier to understand no matter what play format or battle format will be used.
Did the rule work well in the tournament?
First Stage: 1 point Burst Finish
This didn’t come into effect much from what I can recall.
However, it might be more about what it encouraged the usage of than what tangible effect it had on points given during matches.
When you make Burst Finishes worth one point, it inherently enables the usage of parts with lower burst resistance.
While the burst mechanic has become less important over time throughout Beyblade Burst (the peak of which was probably during Beyblade Burst Sparking due to the nature of how Rings and Chassis interacted), I do feel that it’s important to not forget about it and how Takara-Tomy continues to factor it into their design decisions.
The most obvious historic example of this was the Bearing Driver. It has a very obviously weaker spring than many other Drivers.
The reason for this is obvious; it’s to nerf how powerful it would be otherwise. And in general, stamina based Drivers have always been on the lower end of the burst resistance spectrum (although, for some inexplicable reason Takara-Tomy has veered away from this slightly lately after releasing Drivers like Zone’ and Wave’).
Attack type Drivers on the other hand have typically been granted increased burst resistance. Especially when Dash Drivers were introduced a few years ago.
If we are trying to produce a metagame where the incentive to use attack types despite their risk is balanced with a similar risk on the stamina side thanks to lower burst resistance, it seems logical to me to award burst finishes two points.
In reality it’s not always so black and white, but especially given the immense overall power of stamina types in the Beyblade Burst metagame … I’m not sure it makes sense to enhance their ability to use very strong stamina parts with lower burst resistance by making Burst Finishes worth only one point.
When this was first proposed internally, what I said was:
My first thought is that I kind of like the idea of Burst Finishes being worth one point in the standard format. It could maybe make it more viable to use some parts that are prone to bursting.
That’s definitely true. But I think it encourages the usage of parts in combinations that are already strong enough even with Burst Finishes at two points.
Some people argue that two point Burst Finishes encourage “random” results. I don’t agree with this.
There are quasi-random elements to how a battle may play out, so if you want to look at it purely from that viewpoint an argument could be made that a particular result is “random”. But every player makes the conscious decision to use a particular combination.
They are responsible for having an understanding of how likely it is to burst against certain opponents. With that in mind, they need to have made the decision that the risk versus reward balance of making that choice is more likely to be in their favour than against them in any particular battle. Otherwise, they should have made another decision to use something with higher burst resistance and accept risk in another area.
A good practical example of this right now that is relevant in the metagame is the Rise Driver. It has some great upside in many areas, but one of its downsides is that it has relatively low burst resistance. When you make burst finishes one point rather than two, you buff parts like this even further than they probably need to be.

Early in Beyblade Burst the argument could be made that two point Burst Finishes were unfair because attack types had few options when it came to improving their burst resistance. They were basically limited to using specific Disks like Limited or Armed which may or may not have been the best option for them in terms of enhancing their attack ability. But now, they have Dash Drivers and in the case of newer seasons many different Chip/Core options to tune their burst resistance.
With first stage burst finishes at one point in this tournament, you basically got to have your cake and eat it too as a stamina user.
Final Stage: 2 point Knock-Out
Here’s what I expressed internally when this was first proposed:
I feel some hesitation about two point KOs in the finals that I can’t fully explain, but I’m willing to try it and see how it goes.
We changed it to one point because of how easy it was becoming to KO things thanks to the Zwei Layer Base and Judgement Layer Base. The one point KO switch made attack types ironically more viable in my opinion at that time because there was less worry about self-KOing and you weren’t worried about KOing your opponent at the time when you did shoot well because of how powerful the attack types were.
However, now there might be another type of “easy” KOs thanks to the Drift Driver. But maybe that is a good thing and could deter people from using Drift in more aggressive ways in certain situations.
And I guess making KOs two points again may overall be useful for traditional attack types that are not as powerful as they were when the previous rule change was introduced. There’s also a bit less random wall bounce KOs because the Beyblades are heavier and don’t have as much recoil as something like Judgement.
The response to this change during Bey Fray Qt was a bit mixed.
I will preface all of this however with the fact that both one point or two points for knock-outs in WBO Deck Format are valid. It just changes the game a lot either way.
After making it to the finals of this event and relying heavily on attack types, I realized that with two point knock-outs you need to be acutely aware of the score and how many mistakes it affords you.
It means that it’s actually advantageous to use your attack type(s) earlier in the match because at a score of 0-0, 1-0, and 2-0 you still have the ability to make at least one mistake resulting in a self-knock-out (or more if you get lucky with a non-contact self-KO or outspin).
If you are able to take advantage of this you can perfect your shot early and all it will take is three total wins to get the required six points … or maybe even two if you get one point in some other way.
If you bring in your attack type later in the match for the first time, you’re placing a lot of pressure on yourself to perform flawlessly.
That’s not a good recipe for success when using attack types.
After playing in the finals of this event (as you will learn about in part three of this report), I stand by my assessment that the one point knock-out ironically heightens the viability of attack types in WBO Deck Format.
The argument for two point knock-outs has always been that it gives players a chance to quickly mount a comeback.
This carries some weight given how the format was designed. When you’re ahead you do hold a significant advantage because it enables you to take a loss and then counter your opponent directly.
But I think that keeping knock-outs at one point rewards players with skill and perseverance to enable them to make a slow comeback without worrying that their aggressive play will backfire.
When you play with knock-outs at two points, players who play conservatively are at an advantage because they don’t have to worry as much about losing two points as a direct result of their own actions. Instead, they can rely on outlasting their opponent or the mistakes of their aggressive opponent.
In other words, despite knock-outs being worth two points, passive play is what actually is rewarded in this scenario.
We should work to create a scenario where the risk of playing aggressively has an appropriately balanced reward and minimal penalty for failure when considering the realities of what it takes to make it work (practice, confidence, execution). Passive play on the other hand is a valid strategy, but relative to aggressive play the reward for this style should be lower because it is easier to score points this way.
When you’re using an attack type, your stamina type opponent grazes you, and you get knocked-out for two points … It feels bad.
What could be the solution?
After this event 1234beyblade and I were talking about this change and lamented the fact that we couldn’t just make the two-point KOs apply only to “attack types” using rubber or something like that … because the intention is that aggressive play is rewarded.
However, because such a ruling would be too complicated to enforce or define, the next best alternative in my eyes is to keep knock-outs at one point in order to minimize the penalty for failing with an attack type.
And to be more specific, this is what I feel the outcome should be for both first stage and final stage win condition point values across all WBO Beyblade Burst formats (Burst, Burst Limited, Burst Classic):
First Stage (Standard Type/P3C1):
- Burst: 2 point
- Knock-Out: 1 point
- Outspin: 1 point
Final Stage (WBO Deck):
- Burst: 2 points
- Knock-Out: 1 point
- Outspin: 1 point
Players more familiar with the Burst Limited Format and Burst Classic Format may feel differently about this. I also recognize that this may be a subjective discussion in many ways. I can understand the desire for tweaks to this based on personal preference, but what I’ve proposed above feels the most natural to me.
This series is literally called “Beyblade Burst“. Ignoring everything else that is part of my argument, that alone indicates to me what the intention is with regards to what should be focused on or rewarded the most.
One way or another we’ll have to make a decision that allows us to unify these point values across all formats.
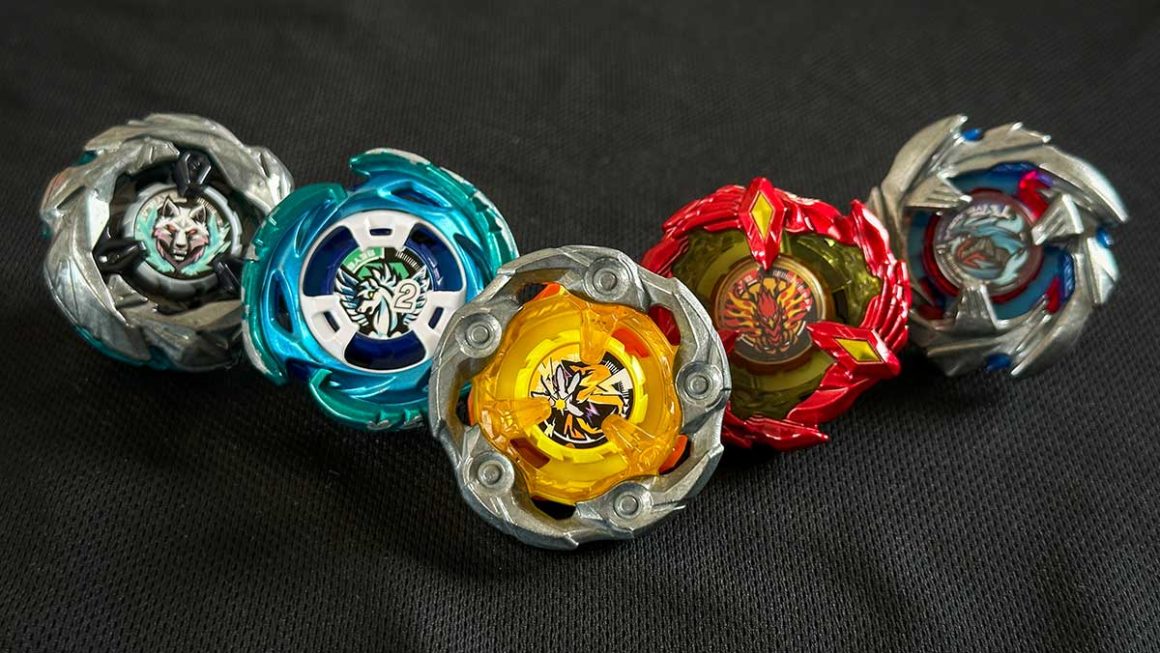
What were the strongest Beyblade Burst parts in this tournament?
You can find the exact combinations used by the winning players of Bey Fray Qt in the second part of this report.
In terms of specific strong Beyblade Burst Parts, there were many in use at this event such as the:
- Dynamite Blade
- Vanish Blade
- Bahamut Dynamite Core
- Belial Dynamite Core
- Drift Driver
- Giga Disk
- Tapered Disk
- Zone’+Z Driver
- Xtreme Dash Driver
- Bearing Driver
- Rise Driver
- Quick Dash Driver
Each of these and more can be interchanged in many different ways depending on your play style, personal preferences, and situation. And I’ve spoken about each of them in previous articles such as What Are The Best Beyblade Burst Dynamite Battle Combos For Tournaments?
The Top 3 New Beyblade Burst DB Parts For Tournaments
However, I’d like to comment in more detail specifically about how the Astral Blade, Over Disk, and Savior Blade were used in Bey Fray Qt, what their strengths and weaknesses are, and answer some of the top questions you may have about them.
They represented some of the strongest new parts that have been released by Takara-Tomy recently. It was our first event with them available for use.
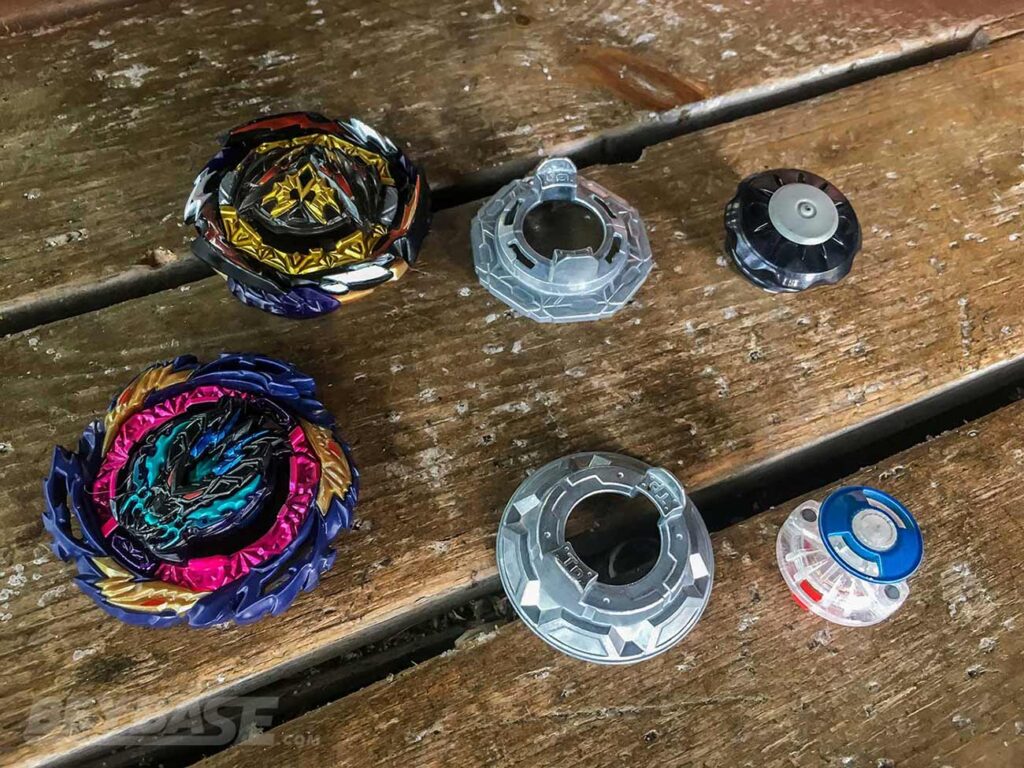
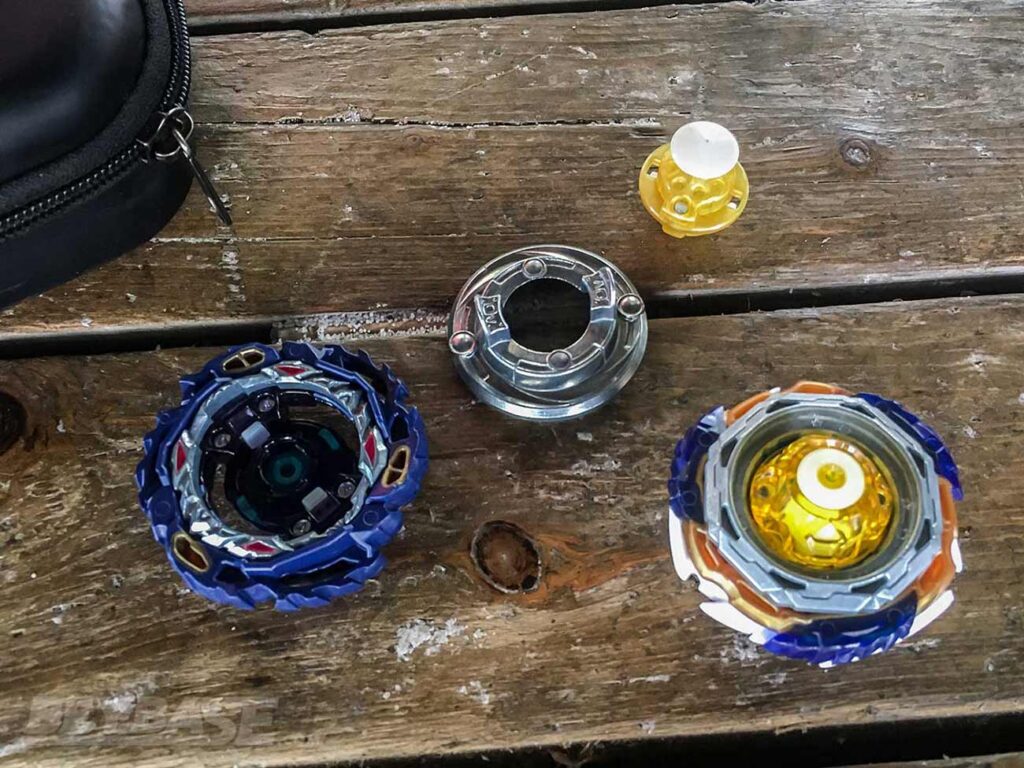
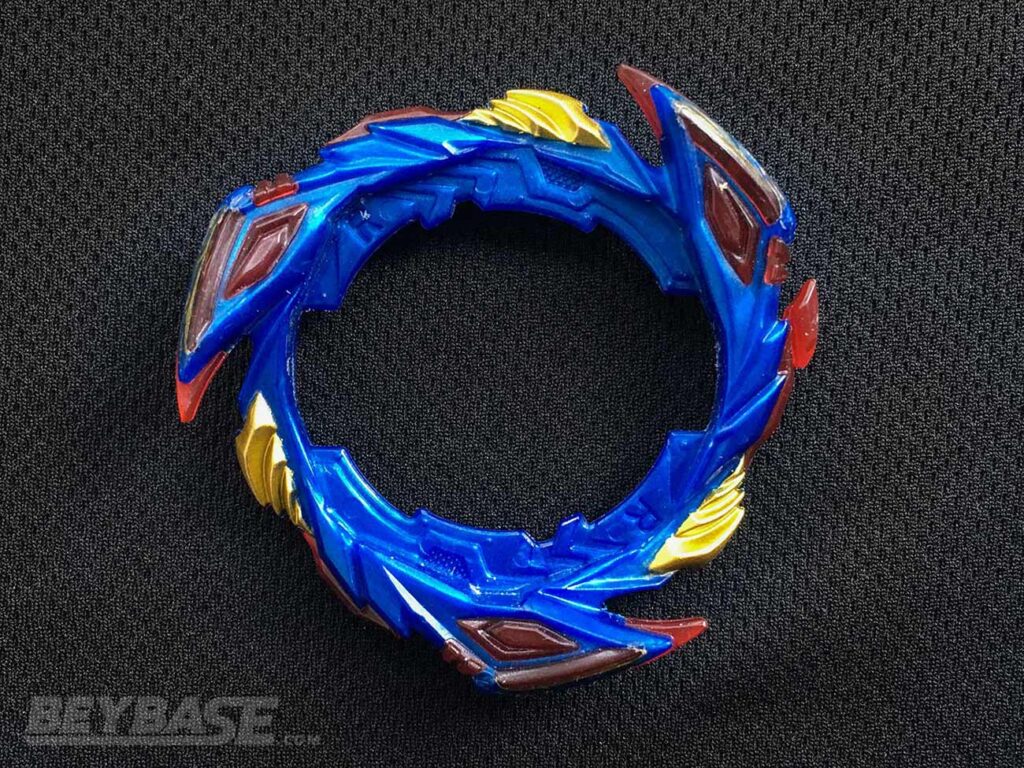
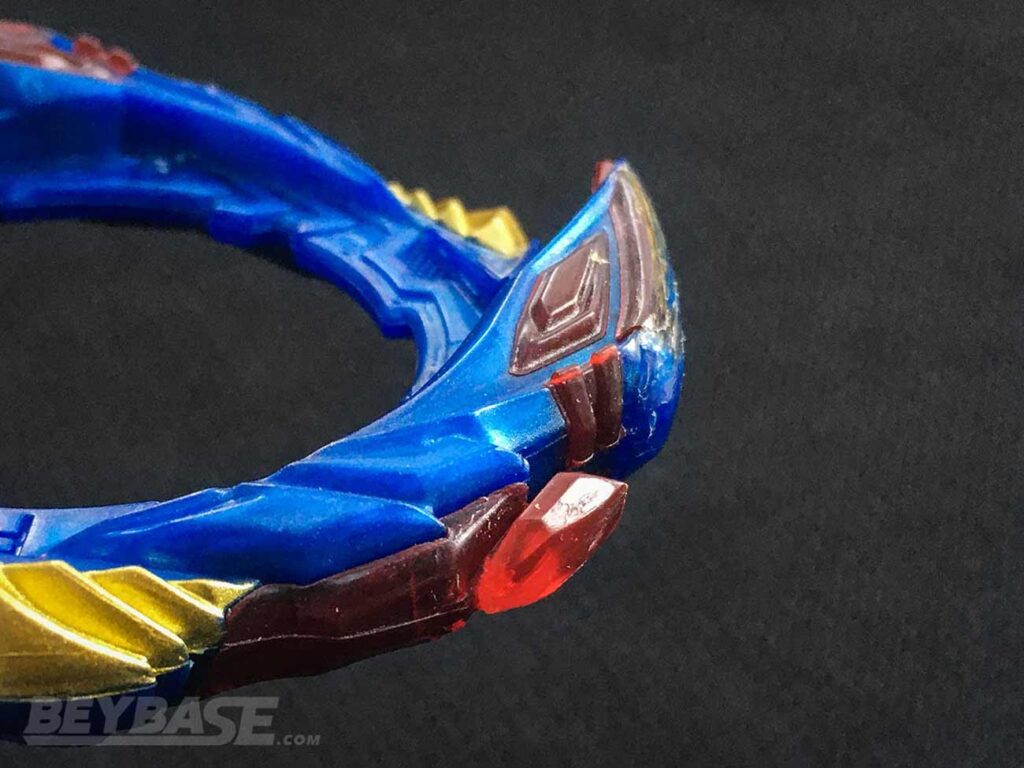
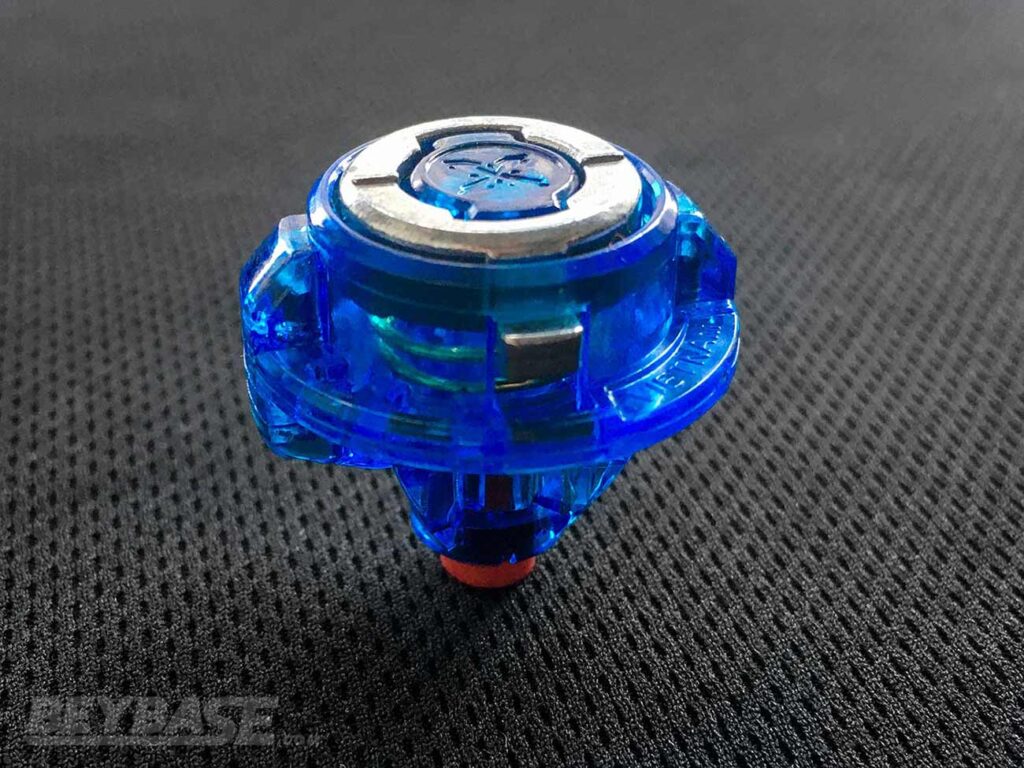
1. Astral Blade
What was the most popular Beyblade combo with the Astral Blade?
The number one contender was definitely the Astral Blade in combination with the Over Disk and Bearing Driver.
Both myself and Justin TC had independently come to the conclusion that it was one of the safest picks for the first stage of the tournament thanks primarily to its combination of high same- and opposite-spin stamina.
It has the ability to outspin a lot of things when in the same spin direction as its opponent, such as the popular Drift and Zone’+Z Drivers. The opposite spin performance of Bearing is in my opinion a slight step below Drift, but it has a chance to win against it.
Bearing has better defensive capabilities in the same spin direction because it does not suffer from the same fate that Drift often does in the same spin direction when it suffers a direct hit and it begins to circle the tornado ridge and kill its stamina or get KOed.
The Astral Blade itself has better same-spin stamina than the Vanish Blade, but slightly worse opposite spin performance, defense, and in my experience it can be knocked off balance a bit easier than Vanish.
The Astral Blade with Over Bearing is not the best combination in any category, but it is proficient enough in many categories simultaneously. This is what made it one of the most popular Beyblade combos at Bey Fray Qt.
Is the Astral Blade better in left-spin or right-spin?
Left-spin is better, but right-spin is serviceable.
At the moment, it has likely the best left-spin stamina in the game. In right-spin, it is OK but I am not convinced yet that it’s better than the Dynamite Blade with F Gear or the Tempest Ring. Would love to hear opinions from any of you who may have tested this more.
Get the Astral Blade from B-188 Astral Spriggan Customize Set
Heads up: If you buy something through some of the links on this post, you won’t pay any extra, but I’ll get a small commission. This helps me keep things running. Thanks for your support!
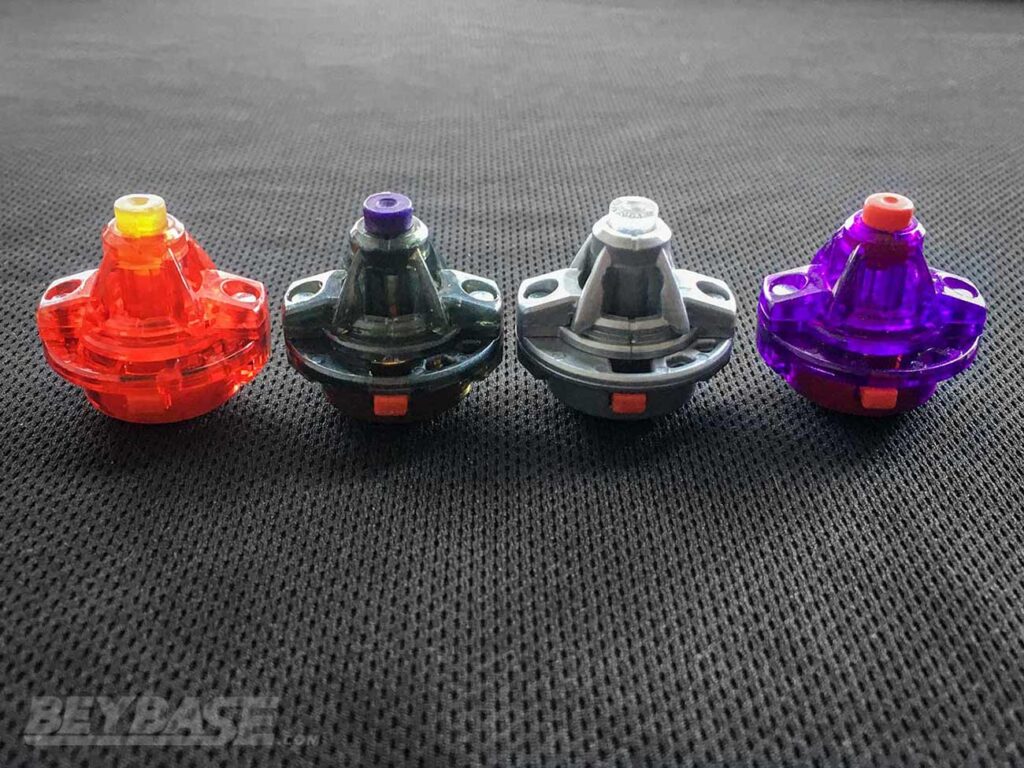
2. Over Disk
Is the Over Disk better than the Giga Disk?
Yes and no. The reason is because while when all else is equal I believe the Over Disk may have the edge over the Giga Disk, results can vary significantly because of both launch strength and the combination in use.
The Over Disk is wider than the Giga Disk which means that if you are using a combination that makes use of something with a low height like the Never Driver, the time at which you begin to scrape the stadium floor will begin sooner than if you had used the more compact Giga Disk.
On the other hand, if you are using something that does not fall over like the Drift Driver or something taller like the Wave Dash Driver, you may find that the Over Disk is the better choice.
In Bey Fray Qt you’ll see in part two that Over was a very popular choice on the Bearing Driver.
Is the Over Disk the heaviest Beyblade Burst Disk?
No. But it’s a close second!
Released alongside the Astral Blade in B-188 Astral Spriggan Customize Set, the Over Disk is actually a bit lighter than the new Nexus+S Disk that can now also be built thanks to the S Gear attachment included in the set.
My Over Disk weighs 33.46g and Nexus+S 34.80g. For comparison, the Giga Disk weighs 33.21g.
Get the Over Disk from B-188 Astral Spriggan Customize Set
Heads up: If you buy something through some of the links on this post, you won’t pay any extra, but I’ll get a small commission. This helps me keep things running. Thanks for your support!
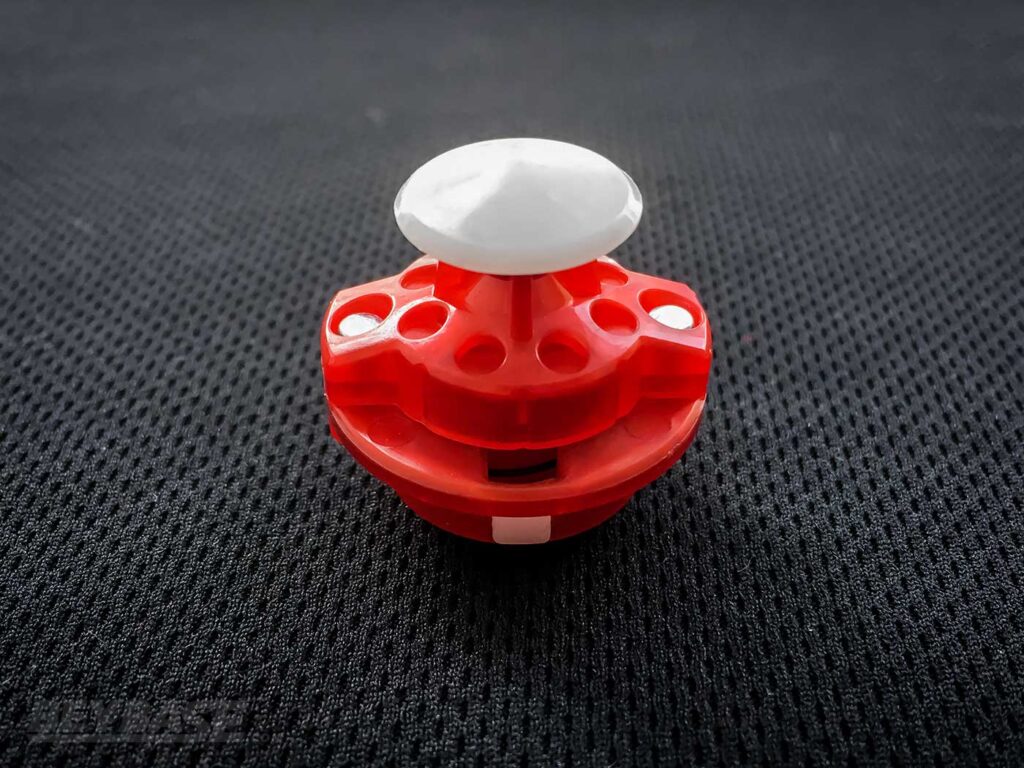
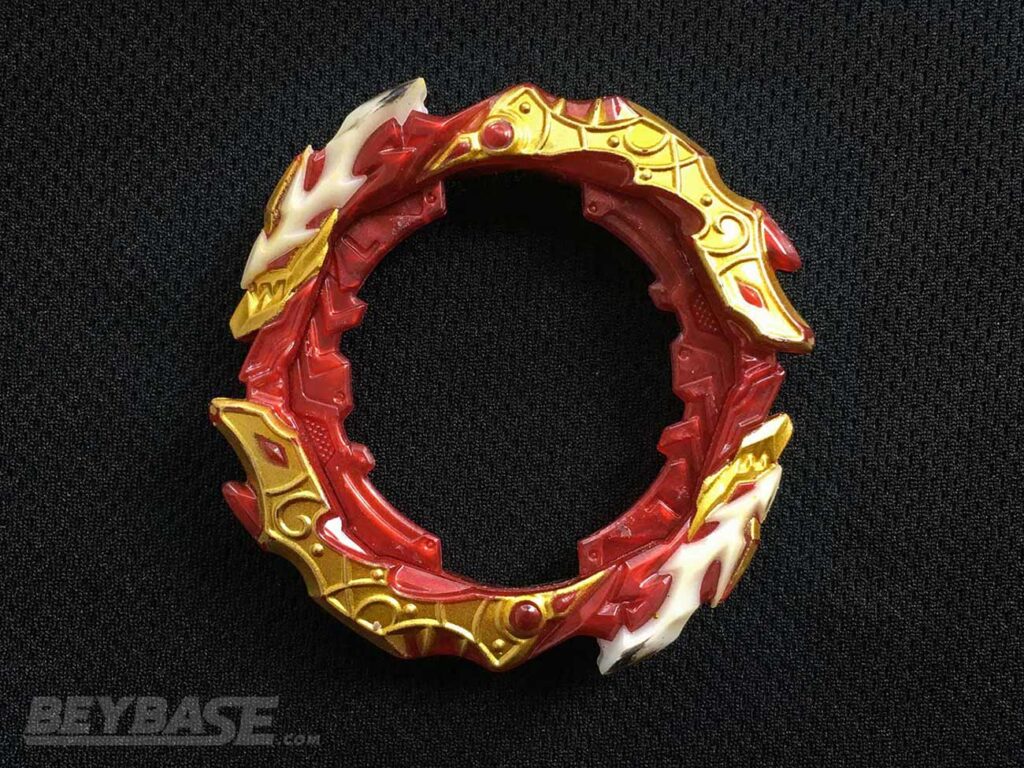
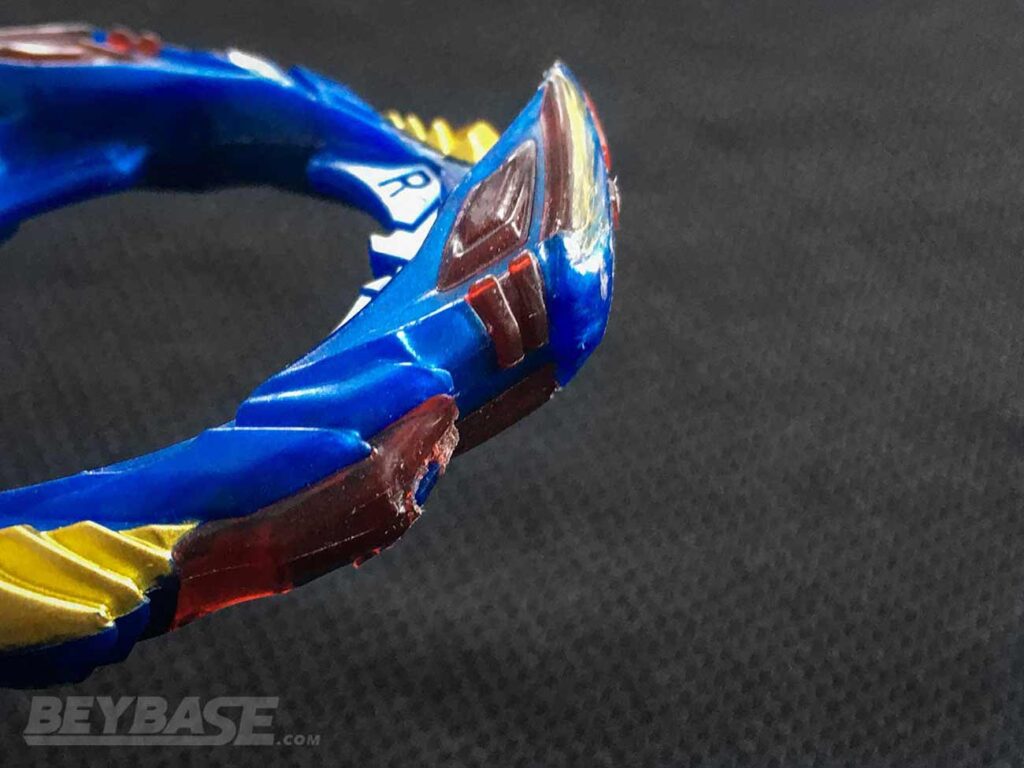
3. Savior Blade
Is the Savior Blade good for attack type Beyblade combos?
Yes! The Savior Blade has quite literally saved the Beyblade Burst right-spin attack type metagame. It’s exactly what has been missing after the viability of combos with the Judgement Layer Base started to fade in 2020.
The Savior Blade was very popular on the Xtreme Dash Driver, Metal Xtreme Driver, and Quick Dash Driver during Bey Fray Qt. Particularly in the final stage as you will learn in part two of this report.
It can stand up to basically any right-spin combo and even do decently well against left-spin Beyblade combos using parts like the Vanish Blade or Roar Blade.
How to awaken the Savior Blade
One of the features of the Savior Blade is the ability for three small rubber blades to break off after extensive battling which then allow for the Savior Blade’s three massive smash and spike attack points to be exposed. This increases attack power.
There are many ways to approach awakening the Savior Blade, but I would recommend one of the following:
- Put it up against a very aggressively designed opponent such as Rage Longinus Destroy Dash 3A. Here’s an example you can watch of Zankye doing this.
- Put it up against a stationary opponent using the Quest Driver and use an attack type Driver with decent stamina like the Quick Dash Driver on Savior. I used the Astral Blade and Dynamite Blade on Giga Quest as basically a punching bag. I liked this method because it ensured that Savior would have a chance to inflict several strong blows before the battle was over.
I wasn’t able to fully awaken mine before this tournament, but did get two pieces broken off!
If anyone has other tips for how to quickly awaken the Savior Blade, please comment below.
Does the Savior Blade self-burst too much?
If you use a tight Dash Driver, it will not.
I specify “tight” Dash Driver because throughout my testing I discovered that most versions of the Xtreme Dash Driver cause the Savior Blade to self-burst much more frequently.
If you want to use Xtreme’ with Savior, you need to use the silver Xtreme’ from B-173 03: Super Satan 6 Xtreme Dash 1S.
In my testing with all other versions of the Driver, it self-burst a lot more. Especially against left-spin opponents.
One other Driver I found to do well in terms of not self-bursting was the Variable Dash Driver.
The Metal Xtreme Driver also seemed to do well when Justin TC used it at this event, but the sample size was a bit too small to judge.
Takara-Tomy almost blew it for right-spin attack types once again like they did with the glass cannon known as the Burn Ring from the B-174 Beyblade Limit Break DX Set … but thankfully there are some specific Drivers that help to mitigate the chances of the Savior Blade self-bursting.
Get the Savior Blade from B-187 Starter Savior Valkyrie.Sh-7
Heads up: If you buy something through some of the links on this post, you won’t pay any extra, but I’ll get a small commission. This helps me keep things running. Thanks for your support!
Zankye’s Best Beyblade Burst Dynamite Battle Combos
Zankye–who participated in Bey Fray Qt–also put together his own video outlining five of the top combos in his opinion from this event. Check it out:
First Stage Report
Bey Fray Qt was our first Swiss tournament format event since Papabey’s Winter Solstice Classic back in December 2019. There were 19 total participants and the top eight players from five rounds of swiss would advance to a single elimination WBO Deck Format final.
Tournament Participants
First Stage Battle Format: Standard Type (Single Beyblade Best 3-of-5 Format)
As per current worldbeyblade.org rules for ranked events, the first stage was played using the Standard Type match format, which the traditional single Beyblade best 3-of-5 format that most players should know.
As of late, a narrative has been built within the community that this format is somehow less competitive than alternative formats.
I even said in my HIGH PARK THROWDOWN 12 report that I wasn’t sure I wanted to play in another ranked tournament that uses it before:
The more I play with these alternative formats, the more it becomes clear that both are superior to the traditional single Beyblade format. So much so that I’m not sure I really want to play in another ranked tournament using the traditional format anymore.
In retrospect, this may have been a little harsh.
While formats like Pick 3, Choose 1 or WBBA 3on3 do offer strong alternatives in their own way, I do think there is an argument to be made for this traditional single Beyblade battle format … It challenges you in different ways. There is depth hidden behind its simplicity.
The one aspect which I admire the most about how it challenges players is the inherent restrictiveness of the format. Because both players are locked into a single Beyblade, it can very much come down to things like launch strength, launch technique, and confidence.
Unlike WBBA 3on3 for instance, both players are forced to use their combos multiple times consecutively. Different tweaks in strategy often emerge because of this that can change the final outcome of the match.
Just like in the testing of Beyblades, the more rounds you play against something, the more accurate the result will be.
One other aspect it challenges is players’ picking ability, which must be informed by a significant base of knowledge. The pressure to make the right choice is huge in this format.
Multi-Beyblade formats can sort of bail you out because there is less reliance on a single Beyblade. Picking ability is still important in multi-Beyblade formats, but it isn’t as critical as the single Beyblade format.
And when someone breaks from the mold in this format to use something that isn’t the safest combo, they demonstrate a higher degree of bravery and it’s much more exciting to watch because of it.
Every battle format has positives and negatives, but after playing in this event I would say that my perspective has shifted back towards being a little bit more neutral than it was before when it comes to comparing this format to others like Pick 3, Choose 1 or WBBA 3on3.
Sponsored: Order the newest Beyblades at malloftoys.com!
Heads up: If you buy something through Mall of Toys, you won’t pay any extra, but I’ll get a small commission. This helps me keep things running. Thanks for your support!
Blader Kei’s First Stage Matches
Round 1 – Astral Bahamut Over Bearing-0 (Kei) vs. Lord Spriggan 0 Cross Xtend+ (Aigasrage)
Final Score: 3-0 Kei
I had little idea of what Aigasrage would use in this match, so it was an easy choice to stick to my strategy going into this tournament and pick ABH.Ov.Br-0.
I was able to easily outspin LS.0C.Xt+ to win the match 3-0.
Round 2 – Astral Bahamut Over Bearing-0 (Kei) vs. Astral Fafnir Giga Bearing-0 (Tahoor)
Final Score: 3-2 Tahoor
It seemed likely based on what information I had that Tahoor would be using a combination with the Bearing Driver. But I didn’t know what spin direction it would be.
I took a bit of a risk by choosing to stick with ABH.Ov.Br-0 because if he had been right-spin and using something like Tapered Bearing, it might have been a bad matchup.
However, he chose AFF.Gg.Br-0. At first, I was confident about this matchup because based on my testing the Over Disk had a bit better stamina than the Giga Disk.
That being said, the performance of Bearing Drivers can vary wildly. I went up 2-0, but Tahoor then mounted a comeback to take the match 3-2.
A few of the reasons for this were probably that the Bearing Driver I was using was relatively new compared to his, which meant the tip was sharper. With a sharper tip, Bearing starts to lean over on its side earlier.
This, in combination with the wider Over Disk meant that Tahoor’s AFF.Gg.Br-0 was able to push my combination down and cause it to scrape earlier.
After seeing this happen, I had some regret because in HIGH PARK THROWDOWN 12 I had relied on my semi-worn Bearing and was successful in most of my matches. I had decided to switch to my new one for this tournament hoping that it would have better same-spin stamina, and it did seem to during my testing.
It seems to me that semi-worn is really the sweet spot because if it’s sharp you run into the problem I had in this match. If it’s too worn and almost flat, you may get a slight boost in opposite spin performance, but it really hinders your same-spin performance and controllability.
That being said, after this tournament I did some direct testing again between the relatively new (red) Bearing Driver that I used for this match and the semi-worn (yellow) one that I used during HIGH PARK THROWDOWN 12.
I did mirror match testing with them using Vanish Fafnir Over Bearing-2. The red one won pretty handily … which is what happened before this tournament as well. The red one spins a bit more freely, which might be what gives it the edge.
So, when deciding what Bearing Driver to use, there are many factors to consider. Many of these factors will be in your control, but some (like how strong your opponent’s Bearing is) will not.
Round 3 – Astral Bahamut Over Rise-0 (Kei) vs. Dynamite Belial Giga Bearing-2 (1234beyblade)
Final Score: 3-0 Kei
After playing against 1234beyblade a whopping 24 times in the first stage back in 2016, five times in 2017, we’ve only played each other 5 times since 2018 in the first stage. This has largely been because of the increase in tournament size during that period and our rising rankings … so needless to say, we know each other well and it’s nice to have a chance to play with him! But also scary!
The only thing you can typically predict about our matches is that they are unpredictable. We both aren’t afraid to use attack types. But this time, we chose stamina.
This was one scenario where it made sense for me to divert from my tournament strategy slightly and refrain from choosing ABH.Ov.Br-0.
I went with ABH.Ov.Rs-0 (awakened Rise Driver) instead.
Going into this tournament, I had a lot of mixed feelings about awakened Rise. The reason being that at HIGH PARK THROWDOWN 12–the tournament I first used it–we played using a modified Knocked-Out/Play Area ruling that made “bounce backs” legal. Combos that use an awakened Rise Driver rely on being able to ride the tornado ridge of the stadium and often need to bounce off walls to stay in when it skips the ridge.

However, for this event since we had also lowered Burst Finishes to one point for the first stage, I figured this would be a solid pick against 1234beyblade because it would have a chance against both stamina and attack type combinations.
1234beyblade went with D(F)BL.Gg.Br-2, which was a little bit surprising because upon arriving that morning he was lamenting how overpowered the Drift Driver apparently was … but I think his opinion changed a bit after doing more testing versus same-spin Bearing combinations before the event started. He also probably thought that I thought he would use Drift.
I thought it was a possibility he used Drift, but so was Bearing or something using Xtreme’ like Savior. ABH.Ov.Rs-0 gave me a chance against all of them.
I was able to outspin him three straight times and take the match 3-0.
Round 4 – Dynamite (F Gear) Valkyrie Over Drift-10 (Kei) vs. Dynamite (F Gear) Belial Over Rise-10 (henwooja1)
Final Score: 3-1 henwooja1
In my first loss against Tahoor, I made the right selection, but lost because of poor Beyblade building awareness.
In this match against henwooja1, I did almost the opposite. I made the wrong selection, but had built a strong combination.
I chose D(F)VL.0v.Dr-10 (awakened Drift Driver). The awakened Drift Driver has slightly better opposite spin performance (Life After Death) than a brand new one, but it sacrifices same-spin stamina.
henwooja1 went with D(F)BL.Ov.Rs-10 (awakened Rise Driver), which was one possibility I had suspected.
I knew he had been using Rise, but the main problem was that I really didn’t know what spin direction he was going to choose. I almost chose to use the Roar Blade instead of Dynamite, but decided against it because I had been using left-spin all day and figured he would have noticed that.
Although it was not the ideal situation in my mind, I did have some confidence using awakened Drift in same-spin despite it’s self-kO tendency because if you launch it solo and very hard, it can bounce off walls and stay in the stadium relatively well. But after playing this match, it seems to be a good example of the type of thing that you really need to test with two people to fully understand. It might be able to stay in the stadium when launched solo, but the same is not true in a real battle.
I ended up scoring one KO against him, but lost the match 3-1.
Overall, I’ve concluded that using awakened Drift is too risky in most situations for the standard type battle format. The potential upside of being awakened if you guess right and your opponent is in the opposite spin direction does not balance with the level of risk you take on if you’re wrong and they are in the same-spin direction.
A better risk to take in this type of situation would have been to use an attack type.
Or even sticking to my plan of using ABH.Ov.Br-0 would have given me a much better chance of winning.
Round 5 – Astral Bahamut Over Bearing-0 (Kei) vs. Dynamite (F Gear) Belial Over Never-3 (originalzankye)
Final Score: 3-2 Kei
I needed a win in this match to have a chance of advancing to the finals.
Sometimes in these scenarios I might go against my first instinct to use something safe, but for this match I decided to return to my tournament strategy, choose ABH.Ov.Br-0, and trust that my assessment of the combo would be correct.
I also knew that Zankye had relied on combinations like Vanish Bahamut Over Bearing-10 and Dynamite Belial Giga Never-3, both of which ABH.Ov.Br-0 would likely be able to defeat.
He ended up going with D(F)BL.Ov.Nv-3, which was very similar to the aforementioned combo.
I went up 2-0, but he made a comeback to tie the match at 2-2. In an effort to prevent another reverse sweep in this tournament, I switched to High Mode.
I need to test this more, but so far in opposite spin, I’ve found that switching to High Mode can be beneficial if your opponent is in Low Mode. Particularly in this scenario where the Never Driver itself is shorter than the Bearing Driver. It increases the chances of your higher combination being able to lean on top of your opponent and spin slightly longer than them.
Thanks to this change, I was able to earn the third point, win the match and advance to the finals!
Other First Stage Battles
Or become a BeyBase HQ member to get early article access and behind-the-scenes updates. Thank you!
What do you think? Comment below!
I’d love hear what you guys think of the Beyblade metagame as it stands right now, whether you attended the tournament or not.
Comment below and let me know!
If you enjoyed reading this article, please also feel free to share it with any of your friends who are into playing Beyblade competitively or enjoy hosting tournaments.
Bey Fray Qt Tournament Article Series
16 thoughts on “The Top 3 New Beyblade Burst DB Parts For Tournaments (Bey Fray Qt Report – Part 2)”
Comments are closed.
I hope TT will make a right spin core that can compensate Savior’s burst resistance. Despite the issue, I’m just glad that we had a greatly competitive right spin attack that can take against other stamina/defense competitive combo. It truly does speak its name as the “Savior of right spin attack.”
Yeah, it would be really great if they would release a right-spin Dynamite Core that solves this issue with Savior entirely. It doesn’t make sense to me why they even designed it to have burst resistance issues in the first place; they should know better by now that attack types need strong burst resistance.
This post aged like wine. Belial 2 core is the best right spin db core for defense/stamina and the savior blade.
After I had read whole of the Article here, I had figured out some combos that may be more powerful than the combos in the article there. It is:
1. Vanish Bahamut Over Drift-0
2. Savior (Awakened) Valkyrie Giga Evolution’ (Awakened)-7
3. Dynamite (F Gear) Belial Giga Zone’+Z-6 (Also sometimes I will change the 6 Armor with (L Gear) in High mode.)
4. Astral Longinus Over Bearing-2
That’s all so what is your opinion about this Combo? It is a very good combo? because I always want the best for my combos.
Thanks for reading, M Luqman!
1. This is a great combo, no doubt. My only problem with it is the risk you accept when playing with it in same-spin matchups due to Drift’s tendency to go out of control (it’s not nearly as bad on DB Beyblades, but it still happens).
2. I haven’t tested Evolution’ with Savior, so it’s hard for me to say definitively how I feel about this one. If the burst resistance is good on Ev’ with Savior, I can see this being a good anti-attack combo. I believe using Xtreme’ (Silver) makes it more versatile, though.
3. This is great too. Some players used this combo at this event as you’ll see in part three. You can some defense thanks to the burst resistance and weight of Zn’+Z, but sacrifice a bit of same-spin stamina in comparison to something like Bearing.
4. I don’t have Longinus yet. It’s not even officially released yet in Japan as I am writing this haha, so I’m not sure how you have it. Anyways, assuming the Longinus Dynamite Core has decent burst resistance, then that combo is great as well. It’s almost the same as the one I talked about in this article that uses the Bahamut Dynamite Core. Great same-spin stamina, but lower defense compared to using something like Vanish on it.
Sorry, my keyboard :this Combo= these Combos
Tks again for compiling such useful tips Kei. Regarding point scoring, I have an idea that might solve the dilemma about whether to award 1 or 2 points for a KO. Make it worth 1.5 points so in the middle of a burst & an outspin. But to avoid half points, make it first to 10 points, burst finish is 4 points, K.O. is 3 points, outspin is 2 points. This would more accurately reflect the risks & rewards surrounding KOs. What do u think?
You’re welcome! Thanks for reading, TCBlading.
That’s a pretty interesting idea, actually. I hadn’t considered something like that. That makes it a pretty difficult road for stamina types since they will need five round wins to earn 10 points. I believe that is fair given how easy they are to use, but worry about what it would mean in terms of match length for stamina vs stamina matches. However, perhaps that could be offset by the battle limit/consecutive draws rules that were in use in this event.
I’ll give this some more thought. Thanks!
Sorry my bad, Kei – I thought tournament points were first to 5, not 3 (been watching too much Frotz videos lol). In this case of your tournaments being 1st to 3 points, I would change this to 1st to 6 points (or even first to 8) rather than first to 10 points (assuming burst 4 pts, KO 3 points, OS 2 points)
Also, another idea, only in the case of limited time, or very large participant numbers at tournaments: cull faster at some stage by battling 3 or 4 beys in the same stadium using a bigger one such as B-50 or Takara Tomy Mall stadium, or even the DB stadium. Last 1 or 2 beys (depending how fast u want to move the tournament along) to survive or outspin progress to next round.
This also makes bladers test & prepare combos that do well in such multi-player match ups. Which they do, as u know, in Japan.
Oh, I see. Yeah, first stage matches are to three points. Final stage matches are to five points as we use WBO Deck Format.
For first stage, I might actually prefer 10 points with your proposed point values because it still allows for a match to be played across at least a few rounds. If it was six points, I’m just not sure how I’d feel about potentially losing a match in two rounds, which seems likely given how relatively common KOs are.
Maybe 9 points is the sweet spot because it would require three wins by burst, three wins by KO, or five wins by OS at minimum.
Or 7 points. It’d require two wins by burst (which are less common), three wins by KO, and four wins by OS at minimum.
You’d also probably want to factor in non-contact Bursts and KOs. Those could be worth one point.
There’s a couple problems with your second idea:
1. One is that availability of those larger stadiums is low; most WBO Organizers do not own them because they’ve never been used for competitive play for the WBO and are more expensive to ship.
2. Second is that … I understand that it tests you in different ways, but I just feel those types of matches are so much more boring and unfair to players. I experienced this type of format at a G3 event in Osaka last year and was knocked out after literally one round in the wide stadium. My case is an extreme one given the distance I traveled to be there from Canada, but even if I ignore that, it’s not a good experience for anyone to enter an event and be eliminated after a single round against opponents they had no opportunity to learn anything about due to the match being just a single round. To me, it seems like the easy way out for Organizers rather than something designed to please players and actually create a competitive experience where you have the opportunity to learn and adapt as you play.
Interesting to have considered different points scenarios! Worth testing them out perhaps in future tournaments.
Yes it is good to give a pleasant experience where ppl don’t get eliminated too quickly in a tournament. But limited time combined with large numbers can also be a strain on organisers & contestants who can’t spend all day waiting for their turns so it nay be useful to incorporate some culling variations like multiplayer or less points at some stage after people have played a ‘reasonably satisfying’ amount of rounds.
Second chance round opportunities for those knocked out early could remedy this, also, 3 or 4-bey battles can be played over more rounds vs just 1, so there is a chance where if u r knocked out or the first bey to stop spinning u have another 2 or 3 chances to win, using either a first to x points system or first to get 2 or 3 1st places progresses.
In 1 place I know & used to play at, tournaments start off with free play no eliminations, then lenient rules where if both beys last a certain time they both progress, then first to 3 points wins for final 24 or 12. There is a second chance opportunity for half of those eliminated to get back in depending on number of participants that day. Sudden is death applies for final 6, then the final 3 or 4 play 3 rounds with 3 or 4 beys battling at same time in the final. It’s far from boring (except attack types don’t do so well in general) & provides variety to game play vs 1v1 blading all the time. The B-50 stadium is used throughout & it’s harder than in a standard stadium to get KO’d.
Point taken re availability of bigger stadiums. It’s a shame that great stadiums like B-00 Takara Tomy Mall Stadium or the B-50 wide stadium are so expensive due to shipping costs mainly.
Thanks for sharing your insight, glad everyone is having fun! I agree with some of this, but our tournaments don’t have these issues. We play on DB-183 stadiums only for everything superking and beyond. Also, we do 5g straight through so a tie is a tie, and we do 1 redo, and then if tie again, count it as 1 point for each player and move to the next beys in the deck. Our tournaments are fast, fun, and full of diverse combos. Especially since we have more participants and more bey variety. Also, funny how my purple xtreme’ is more burst resistant than my silver xtreme’ 🙂
Thanks, Dreamblader! Where do you play? I’d love to hear more about your experience.
What is your opinion of the DB stadium versus the Burst BeyStadium Standard Type? I would say that in general the popular opinion among WBO players is quite negative when it comes to the DB stadium as a competitive stadium.
I don’t have it myself at the moment, but from what I’ve seen it seems difficult to use traditional attack types using Drivers like Xtreme’ in it? It seems like all of Takara-Tomy’s newer Drivers with very wide tips were designed with this stadium in mind. And it seems like the stadium really drives you to use stamina types given the size and reduced number of exits. Are these fair assessments in your opinion? How would you say the metagame differs with this stadium?
I’m interested in it, but face both hesitation from my community and also within myself. It seems like Takara-Tomy is steering the game away from the traditional competitive gameplay with a balanced representation and division between attack/stamina/defense seen since the plastic’s generation in stadiums like Tornado Attack or Metal Fight Beyblade in the Attack Stadium. Stadiums like these are the pinnacle of Beyblade stadium design in my opinion.
Do you only play 5G? Do you play using the standard rules to 3 points? I can see how ties would not be as much of an issue in that format or 3on3. We did a 3on3 tournament in July and there were not really much issues with draws even without a procedure in place to put a cap on them.
But we are trying to solve the problem for all popular battle formats across all generations of Beyblade. Certain formats like what we call “Standard Type” (1v1) are more prone to suffering from issues due to draws than others. Because this format is the de facto standard for the WBO (right now) and will always be an option, it’s something that needs to be resolved as part of our organized play framework that organizers around the world can use.
any one has good combos for savior valkrie? when i get my valkrie i am thinking about gluing it but that wont be fair to other combos for testing so im looking for combos to test out then i might consider playing competetive after covid calms down like alot so tell me ok!
I really love Savior Ragnaruk Giga Xtreme’-2! It’s a top tier attack type combination for the Savior Blade.
Hi, Kei, love ur articles. I’m new to the dB layer after a long break on beyblade(last time I played it was the end of sparking era). Just wanted to know if I were to start buying right now, what would be a good buy? You mentioned the astral ring and I’m thinking of buying that because it comes with the very useful attack piece-metal xteme. As well as the booster guilty Longinus.
But for now, Can you give me a simple list of alternatives to xtreme’. Currently, I am using destroy’ from rage Longinus or evolution’ from Brave Valkyrie. Also, would you think that Hyperion 2 + metal core would work as a good alternative to solomen.
Finally, would you mind rating my sparking deck and giving me some pointers? I have most of the parts in the sparking era except for mirage fafnir and death solomen.
1. Rage Helios-2 +mcc drift OR Rage Helios-2 +mcc evolution’ (which one is better)
2. Tempest Hyperion-2 +mcc wheel zone’+z 1S OR Tempest Hyperion-2 +mcc wheel xtend+ 1S
3. Brave Valkyrie evolution’ 2A or Brave Valkyrie destroy’ 2A