Affiliate Disclosure: If you buy something through some of the links on this post, you won’t pay any extra, but we’ll get a small commission. This helps us keep things running. Thanks for your support!
In the first part of this series, I discussed how the Beyblade Burst metagame has evolved over the past year from a player strategy and gameplay balance perspective since I wrote the 2020 edition of the Top 5 Best Beyblade Burst Combos.
In this article, we’ll dive into specifically what the best Beyblade Burst combos of 2021 are, how I selected them, and what you need to build them!
Whether you’re looking for the strongest combos to defeat your friends with in friendly battles or you want to win competitive Beyblade tournaments, this article is a great starting point to understanding not only what the best combos are, but why they are good.
BeyBase “Best Beyblade Burst Combos” Article Series
Champions aren’t born overnight. In my latest article, I break down how my pursuit of knowledge, adaptability, and reproducibility compounded into victory at a 256-player G2 tournament.
Sponsored: Order the newest Beyblades at malloftoys.com!
Heads up: If you buy something through Mall of Toys, you won’t pay any extra, but I’ll get a small commission. This helps me keep things running. Thanks for your support!
How did I select the best Beyblade Burst combos of 2021?
Before we dive into the list, you might be wondering: how did I compile the list of the best Beyblade Burst combos?
The method I’ve used is largely the same as the one explained here in the 2020 edition of the Top 5 Best Beyblade Burst Combos.
However, to summarize, there are four key components:
- Blader Kei’s Opinion
- Interviewed Top WBO Players & Organizers
- WBO Winning Combinations Data (March 2020 – April 2021)
- WBO Rulings & Burst BeyStadium Standard Type
The influence of the pandemic over the past year also cannot be understated. In some ways, it isn’t a stretch to say that Beyblade Burst Sparking is a “lost” era for many Beyblade players.
The number of events that were hosted compared with the period covered in last year’s edition of this article is significant, but there was still a decent amount of real tournament data to pull from thanks to the looser restrictions in some areas at certain times that allowed them to host tournaments.
Top WBO Players & Organizers
The people selected are a mix of the top most competitive players in WBO tournaments in 2020 and 2021 so far as well as a returning high-ranking player who contributed to this list last year.
froztz
- WBO Burst Ranking: #93
- Ranked Tournaments Attended: 14
- Top 3 Finishes: 9 (First Place: 7)
- # of Entries on Winning Combos: 25 (1st Place Overall)
Cscramon
- WBO Burst Ranking: #17
- Ranked Tournaments Attended: 9
- Top 3 Finishes: 9 (First Place: 4)
- # of Entries on Winning Combos: 22 (2nd Place Overall)
Shindog
- WBO Burst Ranking: #14
- Ranked Tournaments Attended: 0
- Top 3 Finishes: 0
- # of Entries on Winning Combos: 0
And also myself:
Kei
- WBO Burst Ranking: #1
- Ranked Tournaments Attended: 1 (1 as Organizer)
- Top 3 Finishes: 1 (First Place: 1)
- # of Entries on Winning Combos: 5
Above data based exclusively on ranked Burst Format events from March 2020 – April 2021.
Each person was asked:
1. What do you feel the top five most competitive Beyblade Burst combos for 2020/2021 were? Parts may be repeated, but do try to have some variety (eg. don’t list one combo with five different disks; try to pick the best variant of a combo). And why?
2. What is one Beyblade Burst combo you feel was underrated in 2020/2021? This can be something that was underrated at any point during this period, even if it is outclassed now.
You can find their precise answers in the next part of this article: 5 Top Ranked Beyblade Players Select Their Favourite Beyblade Burst Combos.
But first, let’s take a look at the top five best Beyblade Burst combos of 2021 compiled while considering each of the above factors!:
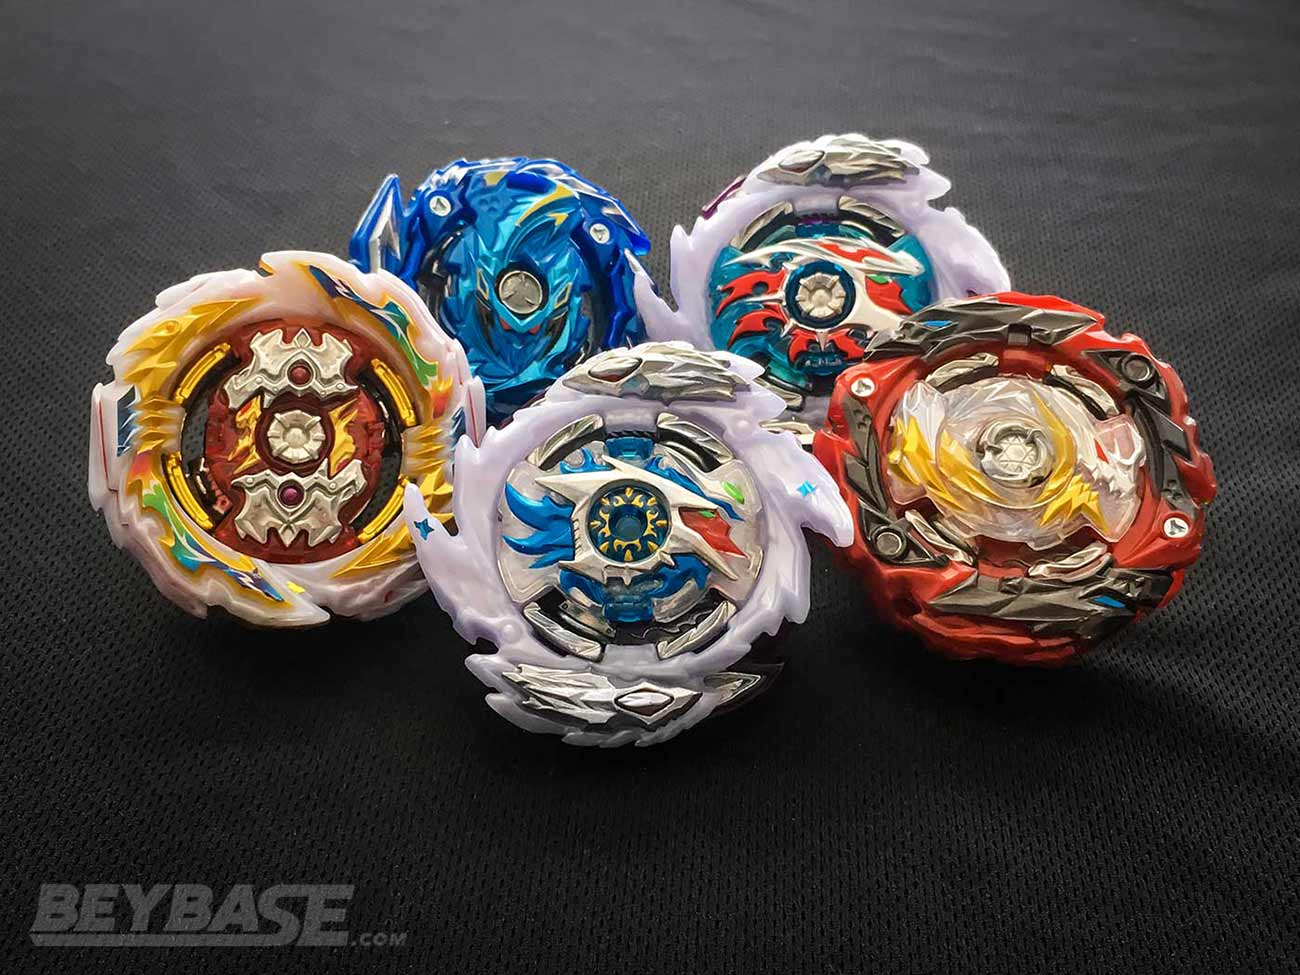
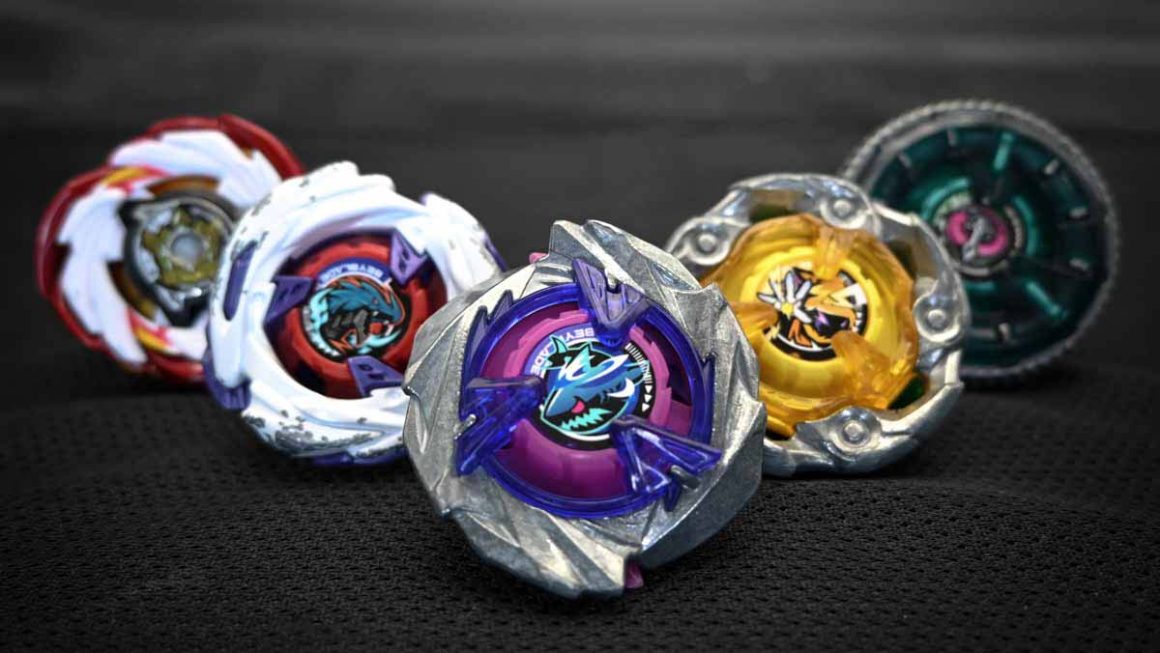
The Top 5 Best Beyblade Burst Combos of 2021
Check out the top five best Beyblade Burst Combos below! I detail their parts, strengths, weaknesses, and what you need to build them.
If you’re looking for a quick overview of the list and some test battles between the combos, check out this awesome video I collaborated with the BeybladeGeeks on!
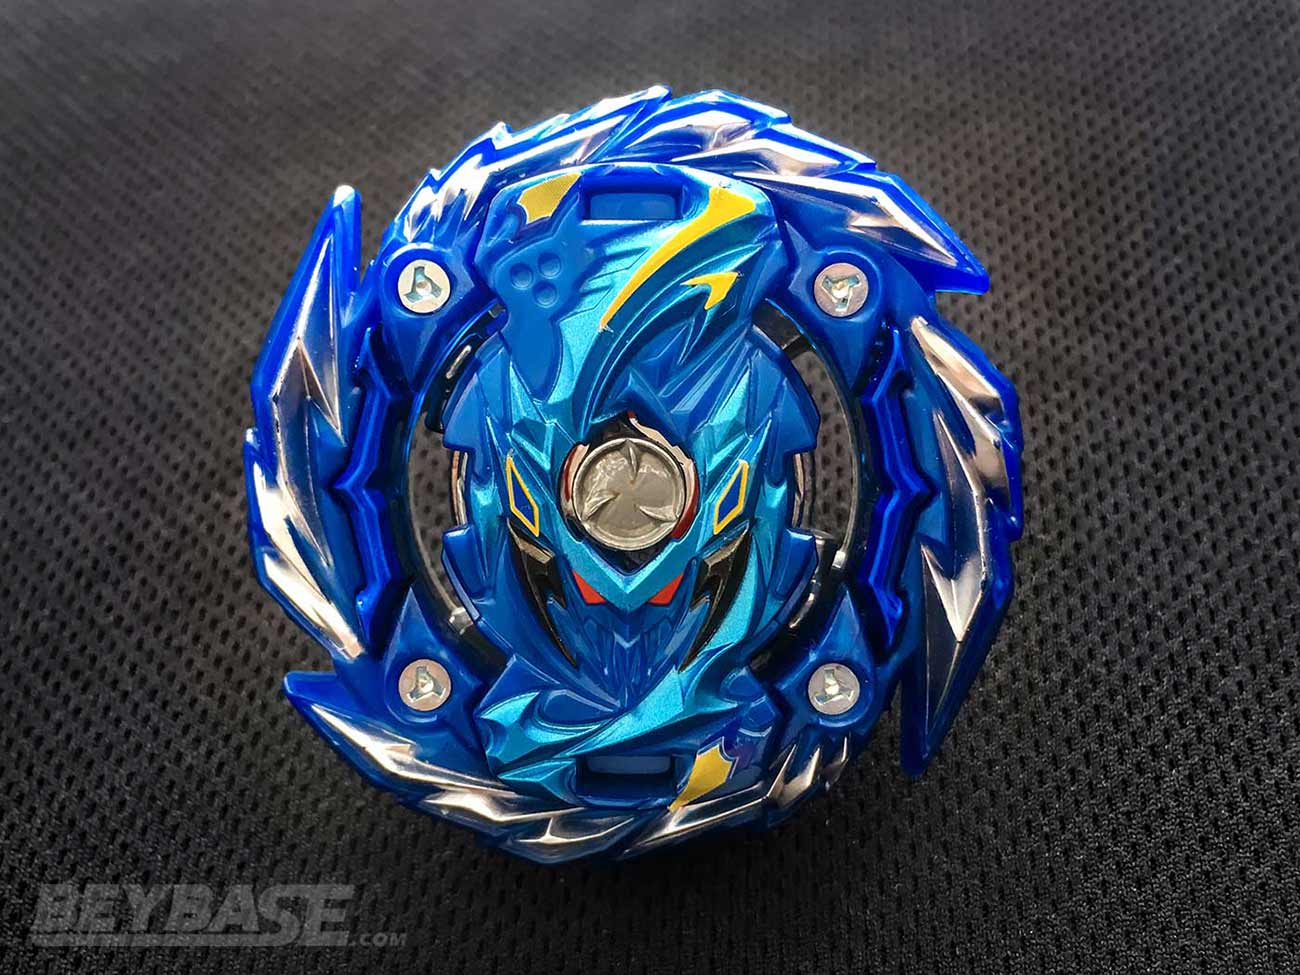
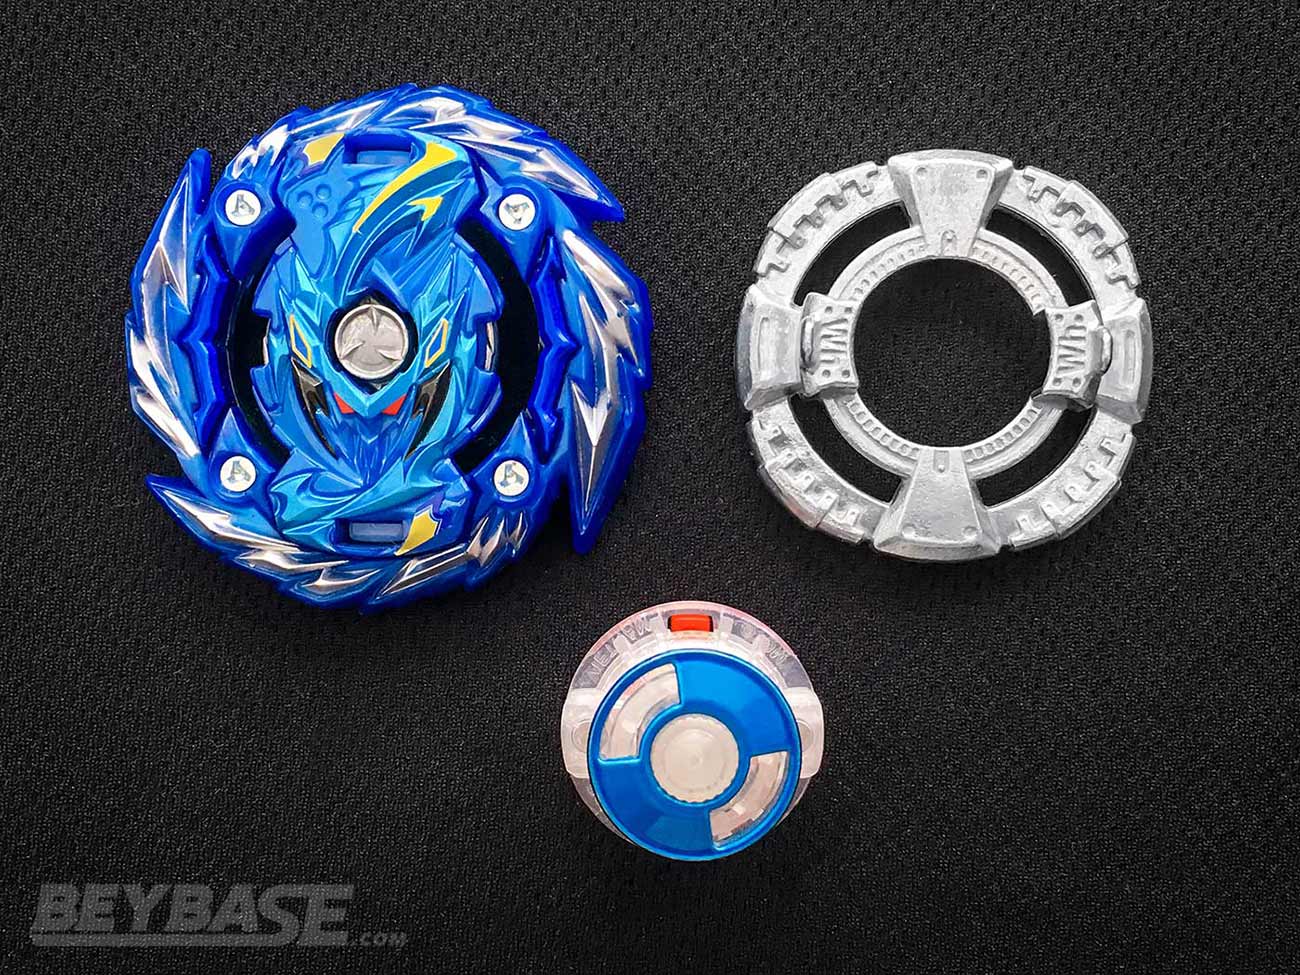
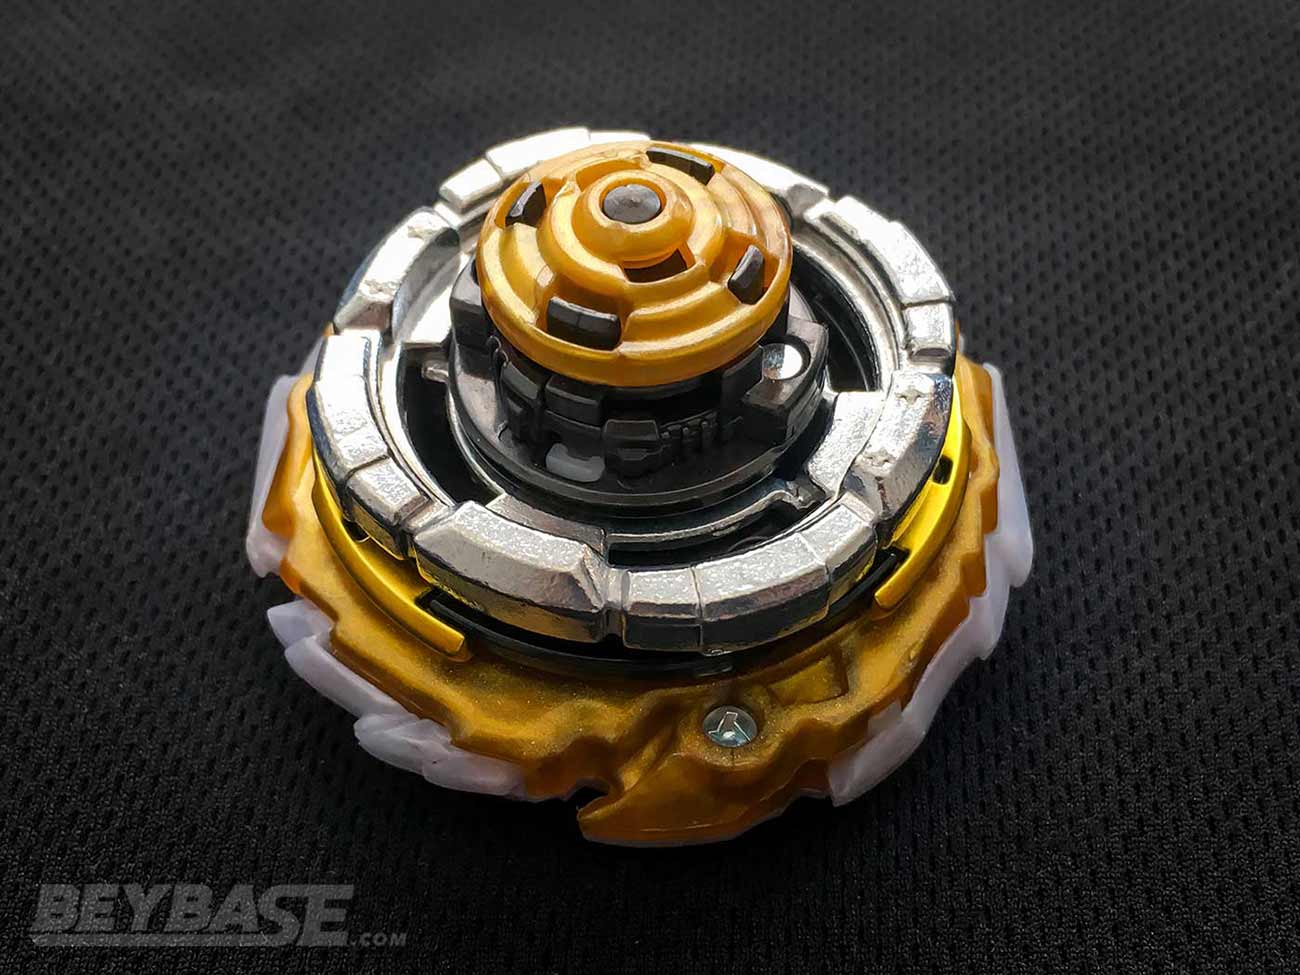
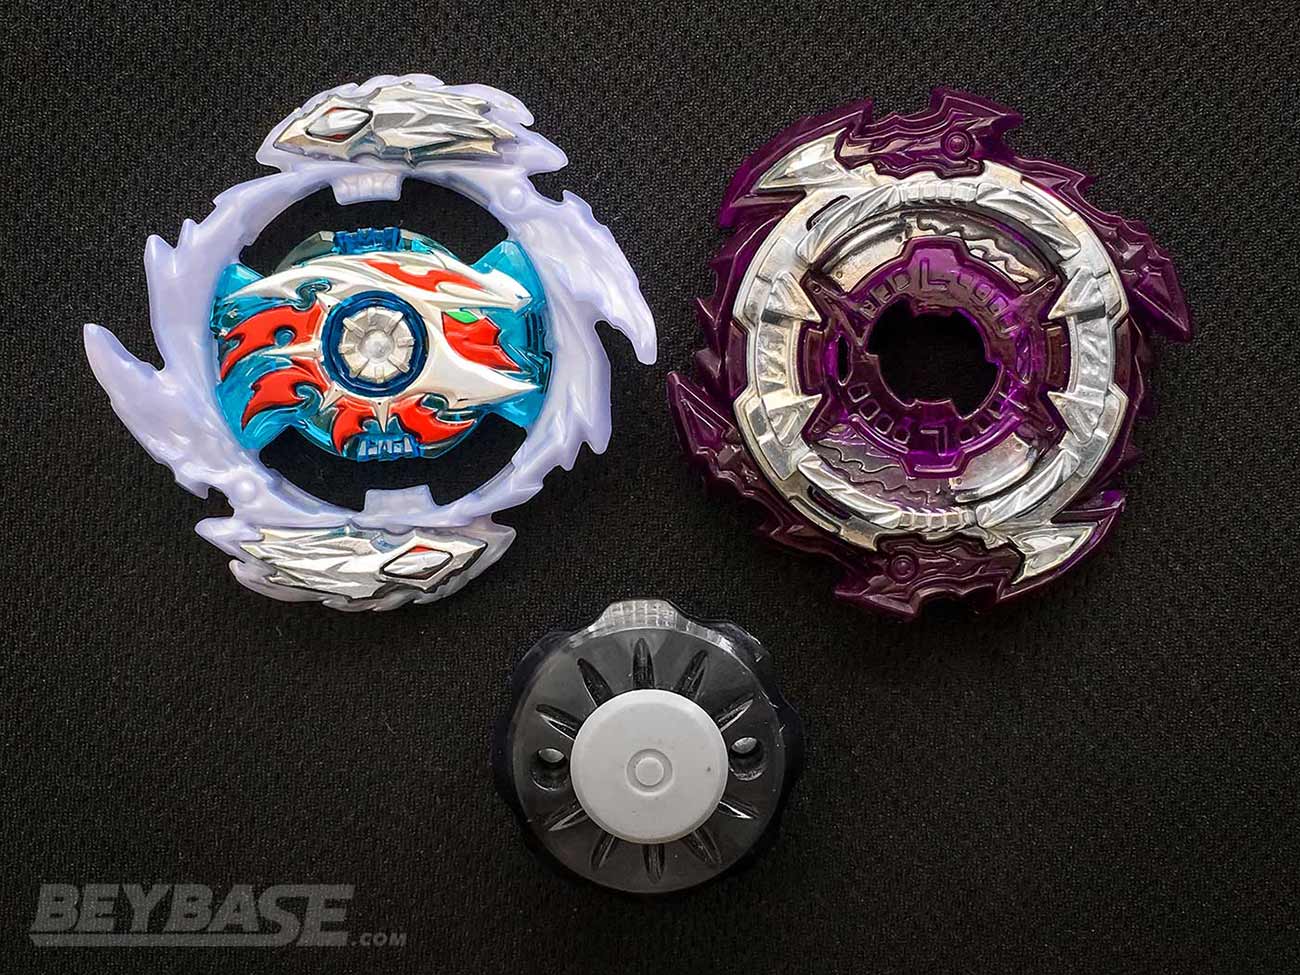
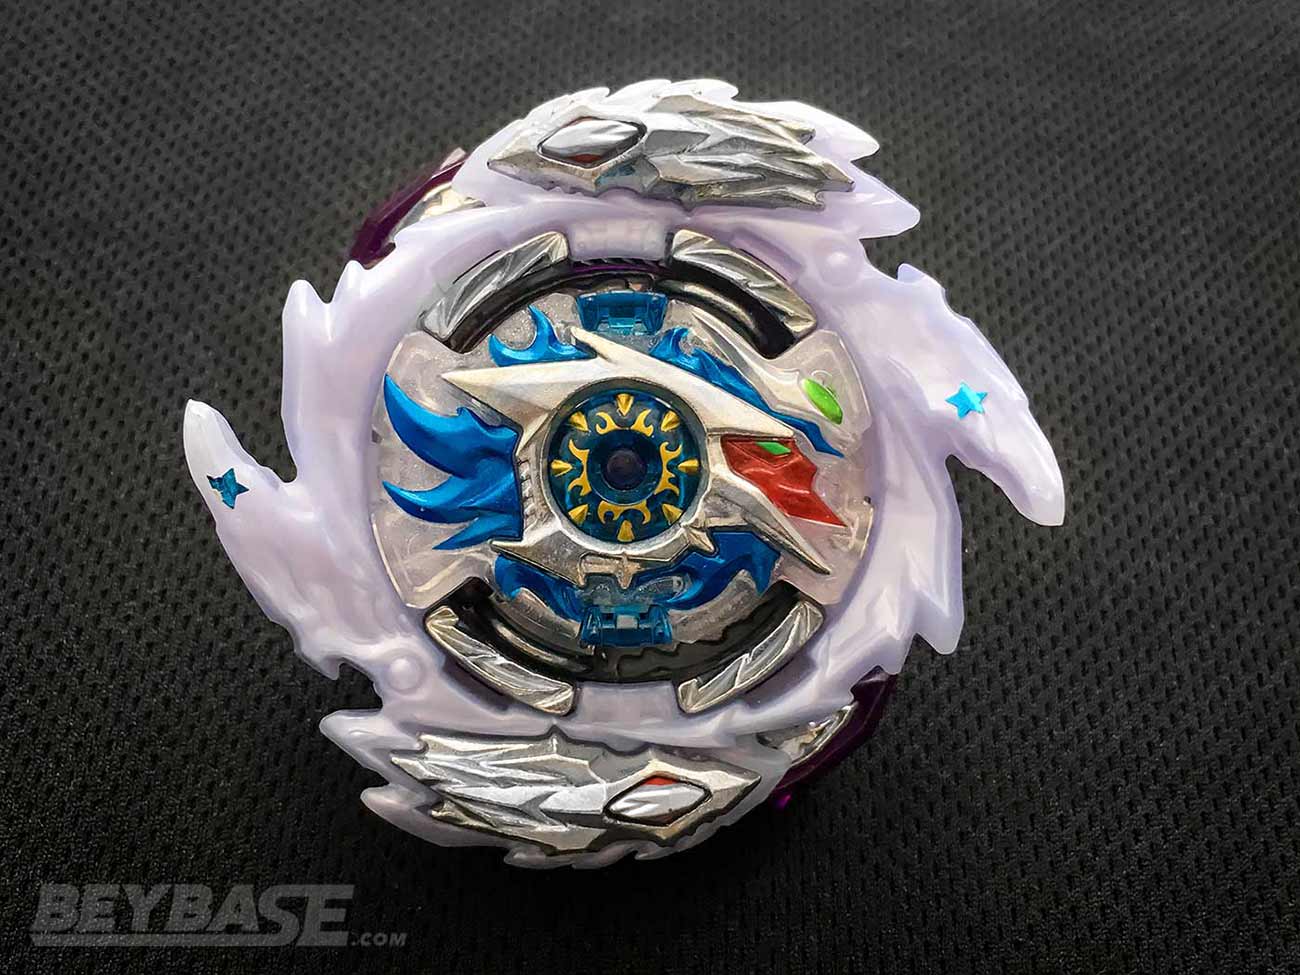
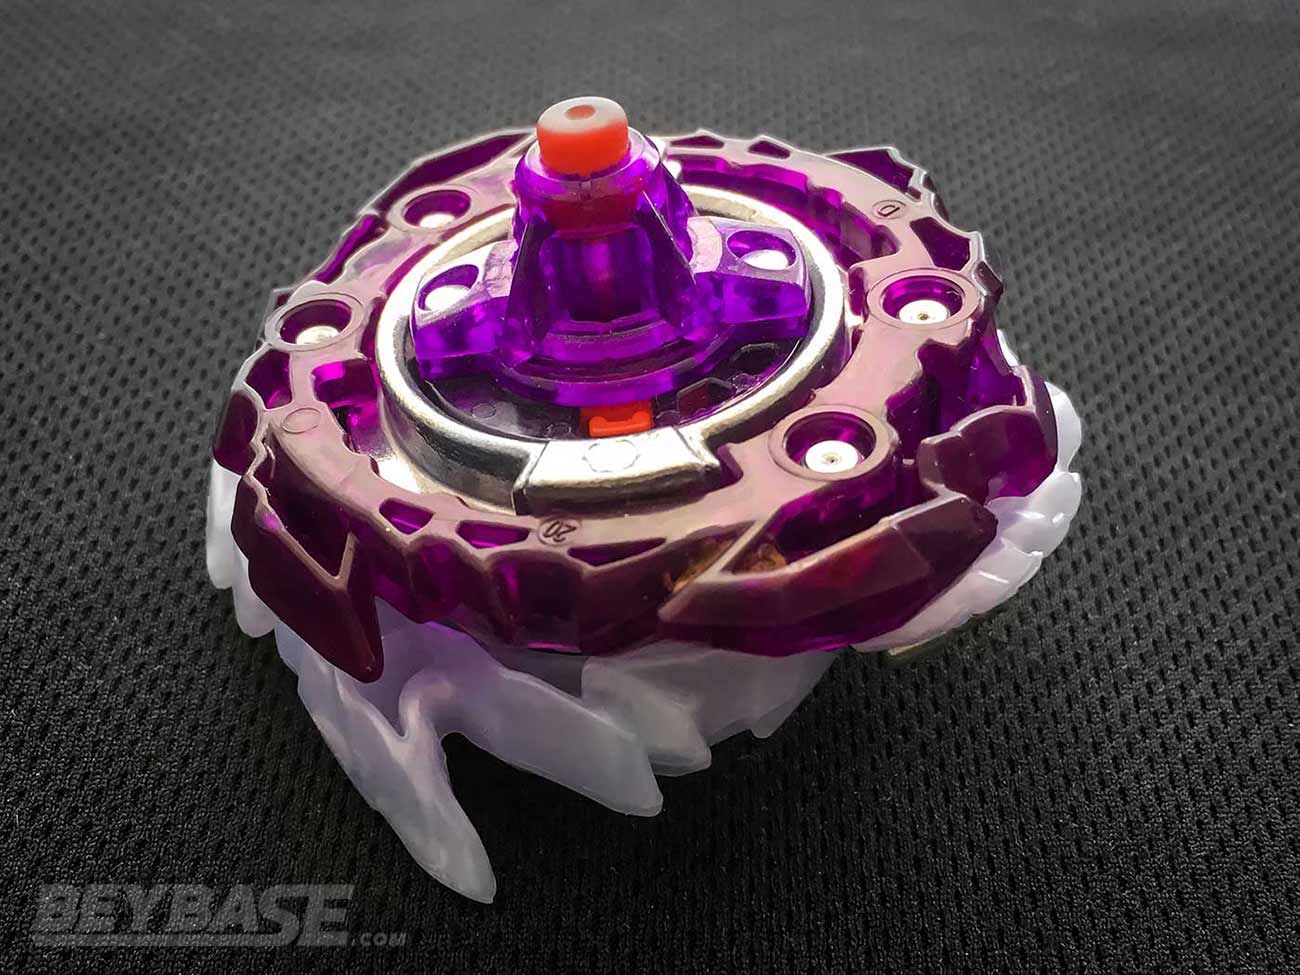
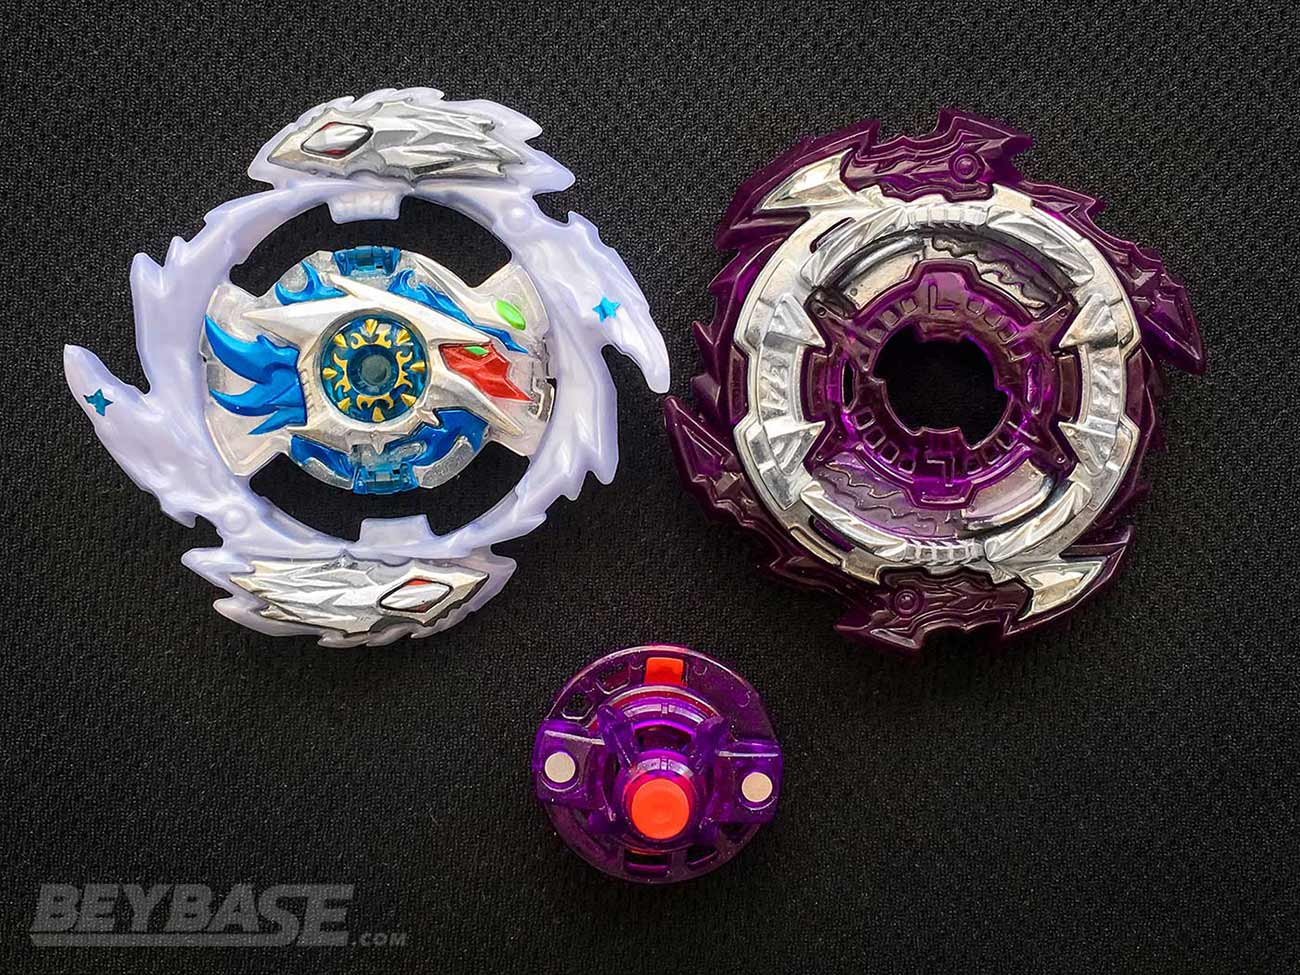
Best Beyblade Burst Combo #5: Master Spriggan Wheel Zone’+Z
… good to great defensive prowess depending on the situation as well as great opposite spin performance and enough same spin performance to be able to outlast some of the most popular combos …
The Parts
- Layer Base: Master
- Gatinko Chip: Spriggan
- Disk: Wheel
- Driver: Zone’+Z
What is Master Spriggan Wheel Zone’+Z good and bad at?
Master Spriggan Wheel Zone’+Z (MS.Wh.Zn’+Z) has good to great defensive prowess depending on the situation as well as great opposite spin performance and enough same spin performance to be able to outlast some of the most popular combos and parts in the game today.
Strengths
- Zone’+Z Same Spin Stamina: While the same spin stamina of the Zone’+Z Driver may not be the highest, it is high enough to outspin the super popular Drift Driver.
- Matchup vs. Rage on Drift: MS.Wh.Zn’+Z in left-spin can outspin combos using the Rage Ring and Drift Driver and also is able to deflect/absorb Rage’s attacks surprisingly well. In my testing, Rage often self-KOed and Master only lost one click or less most of the time.
- Matchup vs. Tempest on Xtend+: In left-spin it can outspin combos using the Tempest Ring and Xtend Plus Driver, which are also super popular.
- Strong Opposite Spin Defense: Master’s shell-like shape in left-spin helps it to be able to take strong hits from right-spin attackers.
- Strong Opposite Spin Stamina: While it doesn’t possess the highest opposite spin performance in the game, in general, thanks to Wheel and Zone’+Z this combo has great, top-tier opposite spin stamina relative to most other Drivers in the game.
Weaknesses
- Using Master in Right-Spin: While in some situations using Master in right-spin may be advantageous, in general it is avoided due to the more raised shape produced by flipping the Master Layer Base to use it in this spin direction. It is still usable, but slightly worse in my experience overall. Most people use it in left-spin.
- Same Spin Attackers: The Rage Ring on something like the Xtreme Dash Driver in particular is quite strong versus this combo and is capable of both bursting and KOing it.
- Opposite Spin Drift: Zone’+Z is a top tier opposite spin Driver, but Drift really is the king.
Master Layer Base: Second Time’s The Charm
Master is the only Beyblade Burst GT part that made it onto the list this year; that alone is impressive. It nearly made the cut last year, but was just barely edged out by Imperial Achilles 00 Expand Destroy Dash which took the fifth spot.
Master did make it to fourth place on my personal list last year (Master Diabolos II 00 Wall Bearing) and The Supreme One even had it in her number one combo (Master Diabolos 00 Cross Xtend Plus), but it was still quite new at the time and Imperial received a lot of votes as being “underrated”, so I went with it instead.
However, this year Master has demonstrated its power by continuing to be a presence in the metagame as the fourth most used Layer of the year going head-to-head with the heavyweights of Beyblade Burst Sparking.
As a result, I could not deny it a spot on this list for a second year in a row!
Want to build MS.Wh.Zn’+Z? You’ll need:
-
Master (1 of the following):
-
Spriggan:
-
Wheel:
-
Zone’+Z:
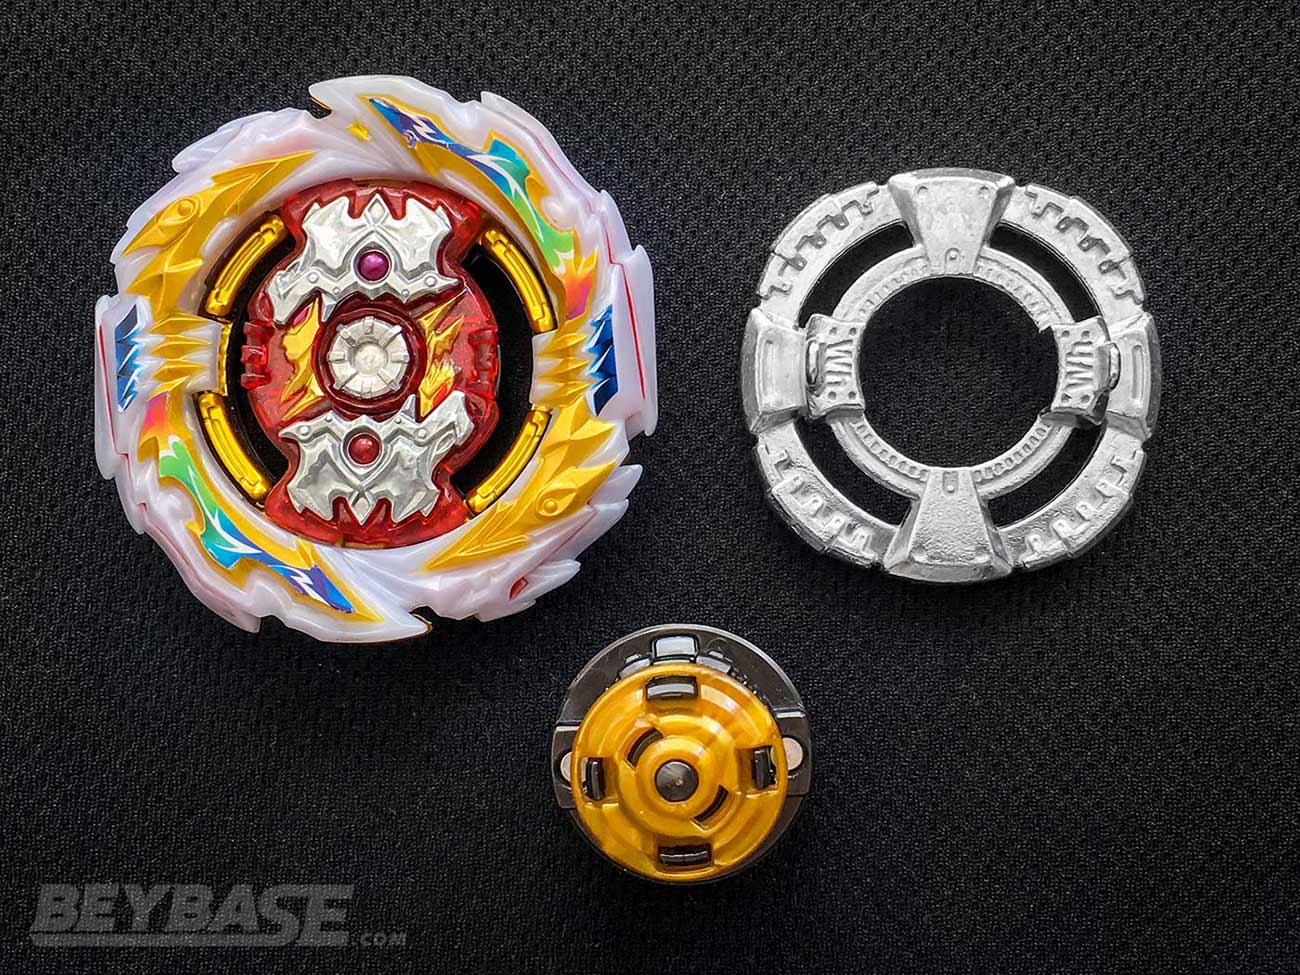
Best Beyblade Burst Combo #4: World Diabolos Drift 2B
If you’re in the opposite spin direction of your opponent, your chances of winning are unlikely to be better than almost any other combo in the game.
The Parts
- Ring: World
- Sparking Chip: Diabolos
- Driver: Drift
- Chassis: 2-Balance
What is World Diabolos Drift 2B good and bad at?
World Diabolos Drift 2B (WDb.Dr 2B) is arguably the strongest opposite spin stamina combo Beyblade Burst has ever seen. If you’re in the opposite spin direction of your opponent, your chances of winning are unlikely to be better than almost any other combo in the game.
Strengths
- Opposite Spin Stamina: The World Ring and free-spinning 2B Chassis pair perfectly with the extremely wide free-spinning tip of the Drift Driver to ensure that this combo will steal spin and continue spinning without falling over longer almost any opposite spin opponent.
- Opposite Spin Defense: The Drift Driver is not only able to simply spin longer than almost any opponent in the opposite spin direction, it also has at times incredible defense against opposite spin opponents. Similar to the Bearing Driver–but even better–it doesn’t hold its ground as strictly as a rubber tip does, but it’s able to absorb the impact of hits and then swing back in to counter opponents. Opposite spin has always had this ability to a degree, but Drift takes it to another level due to its design. Unless your attack type wielding opponent is particularly skilled, there’s a good chance this will cause them some massive headaches in a battle.
- Movement of Drift: Because the tip of the Drift Driver is so wide, it doesn’t take much power for it to move aggressively around the stadium. As described below, this can be a liability in many cases. However, players can use this movement to their advantage to try and KO their opponent–mainly if their opponent is using a combo that moves around a lot as well–if they are careful with their launch power. In some cases, this might be your only chance of victory.
Weaknesses
- Self-KO Tendency: While Drift’s movement can be an asset, admittedly it is often a liability. The Drift Driver is unable to catch the ridge of the stadium very well most of the time, which causes it to self-KO quite easily.
- Same Spin Stamina: Due to the above, you cannot launch Drift at full power without a massive self-KO risk. This, combined with the poor same spin stamina of Drift in general makes it a very bad choice for these types of matchups.
Want to build WDb.Dr 2B? You’ll need:

-
World & 2B:
-
Diabolos (1 of the following):
-
Drift:
Best Beyblade Burst Combo #3: Tempest Solomon (MCC) Wheel Xtend+ 1S
… this combo possesses high same spin stamina–especially compared to the other most popular stamina Driver this year, Drift–good defense, burst resistance, heavy weight and opposite spin performance.
The Parts
- Ring: Tempest
- Sparking Chip: Solomon (Metal Chip Core)
- Disk: Wheel
- Driver: Xtend Plus
- Chassis: 1-Stamina
What is Tempest Solomon (MCC) Wheel Xtend+ 1S good and bad at?
Tempest Solomon (MCC) Wheel Xtend+ 1S (MCC TSl.Wh.Xt+) is a straight upgrade to the number three best Beyblade Burst combo of last year, Perfect Phoenix (Level Chip) 00 Cross Xtend+.
Like that combo, this combo possesses high same spin stamina–especially compared to the other most popular stamina Driver this year, Drift–good defense, burst resistance, heavy weight and opposite spin performance.
Xtend+ was the most used Driver, Wheel the most used Disk, 1S the second most used Chassis, and Tempest the second most used Ring of the past year among WBO tournament winners.
The reason for this is because when combined into this combo, Tempest Solomon (MCC) Wheel Xtend+ 1S is one of the easiest top tier combos to use in the game. This combo will win you almost any match against most stamina combos and unskilled attack type players.
Strengths
- Weight: Thanks primarily to the super heavy Solomon Sparking Chip with the Metal Chip Core and the Tempest Ring–the heaviest Ring just behind Rage–this combo is quite heavy, contributing to its stamina and defense.
- Same Spin Stamina: The incredible stamina of the Wheel Disk thanks to its outward weight distribution in combination with the Xtend Plus Driver gives this combo top tier same-spin stamina. The Solomon Sparking Chip with the Metal Chip Core also contributes to this. Many other Sparking Chips such as Hyperion 2 Sparking Chip were just below Solomon (MCC)’s solo spin time based on my testing and can also be used, but the one which was significantly worse than others (by over 10 seconds on average) was the Lucifer 2 Sparking Chip. Lucifer 2 does come with the benefit of a rubber burst stopper, but given that you will rarely encounter a right-spin attack type in this metagame, that benefit seems negligible.
- Opposite Spin Stamina vs. Lower Tier Opponents: Wheel and Xtend Plus not only help with same spin stamina, but opposite spin stamina as well. This combo will outspin most lower tier combinations in opposite spin.
Weaknesses
- Xtend+ vs. Newer Opposite Spin Drivers: The Xtend Plus Driver has slowly been outclassed for opposite spin performance by newer parts like the Zone’+Z Driver, Drift Driver, and increasing awareness of players about the performance of “awakened”/worn down parts like the Rise Driver. It still has excellent opposite spin performance relative to most other Beyblade Burst parts, but it’s starting to get to the point where it can’t quite compete with the best of the best in this area.
- Skilled Rage Attack Type Users: Tempest Solomon (MCC) Wheel Xtend+ 1S has solid defense against left-spin attack types due to its heavy weight and the difference in spin direction. However, particularly skilled users of attack type combos like Rage Helios 2 Xtreme’ 3A can knock it out with relative ease. This type of player is rare, however.
- Right-Spin Attack Types: Right-spin attack types are admittedly rare these days, but this combo can be KOed and bursted by them–particularly combos using Xtreme’–if your opponent has some skill.
- Burst Resistance: This is not so much a clear cut weakness (especially because right-spin attack types are a bit less common at the moment than they were previously), but something to be aware of depending on the parts you’re using. Some molds of the 1S Chassis are not as tightly fitting as others, which leads to poorer burst resistance.
- Same Spin Ball-Shaped Tips: Drivers with ball-shaped tips like the Atomic Driver can destabilize and outspin this combo due to the sharp tip of Xtend Plus.
Want to build MCC TSl.Wh.Xt+? You’ll need:
-
Tempest:
-
Solomon:
-
Metal Chip Core:
-
Wheel & 1S:
-
Xtend+:
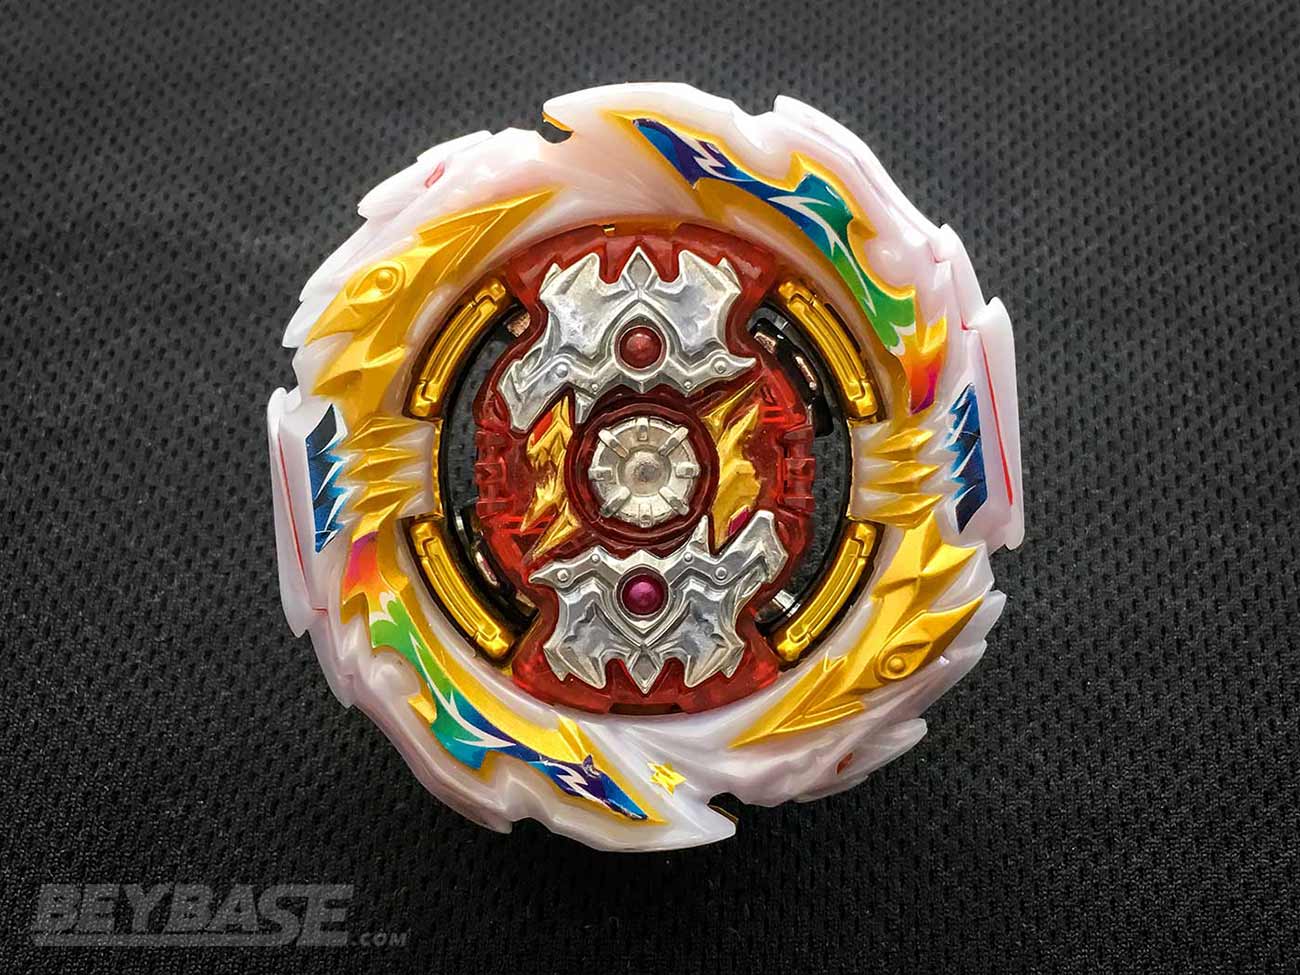
Best Beyblade Burst Combo #2: Rage Helios (MCC) Drift 3A
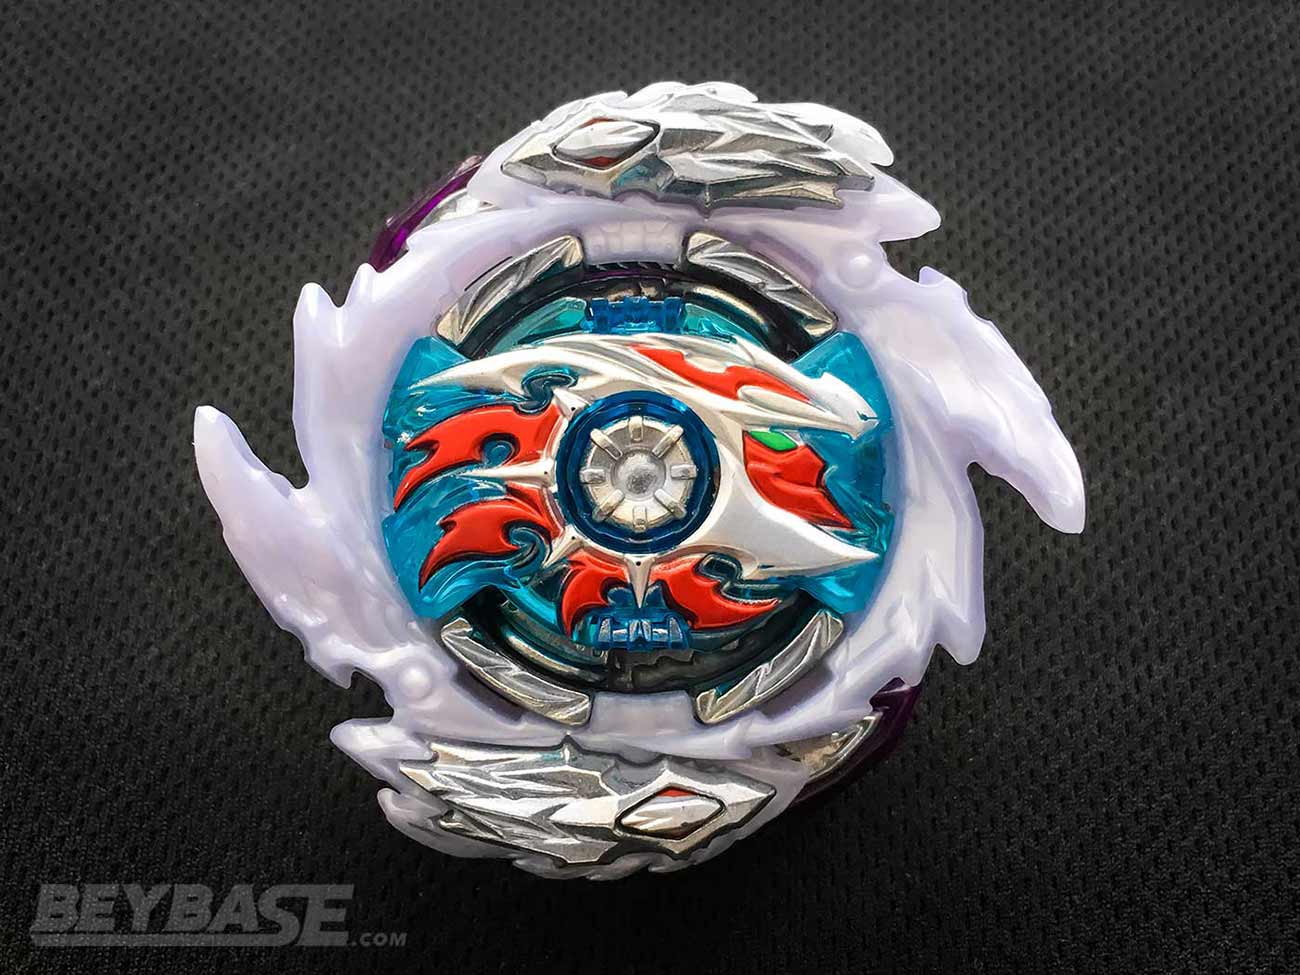
Rage Helios (MCC) Drift 3A (MCC RHl.Dr 3A) is a beast … The result is a combo which can KO most of what it can’t outspin and outspin most of what it can’t KO.
The Parts
- Ring: Rage
- Sparking Chip: Helios (Metal Chip Core)
- Driver: Drift
- Chassis: 3-Attack
What is Rage Helios (MCC) Drift 3A good and bad at?
Rage Helios (MCC) Drift 3A (MCC RHl.Dr 3A) is a beast. It’s a combo that’s almost too obvious; it pairs the strongest attack type Ring with the arguably strongest Driver for opposite spin matchups.
The result is a combo which can KO most of what it can’t outspin and outspin most of what it can’t KO.
Strengths
- Opposite Spin Stamina: Despite the aggressive design of the Rage Ring and 3A Chassis, thanks to the Drift Driver, Rage Helios (MCC) Drift 3A can outspin most opponents. It doesn’t do so as well as something like the World Ring, but it can still do it most of the time. See below for some test results versus Tempest Solomon (MCC) Wheel Xtend+ 1S.
- Right-Spin Attack Types: While this combo has the potential to be KOed by right-spin attack types due to the recoil of Rage and 3A, more often than not I find that the opposing attack type is the one that suffers the brunt of the recoil due to the Drift Driver’s ability to absorb and counter hits.
- Attack Power: While not as strong as a pure attack type using a Driver like Xtreme’, this combo still packs a punch.
- Left-Spin Drift Driver Combos: World Diabolos Drift 2B is one of the most popular combos at the moment, but it’s usually used in left-spin and the World Ring isn’t as aggressive as the Rage Ring. As a result, this combo has a good chance of being able to KO it.
Weaknesses
- Same Spin Stamina: As is to be expected with the Drift Driver, this combo cannot outspin much in the same spin. You have to try and KO or Burst your opponent to win.
- Self-KO Tendency: Again due to Drift, if you are launching this combo aggressively and with any level of power, you run the risk of self-KOing.
- Left-Spin Attack Types: This can be a bit of a toss up, but if you’re facing a left-spin attack type with a rubber tip, chances are they will be able to handle any recoil better than your Drift Driver can. Depending on the Driver your opponent is using you might get outspun by them too if neither of you get KOed.
Bonus Test Results: Tempest Solomon (MCC) Wheel Xtend+ 1S vs. Rage Helios (MCC) Drift 3A
- MCC TSl.Wh.Xt+ 1S: 2 wins
- MCC RHl.Dr 3A: 5 wins
- 13 draws
- MCC RHl.Dr 3A Win Percentage: 71%
Want to build MCC RHl.Dr 3A? You’ll need:
-
Rage & 3A:
-
Helios (1 of the following):
-
Metal Chip Core:
-
Drift:
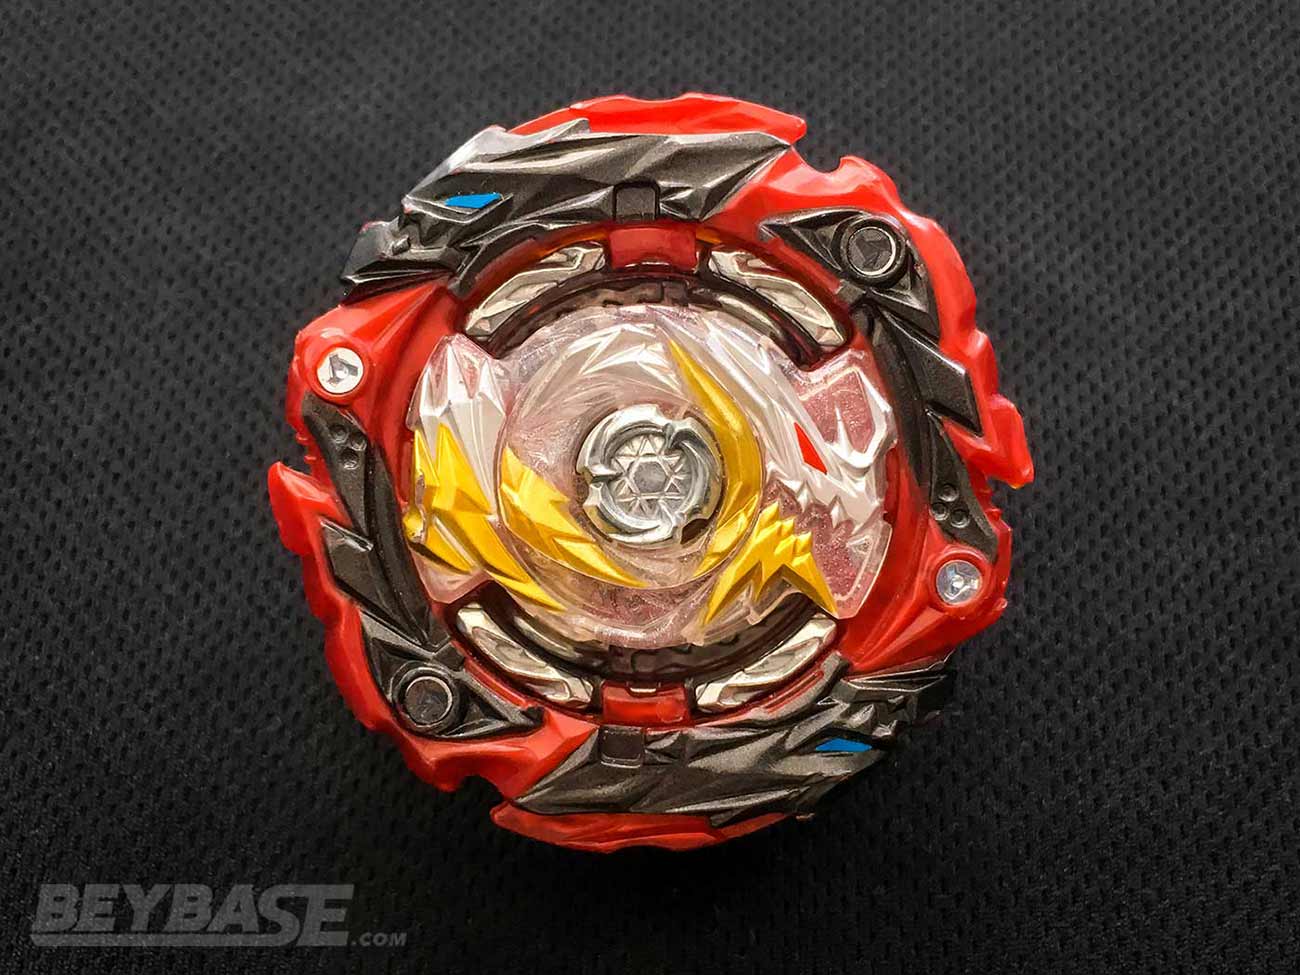
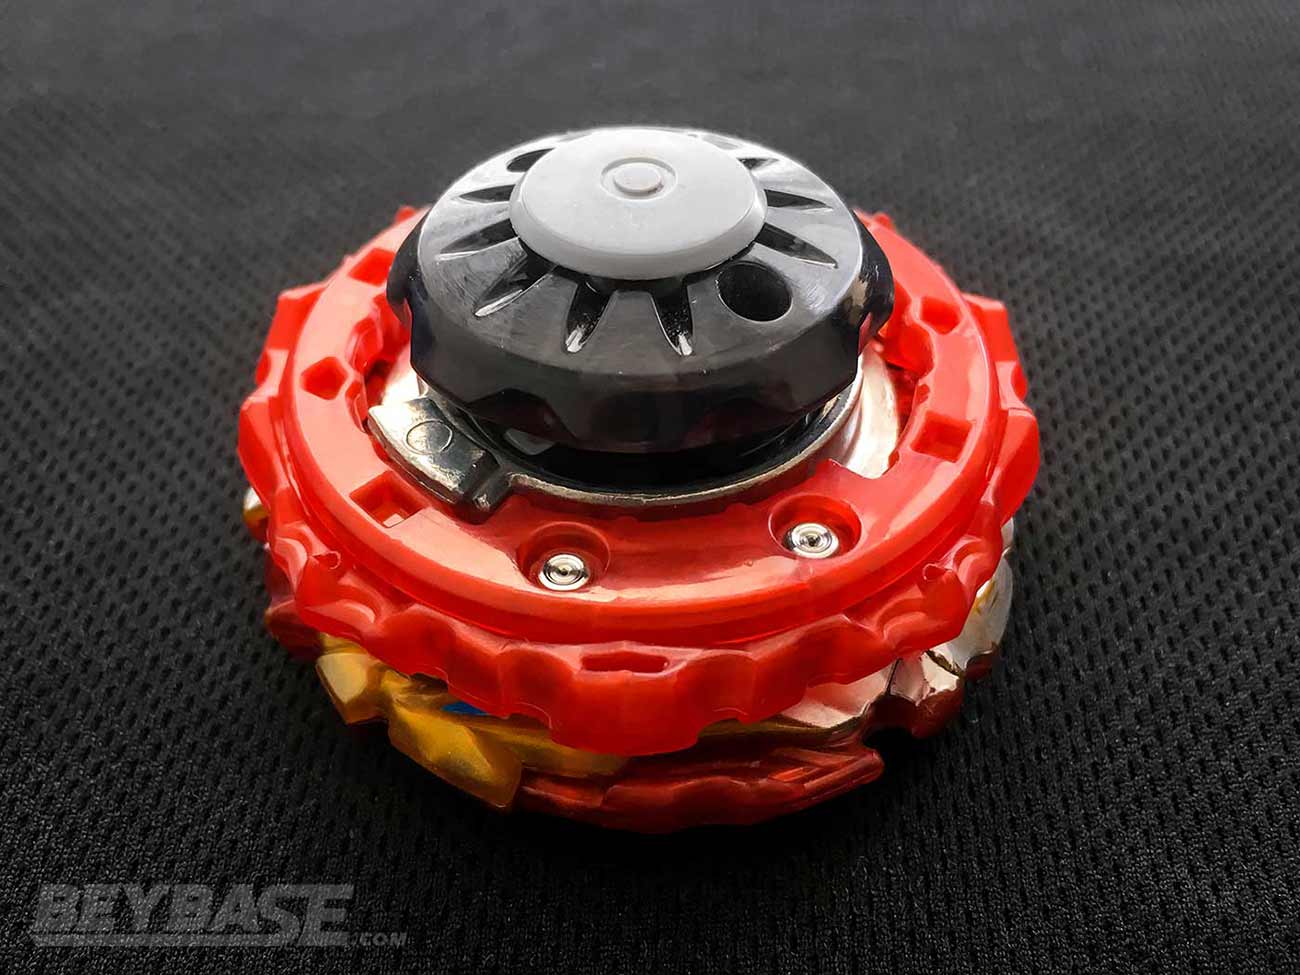
Best Beyblade Burst Combo #1: Rage Helios 2 Xtreme’ 3A
There is no unwinnable matchup for this combo, plain and simple.
The Parts
- Ring: Rage
- Sparking Chip: Helios 2
- Driver: Xtreme’
- Chassis: 3-Attack
What is Rage Helios 2 Xtreme’ 3A good and bad at?
Rage Helios 2 Xtreme’ 3A (RHl2.X’ 3A) is the most versatile, powerful, and dangerous combo in the game in the hands of a skilled user. There is no unwinnable matchup for this combo, plain and simple.
Strengths
- Potential to Win Any Match: A skilled player can pilot this combo directly to the finals or top of a tournament with little resistance, blowing by any other combo on this list.
- Attack Power: It can KO almost any combo in both right- and left-spin and burst many left-spin combos it faces.
- Burst Resistance: The tight Xtreme’ Driver combines with the fused Rage Ring and 3A Chassis to produce a combo that is basically unburstable. This trait is somewhat common to many Beyblades using the Sparking Layer System; because the Ring and Chassis are fused, they create one unified piece which is quite heavy and difficult to make skip over the teeth of the Driver it is attached to.
- Fast Movement: The flat, soft rubber tip of Xtreme’ allows it to swiftly move around the stadium in a tight flower pattern when banked. This enables this combo to inflict vicious knock-outs, bursts, and sometimes hits so hard they drain the stamina of the opposing Beyblade.
- Ring & Chassis Synergy: The 3A Chassis was very obviously designed to work in tandem with the Rage Ring. The sloped dragon heads on the Rage Ring line up perfectly with the two pointed and sloped edges on the 3A Chassis, creating two massive attack points that help this combo inflict serious hits.
- Rage Ring: Similar to the Zwei Layer Base from last year’s number one combo–Zwei Diabolos Sting Jolt Dash–Rage is the heaviest in the game (approximately 14.4g) thanks to the two metal dragon heads which adorn it. This increases its potential in all type categories and future proofs it a bit more than some other lighter Rings.
- Helios 2 Sparking Chip: The metal of Helios 2 again contributes to its overall attack power, but with the Metal Chip Core removed, the weight becomes focused towards the outside of the chip, the idea is that this helps to marginally increase its outward weight distribution in an effort to enable slightly faster movement.
Weaknesses
- Low Stamina: The aggressive design of the Rage Ring and Xtreme’ Driver translates to very low stamina.
- Driver Wear: Xtreme’ as a rubber Driver also suffers from some wear over time, especially with the soft rubber it uses.
- Difficult to Control: Attack types are difficult to control by nature, but especially on the Xtreme Dash Driver. Many players tend to use the more controllable Drivers, but at the end of the day, in almost all cases Xtreme’ is best if you can master it and execute under pressure due to the speed it possesses.
- 50/50 vs. Mobile Attack: While this combo has the potential to win any match, it can be 50/50 against other mobile attack types. Especially those using Drivers which enable faster movement around the stadium ridge than Xtreme’, like an “awakened”/worn down Evolution Dash Driver.
Want to build RHl2.X’ 3A? You’ll need:
-
Rage & 3A:
-
Helios 2 (1 of the following):
-
Xtreme’ (1 of the following):
- B-00 Shadow αmaterios 0 Xtreme Dash
- B-140 Random Booster Vol. 15 – 06: Dead Hades 8 Dash Expand Xtreme Dash
- B-173 Random Booster Vol. 22 – 03: Super Satan 6 Xtreme Dash 1S
Sponsored: Order the newest Beyblades at malloftoys.com!
Heads up: If you buy something through Mall of Toys, you won’t pay any extra, but I’ll get a small commission. This helps me keep things running. Thanks for your support!
Thanks To
Thank you to everyone who helped contribute to this article! Check them out:

What do you think the best Beyblade Burst combos of 2021 are? Comment below!
As you will find out in the next part of this series (5 Top Ranked Beyblade Players Select Their Favourite Beyblade Burst Combos), personal preference and experience can also play a huge role in determining what an individual player feels are the “best” Beyblade Burst combos.
If you enjoyed reading this article, please also feel free to share it with any of your friends who are into playing Beyblade competitively.
BeyBase “Best Beyblade Burst Combos” Article Series
Or become a BeyBase HQ member to get early article access and behind-the-scenes updates. Thank you!
43 thoughts on “The Top 5 Best Beyblade Burst Combos of 2021 (Selected by Expert Players & Organizers)”
Comments are closed.
Related Posts
The Best Beyblade X Combos by Era (Xtreme Stadium & Infinity Stadium) – Competitive Player’s Guide
Beyblade X Custom Line (CX) Buyer’s Guide: Expert Players Review the Best Products for All Skill Levels and Budgets
Lots of opposite spin, and Rage on Xtreme at the top. Can’t say I’m surprised at all, to be honest. That Rage Helios 1 combo surprised me out of the gate, but it really makes sense once you think about it!
Perhaps this is a better comment for your last post, but it really was interesting watching how the metagame really began to shift toward opposite spin battles. Last year’s top list had no absence of it for sure, but you really can tell through this list that it’s an even heavier focus now. I guess we’ll have to see if any of the DB releases really change this meta up (as opposed to getting more opposite spin optimized parts, anyway).
Could you help me understand why Helios 1 > Helios 2 in this combo?
Danny P, regarding Helios 1 vs. Helios 2: on that particular combo (Rage Helios (MCC) Drift 3A), my thinking was that due to the Drift Driver it already moves around a bit too much for my liking in a lot of situations. I’m always worried about self-KOing in same-spin battles.
To try and counteract some of that movement, I wanted to build something with more centralized weight. The Helios 1 Sparking Chip doesn’t have any metal on it like the Helios 2 Sparking Chip does. So when I add the Metal Chip Core to it, it keeps more weight to the center of the Beyblade than if Helios 2 was used. The effect of this is probably incredibly marginal difficult to measure, but that was my thinking. The main point here was to try and push the limits and really optimize these combos down to the smallest detail.
Conversely, in the #1 combo where I used Helios 2 without the MCC, I did so for the opposite reason; I wanted to encourage more movement by using a Sparking Chip with more weight focused towards its perimeter.
You can make a lot of arguments either way on this type of thing, though. Some people might prefer the extra gram or two of weight regardless of the above. It depends on the situation and your preference.
Yeah I would put the metal chip core on Helios 2 to increase attack power.
My best combo is Vanish Fafnir Hurricane Bullet-2. It’s a medium-high speed Balance type with good spin steal capabilities, above-average height, great defense, more than decent stamina (even with the mini-bey on and on), plus unusually high counter-attack power. You guys should try it out! Also, I use a specific set of 2 weight dampers (one vertically and one horizontal), a dynamite launcher and a handgrip like the one Rantaro uses in Beyblade burst god series, so if you use anything else, results may vary.
Thanks, Aindelier! If I were to guess, I would say that with all of the super wide tips Takara-Tomy has been releasing lately to work with their new stadiums, the importance of opposite spin in the metagame isn’t going anywhere at this point. If you look at the history of each Beyblade series, they all pretty much inevitably evolve to the point where it becomes an important part of the game. That said, certainly it doesn’t mean we might not also get new parts with great same-spin performance.
As somebody just getting into Beyblade, this article is a godsend. I do have a couple questions regarding longevity though. I know you mentioned that the Xtreme Dash driver wears down over time, but how quickly exactly? Would casual play for a couple of months wear it down to the point where it wouldn’t be viable in a competitive tournament?
Also, did you exclude the Dynamite Battle series beys because they’re weaker than these combos, or because they’re so new and untested?
I’m so glad to hear that! People like you are exactly who I write these types of articles for; I want to make this information more accessible so even more people can join the competitive scene.
Regarding Xtreme’, it really depends on the number of uses during that period of casual play for a couple of months. If it’s infrequent, it could certainly still be viable. Personally, given the power of that part I believe it is worth it to invest in at least two copies to start. Use one for testing and save one for tournaments. But me, well … I have like 15 right now hahaha. It does sort of depend on your tolerance as well; some people feel better with brand new Xtreme’ Drivers and some are more comfortable with heavily worn ones. I find the best state for me is when it’s been worn down just a little bit, but you still see plenty of the indent on the bottom of the tip. Like in the picture for the #1 combo on this article.
I didn’t include them because they’re so new and untested. Like the edition of this article I wrote for last year, I wanted it to be based on real tournament experience and data so there is less room for anyone to question the list on a general level. People might disagree with certain rankings on this list or specific variants of certain combos, but they can’t argue with the data that was used to compile the list that shows these parts have been the most successful over the past year.
Hey Kei, I respect your opinion about RAGE HELIOS 2 XTREME’ 3A, but is there any difference just by using the longinus chip and longinus core instead of helios 2 chip? Btw I don’t know what to put on the website spot so I just put this website there if you don’t mind.
Hey D.Nate, thanks! The Longinus Sparking Chip would certainly work fine as well. If you want to optimize the combo further however, the additional outward focused weight of the Helios 2 Sparking Chip thanks to the metal on it is beneficial to the combo’s performance.
Hey kei. How is rage helios2(mcc) 3A xcced’+z ?
It has a dash driver, really good attack and top tier lad too. And also brave lucifer 2/ solomon(mcc) 2A/2S ds’ ?
Hey Paarth, I actually highlighted a very similar Rage combo in my Limit Break DX Set review. Scroll down a bit in this section and you’ll see my opinion of it: https://beybase.com/beyblade-burst-sparking-b-174-limit-break-dx-set-review/#3-the-xceed-dash-+-x-and-zone-dash-+-z-drivers-set-new-standards-for-attack-stamina-types
As for your second combo, I think it’s a decent combo. Similar combos saw use last year when we were able to do tournaments in the summer here in Toronto and were successful (originalzankye used it as one of his winning combos in this tournament, for instance: https://beybase.com/wbo-beyblade-burst-sparking-tournament-report-justin-tcs-birthday-bash/). It’s kind of a middle of the road combo. Sort of a jack of all trades, but master of none. It doesn’t have top tier LAD or top tier attack, but it can get the job done in some situations and gives you a chance to win many different match ups.
What do you think about Naked on Wheel Zone’+Z? It trails behind Master’s defense and same spin stamina but has a decent matchup vs World 2B Drift. It was often used in tournaments that use the WBBA ruleset (World can freely change its spin direction) before Rage on Drift became popular.
Yeah, Naked is awesome and I’m glad you mentioned it. It might have been one of the most underrated Layers of early to mid-2020. I noticed it being used when I was in Japan at the start of 2020 and then really started to understand how good it was when I was finally able to start playing in tournaments again in the summer of 2020. I wrote about it in this report: https://beybase.com/wbo-beyblade-burst-sparking-tournament-report/
In that tournament I used it on Xtend+ in my deck during the finals and was able to win one round, but unfortunately lost the match itself. In the following tournament I again included it in my deck during the finals and won the tournament, but wasn’t able to find a situation during the match where switching into it made sense: https://beybase.com/wbo-beyblade-burst-sparking-tournament-report-justin-tcs-birthday-bash/
But once released Rage really made it hard for Naked to excel in my opinion. In the first stage of WBO events where Burst Finishes are worth two points and you’re locked into a particular match up … it’s risky to choose Naked. And in WBO Deck Format there might be more opportunity to use it, but as I found out, even in that situation it’s hard to do unless you’re in the position where you’ve lost a round and your opponent switches into something right-spin with lower LAD. But this isn’t likely if your opponent is smart.
In things like WBBA 3on3 or 5G those formats are generally built on a series 1v1 single rounds between different Beyblades each time; so even if you pick Naked and lose one round, that’s all there will be to it. You don’t have to consider the possibility of players switching in to other things to counter your Naked since you literally can’t use it again (unless you get to Round 4 in 3on3) anyways.
These combos are definitely the top of the meta these days (might be changed once all the db beys come out cause of those gosh darn heavy discs) But I was wondering if you could make a top 5 competetive hasbro combos when most waves of the surge beys come out?
Hey Diego, Beyblade is always evolving so I wouldn’t be surprised if that happens! As for competitive Hasbro combos, it’s something I’ll certainly consider. Admittedly, my area of expertise lies primarily towards the Takara-Tomy metagame and even writing an article like this takes an enormous effort … so doing it for a brand I’m not as familiar with might be even harder. But I certainly do think it could be valuable, so I will consider doing something like that in the future. Thanks!
Honestly, I think that Diabolos should be on the rage combo because it’s more heavy than Helios 2. Also I think that the Giga disc is a much better option than wheel at this point. It has a much lower center of gravity as well as amazing stamina, and fairly decent LAD. Also it’s heavier than wheel.
Also the tip metal fusion is kind of a tribute!
Weight isn’t always the be-all, end-all, but I just double-checked and Helios 2 (with a regular Chip Core) is around 4.90g while Diabolos is around 4.09g. Not sure if my copies of these parts are not typical, but I believe in general Helios 2 is heavier?
I’m definitely excited to try out Giga soon. This article focuses on Beyblade Burst Sparking because we have a larger pool of real-world data and player experience to pull from, but certainly some new Dynamite Battle parts may start becoming viable options for alternatives or improved versions of some of these combos.
Hey Kei, I have another question, is there a beyblade tournament that only use one bey only?
The only time I’ve ever heard of that is when I was in Japan last year and we did a very quick tournament for fun where each player got one random booster and had to use what they pulled haha. Never heard of that being done for any competitive tournaments.
Hello Kei I was wondering if there was a good substitute for the Spriggan gt chip
Hey N.Hubbard. Certainly there is! I would say the GT Chip out of every piece of that combo is the top one that can probably be left up to personal preference is needed. I’ve used Diabolos and Bahamut on other Master combos as well and found them to work fine. Spriggan just felt the best to me when putting this particular combo together.
I honestly haven’t tested the GT Chips in depth on the particular Master combo featured in this article because in general I would imagine they don’t matter too much given the tightness of the Zone’+Z Driver. I’d be curious to hear more thoughts from others on this.
Hi Kei, I want to ask you if there is any alternatives driver for the Rage Helios 2 Xtreme’ 3A? And how do you think about the new beyblade burst DB? And I just put this website on the form because I don’t know what to put.
Hi Shah. Absolutely. I’d recommend giving Xceed’+Z out if you are able to and don’t have Xtreme’. You can learn a bit more about a very similar Rage combo using that Driver in my Limit Break DX Set review.
I haven’t tested with Beyblade Burst DB parts yet as I’ve been focusing on getting this article out focusing on the Sparking era. But I’ll be getting to that soon!
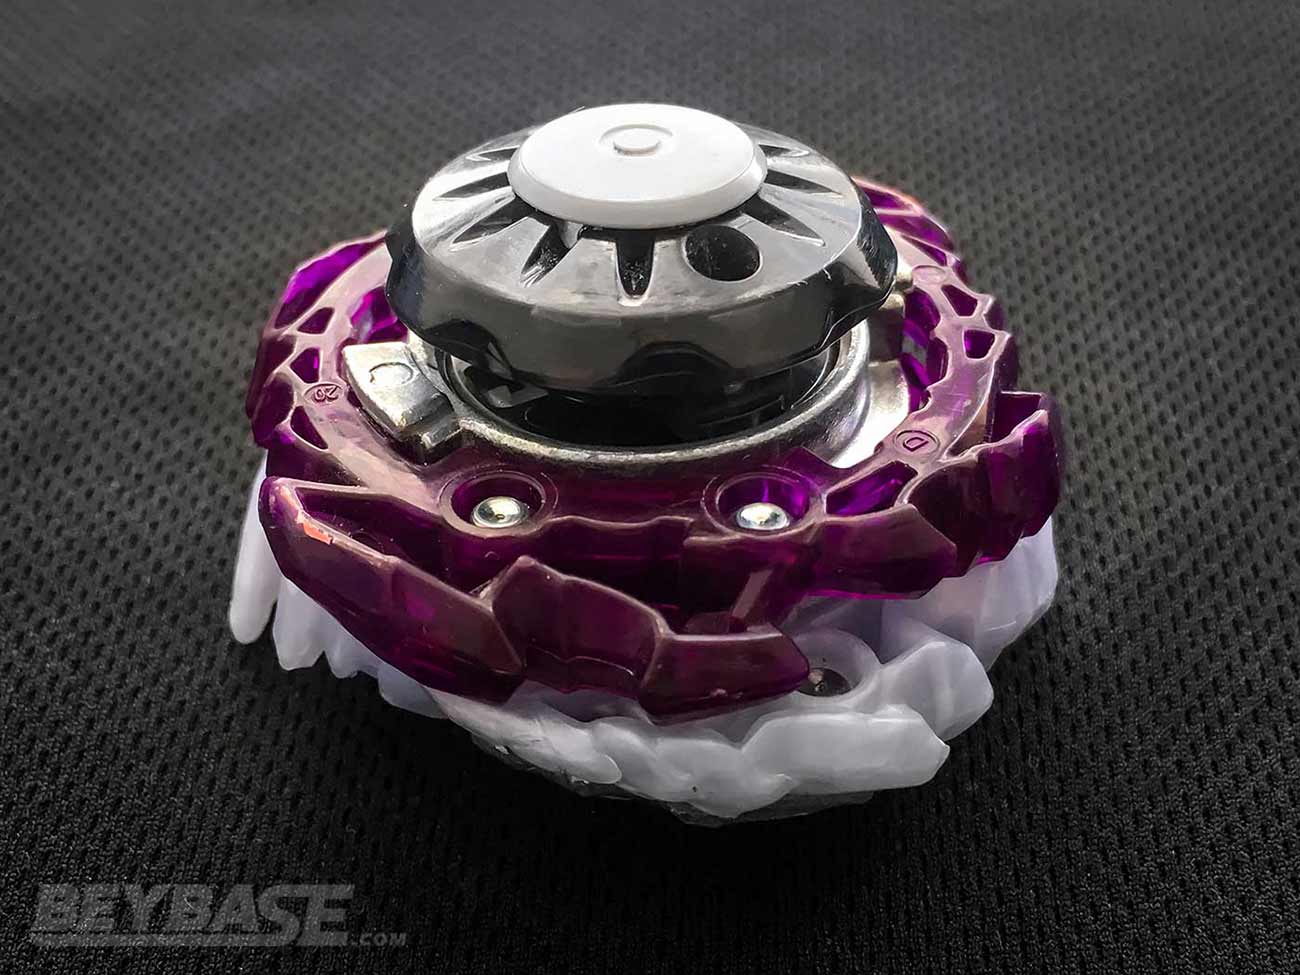
I have a question, what is your personal perspective on the Hollow ring. Hollow ring in my observation is an excellent destabilizer against top-tier Tempest combos if you’re using Xtend+/Atomic.
Hey Noctua. Hollow is a Ring I spent quite some time thinking about and testing. I really wanted to like it, but ultimately just couldn’t bring myself to include it even on my personal top five list. However, some other players who contributed to this article did, which you will see on the next part of this article series.
Maybe I wasn’t using the right combos or balancing my Hollow combos properly, but I just found it to be unbalanced and ineffective in most situations compared to other options. With something like Atomic, I’d rather just use Tempest for example.
The only combo I really liked it on was Hollow Lucifer 2 Wheel Drift 1S, which did extremely well in comparison to other right-spin Drift combos in the testing I included in my Jet Wyvern review. If you search “Hollow” on the review you can find the test results: https://beybase.com/b-177-jet-wyvern-around-just-1d-beyblade-burst-sparking-review/
I’d be curious to hear more from you (and others) about their opinion of Hollow.
You definitely need to try Hollow Lucifer II (heavy side opposite of the scythe) Giga Universe (the new white one or an awakened one) 4A (balance mode). I have a small write up about it on my Instagram. It’s pretty awesome.
I’ll keep that in mind, thanks! I hope the new Universe will also change my opinion of that Driver haha.
I see. Thanks for the constructive response!
I’m surprised Master Wheel Zone’ +Z was used more than the Around Drift version. I guess because more people were using World Drift 2B in the same deck. I personally like the Around disc with Master because of how it adds some burst resistance because of how it “locks” in with the layer. Plus that frees up Wheel to be used with Tempest in the same deck.
Hey Daniel. Actually, Drift was used more than Zone’+Z on Master (12 times vs. 4 times) in the WBO winning combos data.
However, I personally believe that World on Drift 2B is the better overall singular combo than Master on Around Drift so it was tough to also put it onto the top five list. I wanted the list to showcase at least some level of variety and Rage Drift also had to be on the list so …
With Master Spriggan Wheel Zone’+Z it to me also deserved to be on the list because it highlights an important niche in the metagame. Drift goes all-in on opposite spin performance at the cost of same-spin performance. Zone’+Z on the other hand isn’t the best for same-spin performance, but it’s certainly better than Drift. This means it has the ability to same-spin left-spin Drift combos while still having a chance to outspin a lot of opposite spin combos. It also did well for me against Rage Drift, and I believe is heavier than Master Around Drift.
All of that being said, I do agree that Master on Around Drift is of course a great combo! There’s just only so many spots when you’re doing a top five. I tried to be as thoughtful as possible and avoid repeating variations of certain combos that felt too similar where possible.
Ah, I gotcha! That makes total sense!
Hey Kei. This article was great but I was wondering if there are any alternative parts for people who can’t easily get their hands on the Limit Break DX Set? Zone’+Z isn’t exactly in my budget currently so I wanted to know what parts I could use in lieu of it.
Hey Foxfisher159, thank you! Certainly. If you’re looking specifically at Master Spriggan Wheel Zone’+Z, you could use Xtend+ or Drift instead of Zone’+Z on that. They don’t have the exact same performance, but those two Drivers on Master Spriggan Wheel still produce pretty strong combos.
Why is diobolos used when Solomon and Helios and Helios 2 are heavier? Also Helios and metal chip core are inward weight and Helios 2 is outward but what about Solomon and diobolos? Outward inward or in the middle? Sorry for the long message and thank you.
I’m curious if lord diabolos wheel bearing is still a viable combo because it would have great opposite spin stamina and it might be a good counter like judgement diabolos competitively right now. Also there is a great beyblade YouTuber named leftburst I think you should reach out to because he is very good at making great beyblade combos.
Why aren’t there any DB combos?
This article is based purely on the Beyblade Burst Sparking era/metagame as at the time of writing there was not much data or player experience yet with Beyblade Burst Dynamite Battle to be able to make a definitive list.
Do you have any combos for the new dynamite series? One of the combos I’ve come up with is Dynamite Ragnaruk 6 giga Zone’ +Z with F gear any thoughts?
Check out my recent tournament report where I talk about some of the current best Dynamite Battle combos! https://beybase.com/best-beyblade-burst-dynamite-battle-combos-tournament-report/
Zone’+Z, Bearing, and Drift were all quite popular with DB Layers and Disks.
Can you give me a simple list of alternatives to xtreme’. I am more of a part time player and find it time-consuming and expensive to obtain the xtreme’ driver. Currently, I am using destroy’ from rage Longinus or variable’ from Brave Valkyrie. Also, would you think that Hyperion 2 + metal core would work as a good alternative to solomen?
*evolution from Brave Valkyrie.
Also, would you mind giving me an order of which dB Beyblades to buy right now, I haven’t bought a single one. I’m thinking of buying one of the Valkyries (which one should I) and the customisation set with metal xtreme.